Manage Customer Billing Information
|
Content
|
|---|
You can maintain the information and details of your customer by checking on the instructions below. Each tabs of the customer form pertains to the necessary and required details that needs to be updated from time to time.
Details contained in various tab include general information, notes and documents attached to the specific customer. You can also review and analyze the transactions(sales order, sales invoice and payments) related to the customer.
Maintain General Customer Information
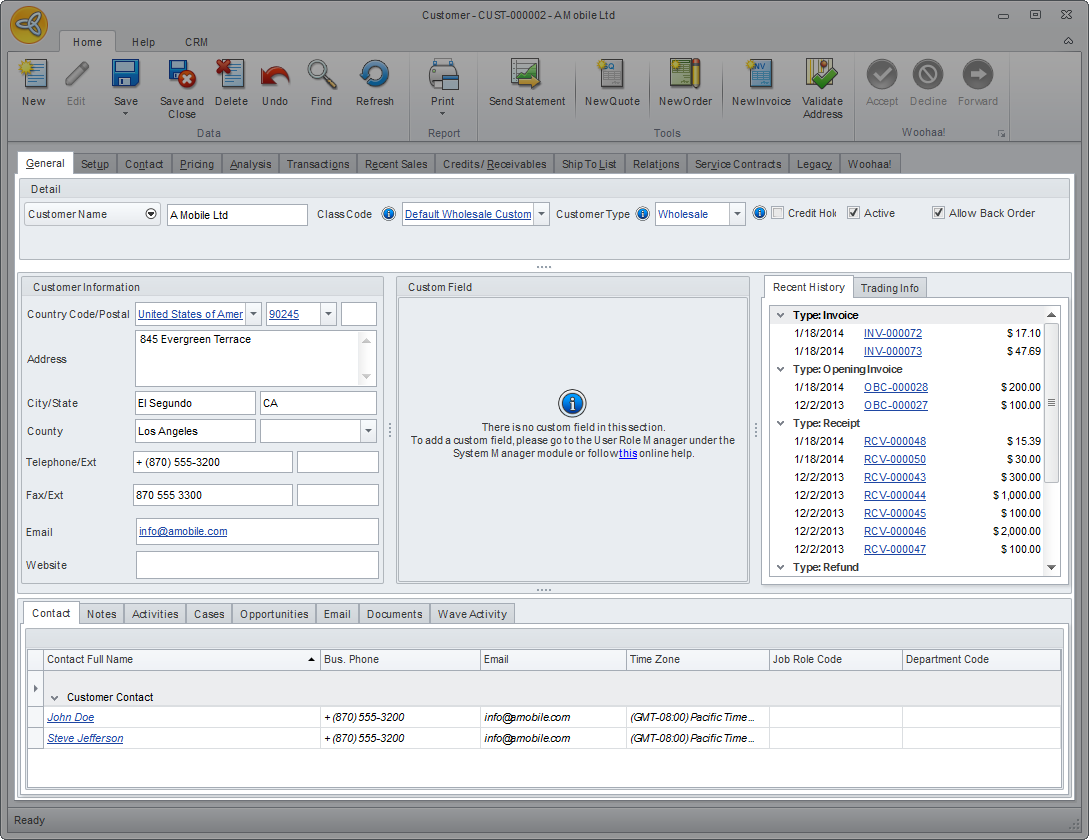
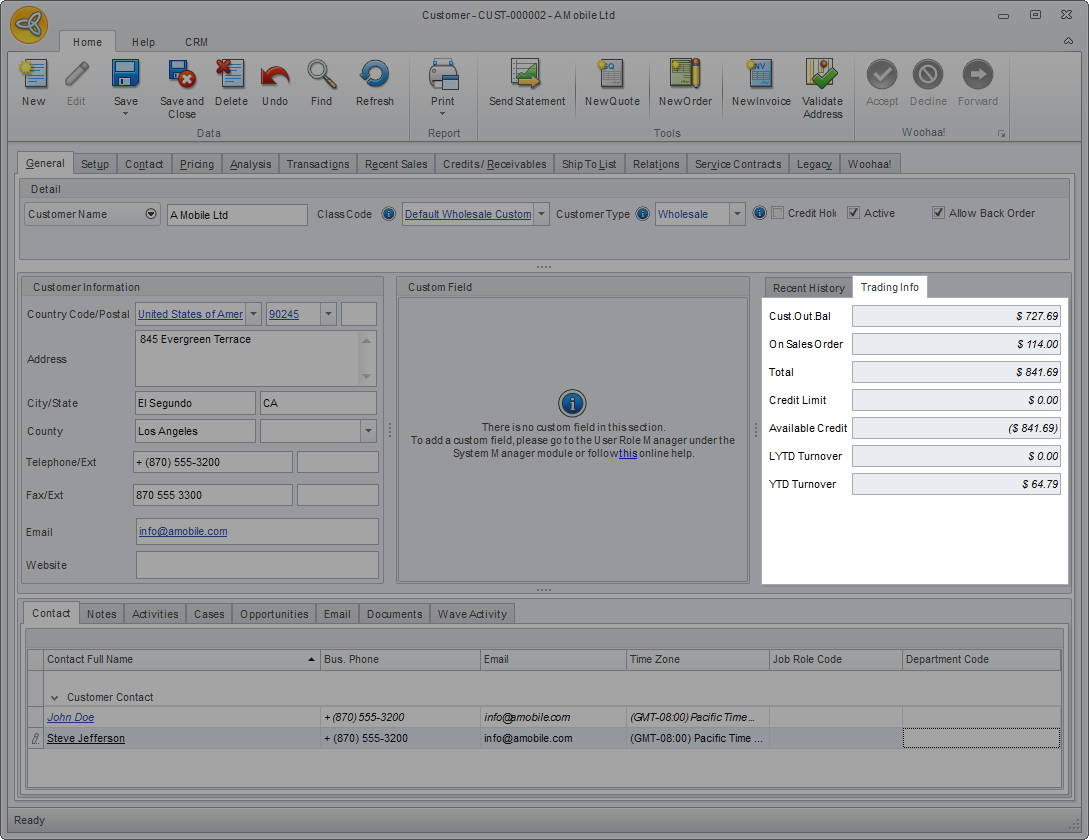
The General tab shows the general customer information set up through the New Customer Wizard. Note: For more information on creating new customers in Connected Business, refer to Set Up Customer List.
Click Image to Enlarge
Detail Section
The Detail section shows the customer name, status (active/inactive), class code, customer type etc. From this section, you can also set the customer on credit hold, allow backorder or deactivate the customer.

Click Image to Enlarge
The following table shows the fields found in the Detail section of the Customer Detail form and the corresponding function/description of each field.
|
Detail Section |
Definition |
|
Customer Name |
Shows the full name of the customer. You can click on the dropdown icon if you want to view the customer full name details (first name, middle name, last name). |
|
Class Code |
This field shows the class template used in setting up the customer record. |
| Customer Type | Indicates the group where the customer is classified. You can click on the dropdown arrow to view the list of existing customer types. |
|
Credit Hold |
This option allows you to put the customer on credit hold. If this option is ticked, whenever a sales order is created for the customer, a message prompt will be displayed indicating that the customer is currently on credit hold. |
|
Active |
This option indicates the status of the customer. When ticked, it means that the customer is active; otherwise, the customer is inactive. |
|
Allow Back Order |
This option allows you to set if the customer is allowed for backorder (ticked) or not (unticked). |
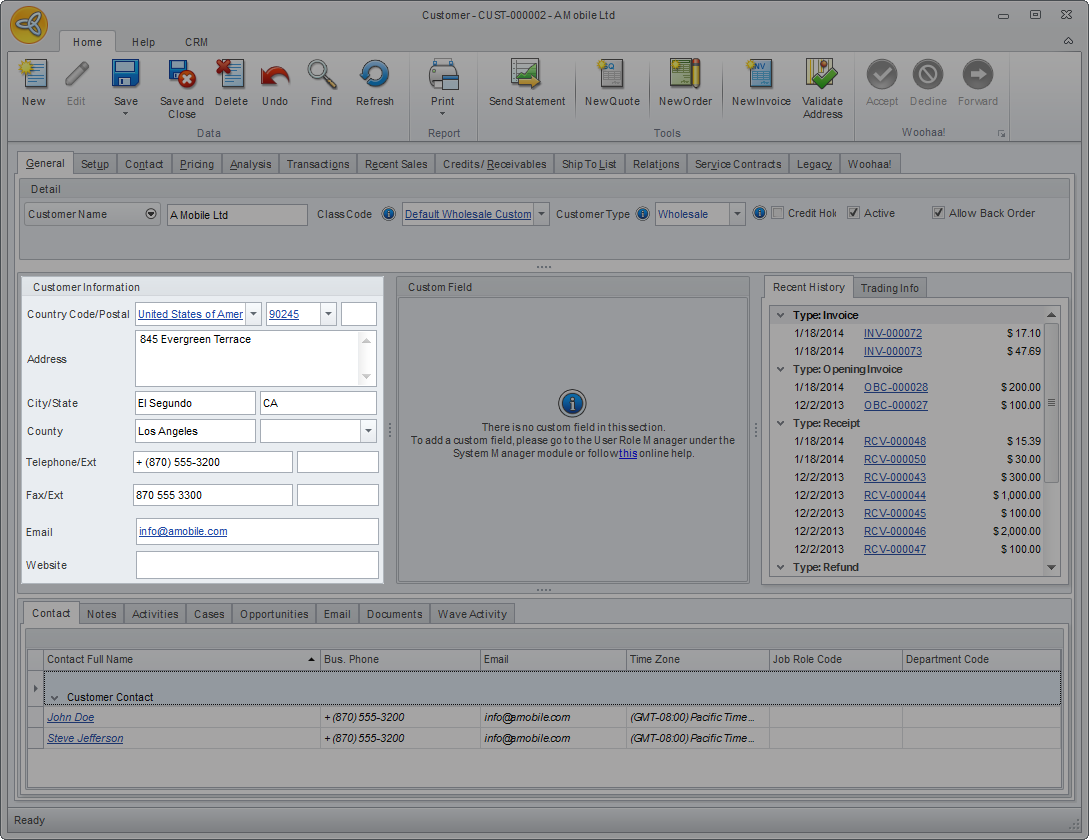
Customer Information Section
The Customer Information section shows the billing address and primary contact numbers of the customer, as well as the customers email address and website.
Click Image to Enlarge
The following table shows the fields found in the Customer Information section of the Customer Detail form and the corresponding function/description of each field.
|
Customer Information Section |
Definition |
|
Country/Postal |
This field shows the country and the postal code of the customer's billing address. The fields in the address section may vary according to the country. |
|
Address |
This field shows the specific address of the customer. |
|
City / State |
These fields show the city and state of the customer. |
| County / Address Type |
These fields indicate the customer county and address type (residential or commercial).Note: The address type selector is added on the address control of some forms in Connected Business e.g. Bill To Form, Ship To Form, etc. |
|
Telephone / Ext |
These fields show the customer's primary telephone number and extension (if applicable). |
|
Fax / Ext |
These fields show the customer's primary fax number and extension (if applicable). |
|
|
This field shows the customer's email address. |
|
Website |
This field shows the customer's website. |
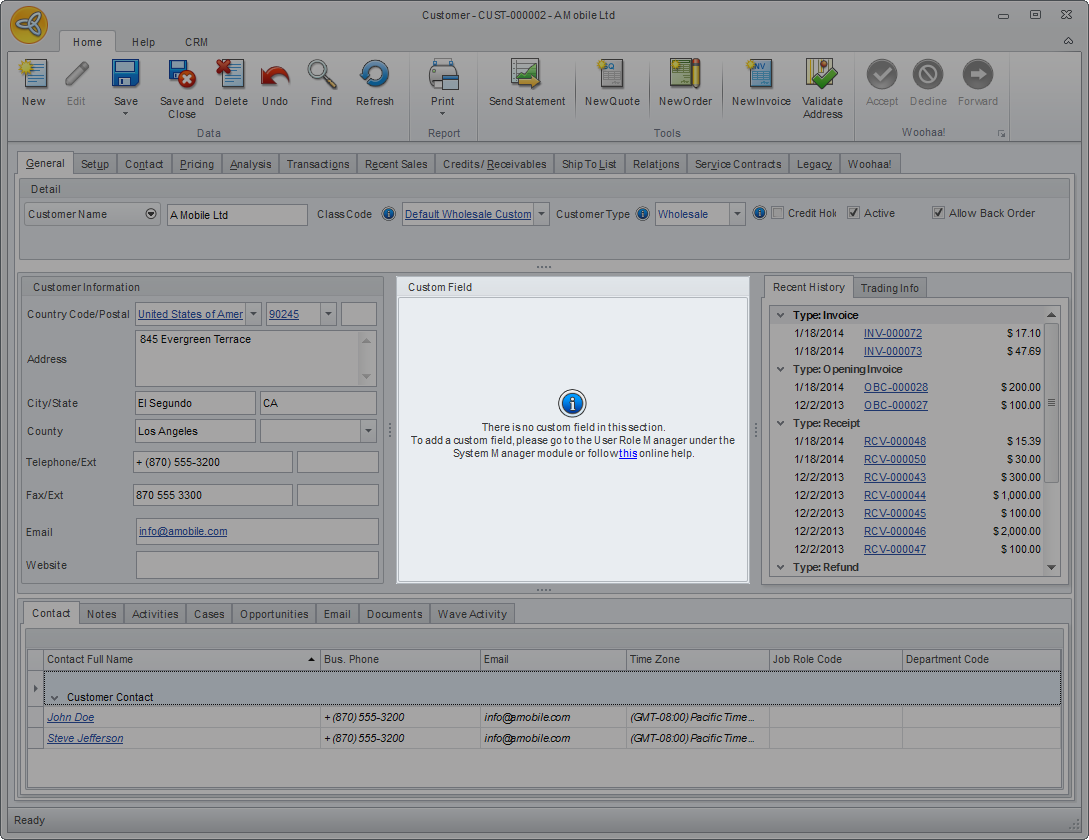
Custom Field Area
The Custom Field section is where the user can customize or add custom fields as needed. You can refer to Create New Custom Fields for more information on adding custom fields.
Click Image to Enlarge
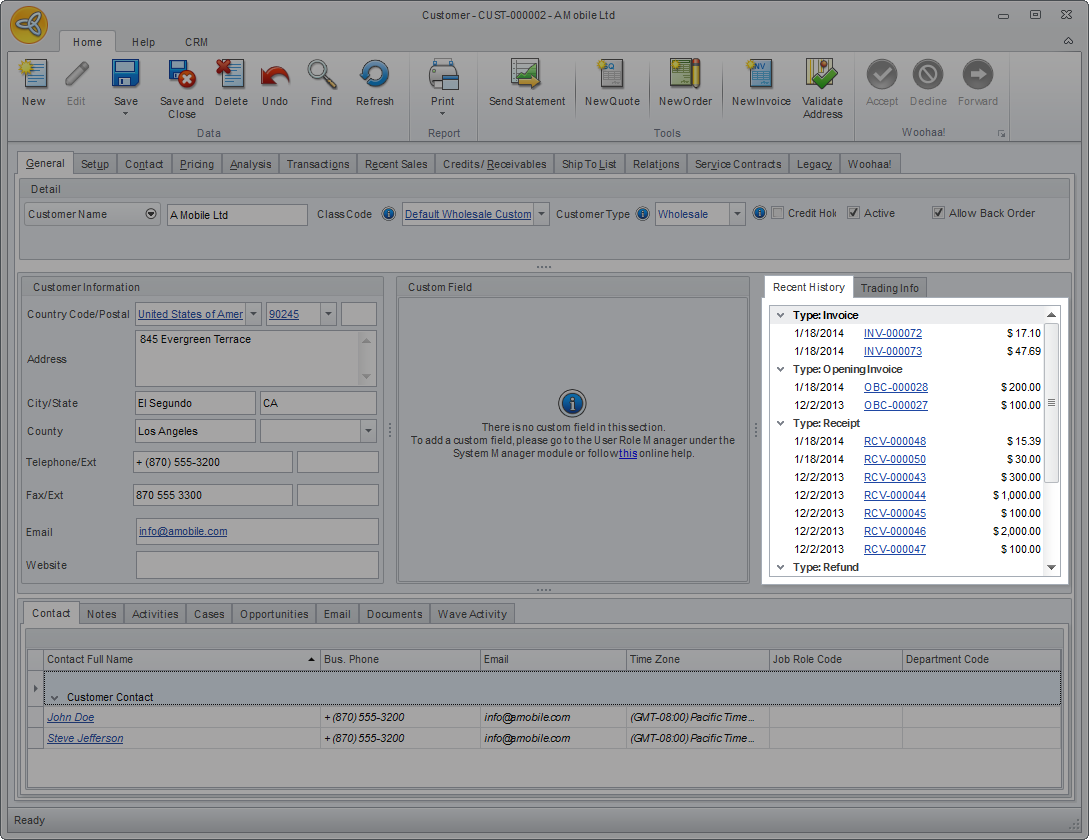
Recent History Section
The Recent History Section lists all the recent transactions of the customer grouped by transaction type. You can view the full details of the transaction by drilling down on its document code.
Click Image to Enlarge
Trading Info Tab
The Trading Info tab shows the latest figures from the customer trading.
Click Image to Enlarge
Delete Customer Billing Information
To delete the customer’s billing information, click the Delete button in the Customer Detail form. A message prompt will be displayed confirming if you want to delete the customer. Click Yes to confirm.

You can only delete customer billing with no related transactions. However, deleting the customer billing does not delete the linked customer shipping information.
Manage Customer Setup Information
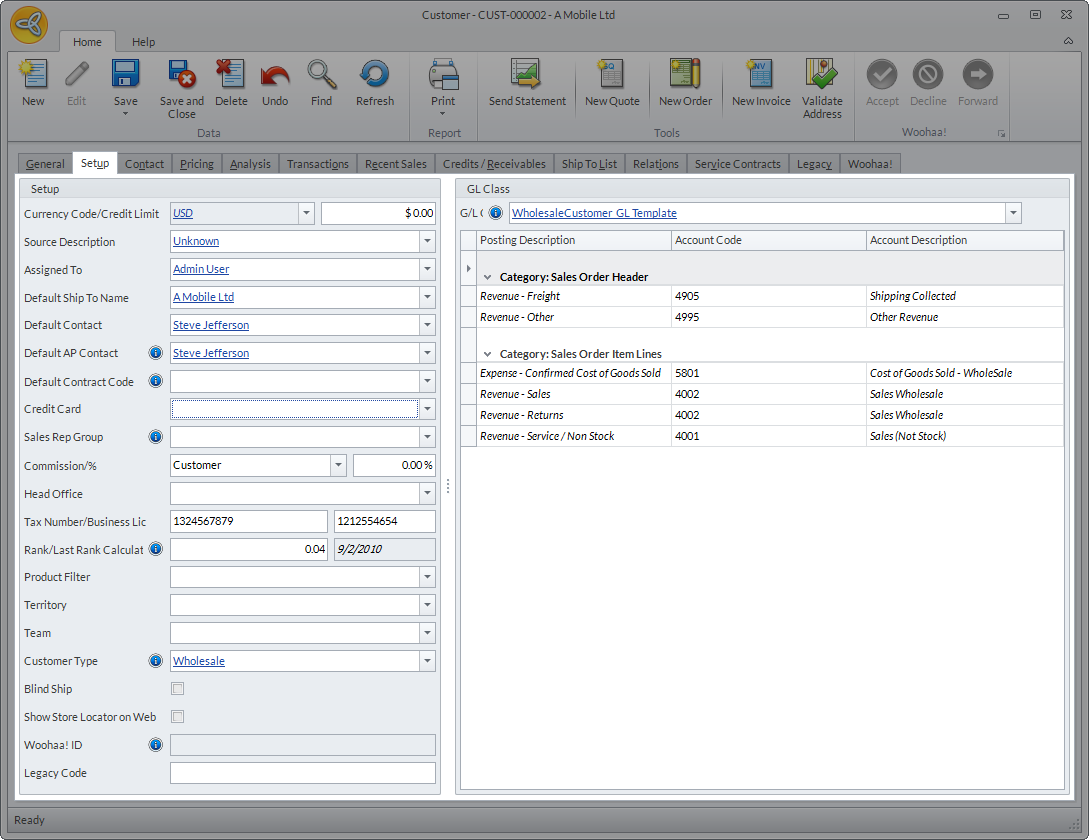
The Setup tab shows various account-related information provided upon creating the customer record as well as the posting accounts.
Click Image to Enlarge
The following table shows the fields found in the Setup section of the Setup tab (Connected Business v13) and the corresponding function/description of each field.

Click Image to Enlarge
|
Setup Section |
Definition |
|
Currency Code/Credit Limit |
Shows the currency set up for the customer and the credit limit allowed based on the customer's currency. Note that the currency is not amendable. |
|
Source Description |
Shows the source where the customer got the information about the company. |
|
Assigned To |
Shows the user name of the user who created the customer record. You may select another user from the dropdown list. |
|
Default Ship To Name |
Shows the default ship to (shipping address) for the customer. You may select another ship to (if any) to set as default. |
|
Default Contact |
Shows the default contact of the customer. |
|
Default AP Contact |
Shows the default Accounts Payable contact set up for the customer (if any). |
|
Default Contract Code |
Shows the default Contract for the customer. |
|
Credit Card |
Shows the credit card used by the customer (if there is any). |
| Sales Rep Group | Shows the default sales rep group assigned to the customer. You can select the sales rep group assigned to the customer from the dropdown list. |
| Commission / % |
Shows commission source set for the customer. You can select from Customer, Sales Rep, and Default. |
| Head Office | Shows the customer's main business office or branch. |
| Tax number / Business License | Shows the customer's business tax and business license number. If the user or system language is set to United Kingdom, the field description changes to VAT No./CO Reg. |
| Rank / Last Rank Calculated | Shows the customer value relative to the overall sales of the Company based on the Last Rank Calculated date. |
| Product Filter | Shows the product filter assigned to the customer as defined by the user. SeeProduct Filtering Feature for more details. |
| Territory | Shows the default territory of the customer (if set up). |
| Team | Shows the default team assigned to the customer. |
| Customer Type | Shows the category or type where the customer belongs. |
| Blind Ship Checkbox | Tick this checkbox if you want to enable Blind Shipping option for the customer. |
| Show Store Locator on Web | Tick this checkbox if you want to enable the store locator option in the website for the customer. |
| Woohaa! ID | Shows the customer's Woohaa! ID Network (if enrolled). See Woohaa! for more details. |
| Legacy Code | Shows the customer existing record from previous databases (if there is any). |
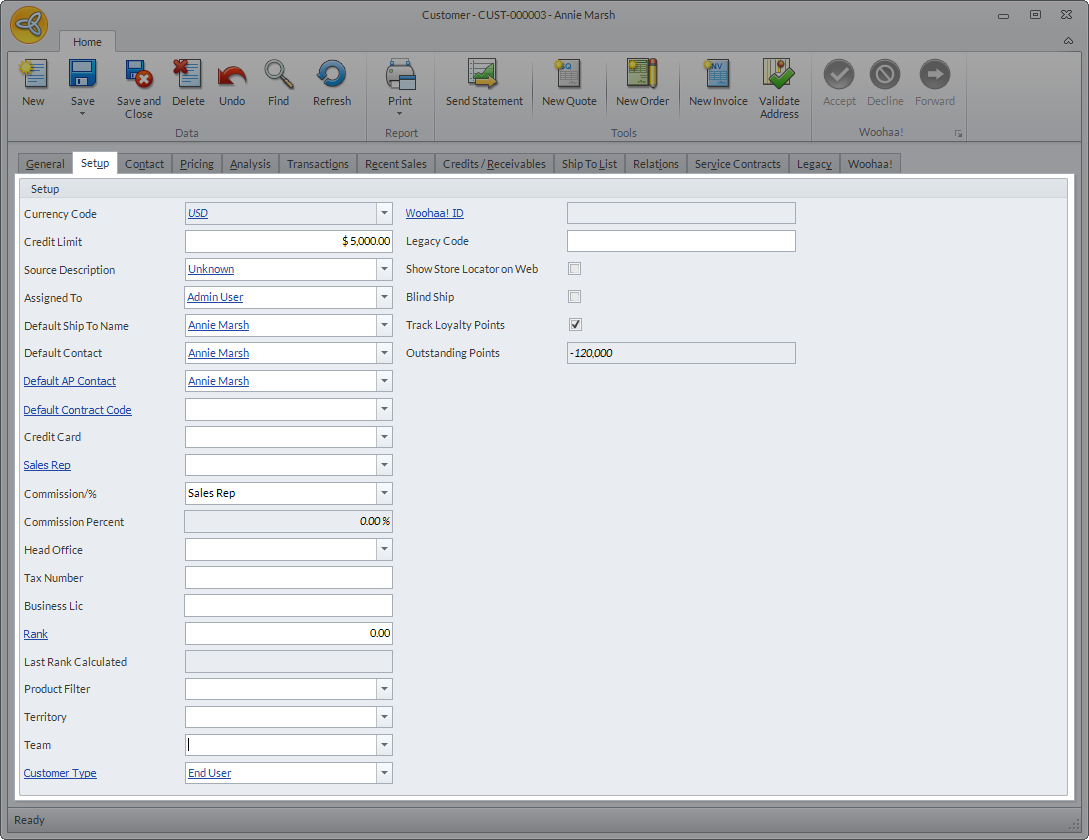
In Connected Business v14, the fields in the Setup tab have been updated.
Click Image to Enlarge
The following table shows the fields found in the Setup tab of the Customer Detail form in Connected Business v14 and the corresponding function/description.
|
Setup Section |
Definition |
|
Currency Code |
Shows the currency set up for the customer. |
|
Credit Limit |
Shows the credit limit set for the customer. |
|
Source Description |
Shows the source where the customer got the information about the company. |
|
Assigned To |
Shows the user name of the user who created the customer record. You may select another user from the dropdown list. |
|
Default Ship To Name |
Shows the default ship to (shipping address) for the customer. You may select another ship to (if any) to set as default. |
|
Default Contact |
Shows the default contact of the customer. |
|
Default AP Contact |
Shows the default Accounts Payable contact set up for the customer (if any). |
|
Default Contract Code |
Shows the default Contract for the customer. |
|
Credit Card |
Shows the credit card used by the customer (if there is any) |
| Sales Rep Group | Shows the default sales rep group assigned to the customer. You can select the sales rep group assigned to the customer from the dropdown list. |
| Commission / % |
Shows commission source set for the customer. You can select from Customer, Sales Rep, and Default. |
| Commission Percent | Shows the percent of commission if the commission source is set to Customer. |
| Head Office | Shows the customer's main business office or branch. |
| Tax Number | Shows the customer's business tax number. If user or system language is set to United Kingdom, the field description will be changed to VAT No. |
| Business Lic | Shows the customer's business license number. If the user or system language is set to United Kingdom, the field description will be changed to CO Reg. |
| Rank | Shows the customer value relative to the overall sales of the Company. |
| Last Rank Calculated | Shows the date when the customer ranking is last calculated. |
| Product Filter | Shows the product filter assigned to the customer as defined by the user. SeeProduct Filtering Feature for more details. |
| Territory | Shows the default territory of the customer (if set up). |
| Team | Shows the default team assigned to the customer. |
| Customer Type | Shows the category or type where the customer belongs. |
| Woohaa! ID | Shows the customer's Woohaa! ID Network (if enrolled). See Woohaa! for more details. |
| Legacy Code | Shows the customer existing record in previous databases (if there is any). |
| Show Store Locator on Web | Tick this checkbox if you want to enable the store locator option in the website for the customer. |
| Blind Ship | Tick this checkbox if you want to enable Blind Shipping option for the customer. |
| Track Loyalty Points | Tick this checkbox if you want to enable tracking of loyalty points for the customer. See Loyalty Points for more details. |
| Available Points | Shows the outstanding loyalty points available for the customer. |
Manage Customer Contacts
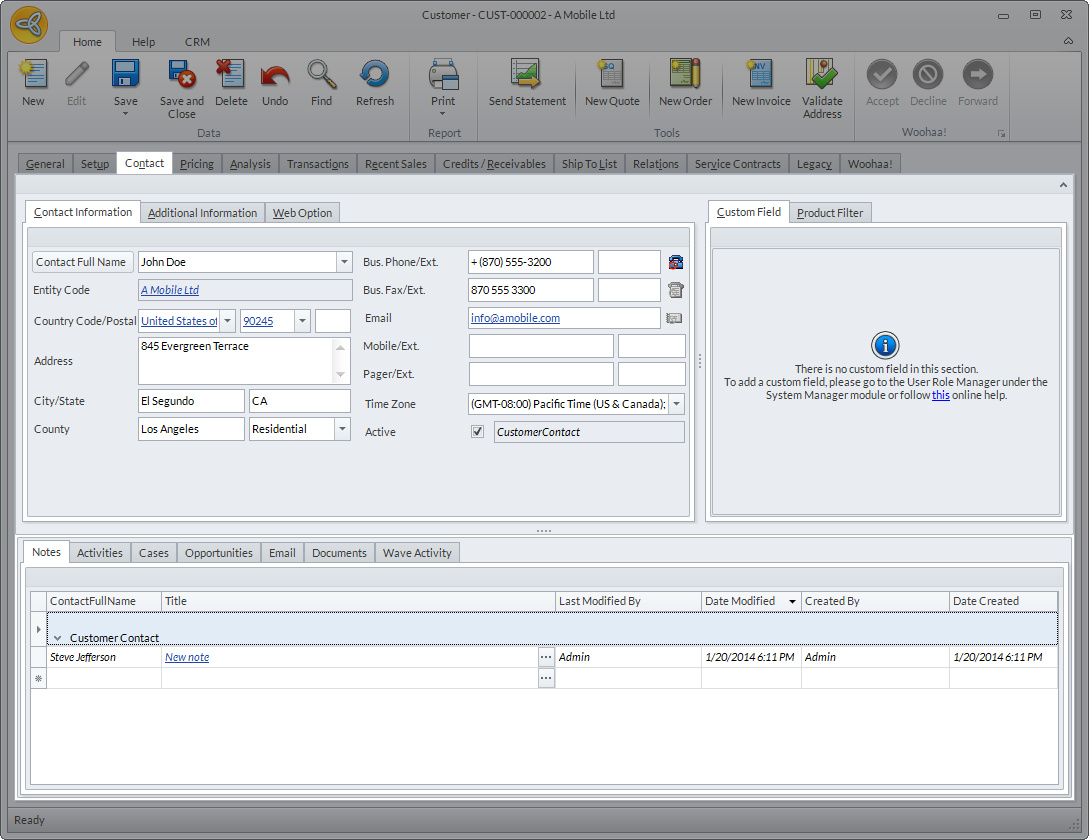
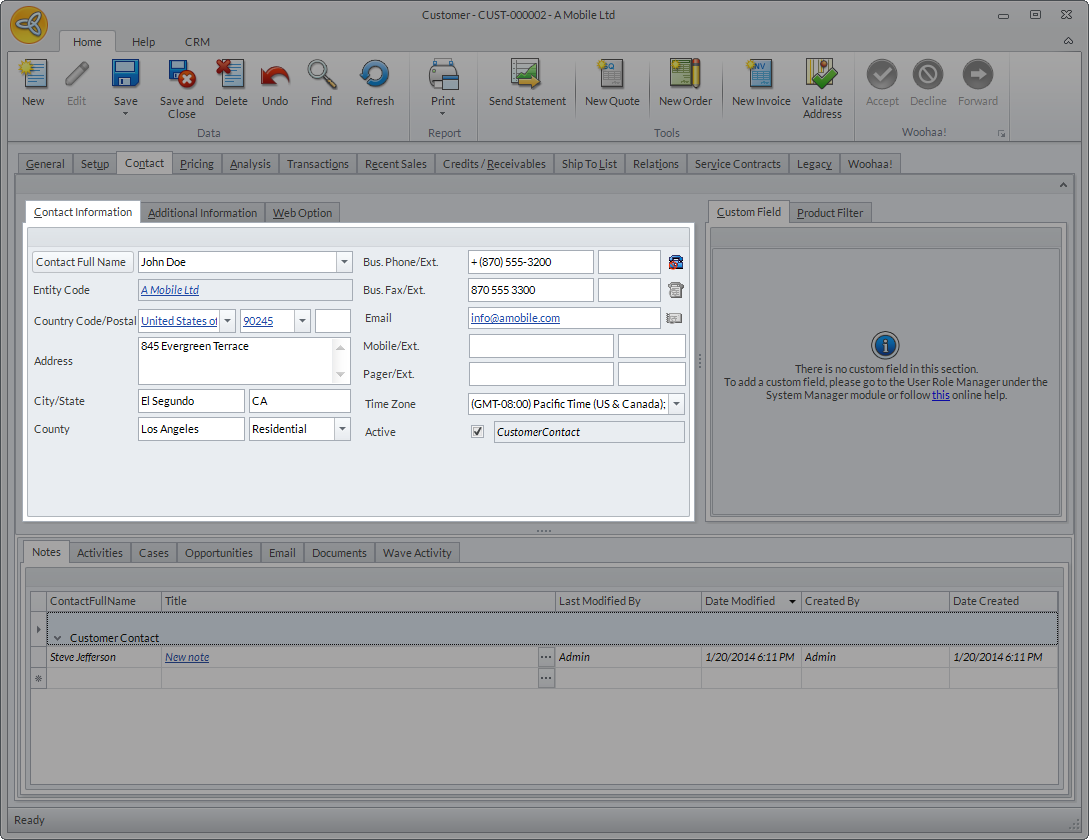
The Contact tab shows the list of all customer contacts. From here, you can add, view, and modify the details of the customer contact.
Click Image to Enlarge
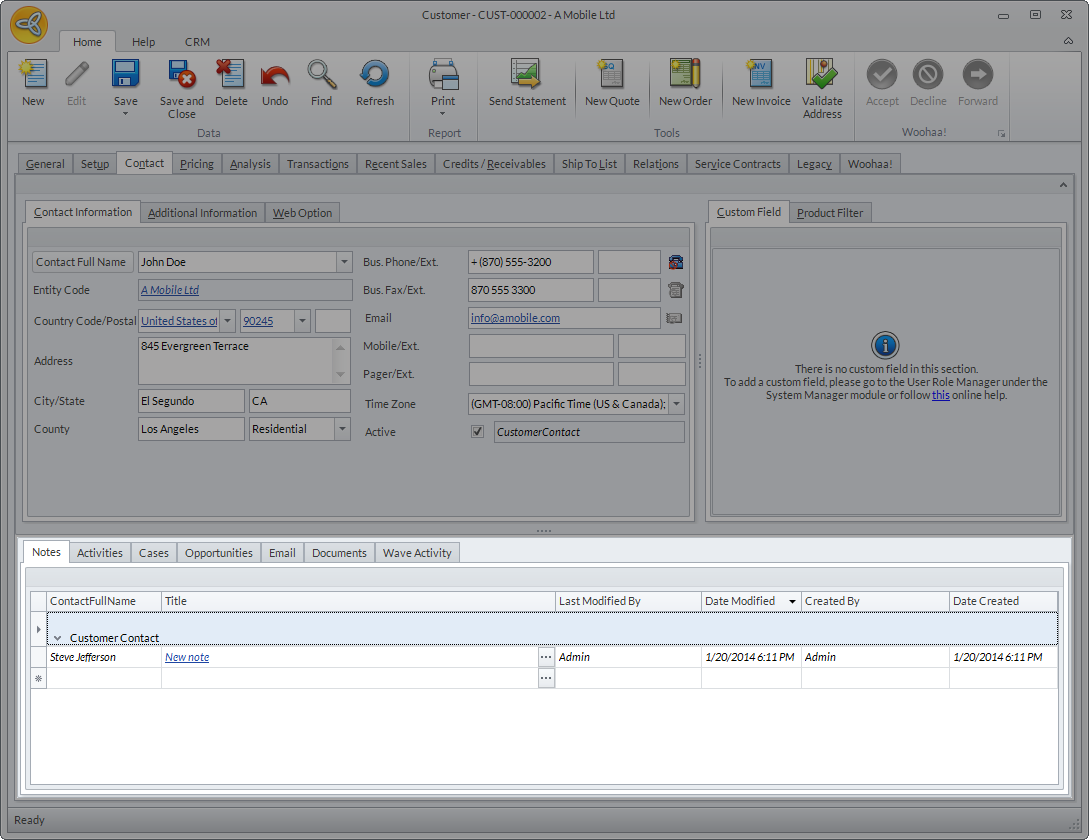
The Contact Information section shows the contact’s general information. If the customer has multiple contacts, click on the dropdown list of the Contact Full Name field, then select the contact to view the contact details. If you want to add a new Contact, click the CRM tab then select New Contact. Enter the contact details as needed then click Save or Save and Close.
Click Image to Enlarge
The following table shows the fields found in the Contact Information tab and the corresponding function/description of each field.
|
Setup Section |
Definition |
|
Contact Full Name |
Shows the customer full name. You can click on the Contact Full Name button to add a salutation, middle name, or suffix as needed. |
|
Entity Code |
Shows the entity (customer, supplier, etc) related to the contact. |
|
Country Code / Postal |
Shows the country and the postal code of the customer. |
|
Address |
Shows the specific address of the customer including the street, block #, etc. |
|
City/State |
Shows the city and state of the customer. |
|
County |
Shows the customer's county (if applicable). |
|
Bus. Phone/Ext. |
Shows the contact's business telephone number and extension(if there is any). |
|
Bus. Fax/Ext. |
Shows the contact's business fax number and extension(if there is any). |
|
|
Shows the contact's email address. |
| Mobile/Ext. | Shows the contact's mobile phone number and extension(if there is any) |
| Pager/Ext. |
Shows the contact's pager number and extension (if there is any). |
|
Time Zone |
Shows the contact's time zone. by default, this is set to the system time zone of the machine where the customer record was set up, unless otherwise specified upon creating the customer. |
| Active | Indicates that the customer contact is active. |
| Contact Type | Indicates the type of the contact e.g. customer contact, supplier contact, etc. |
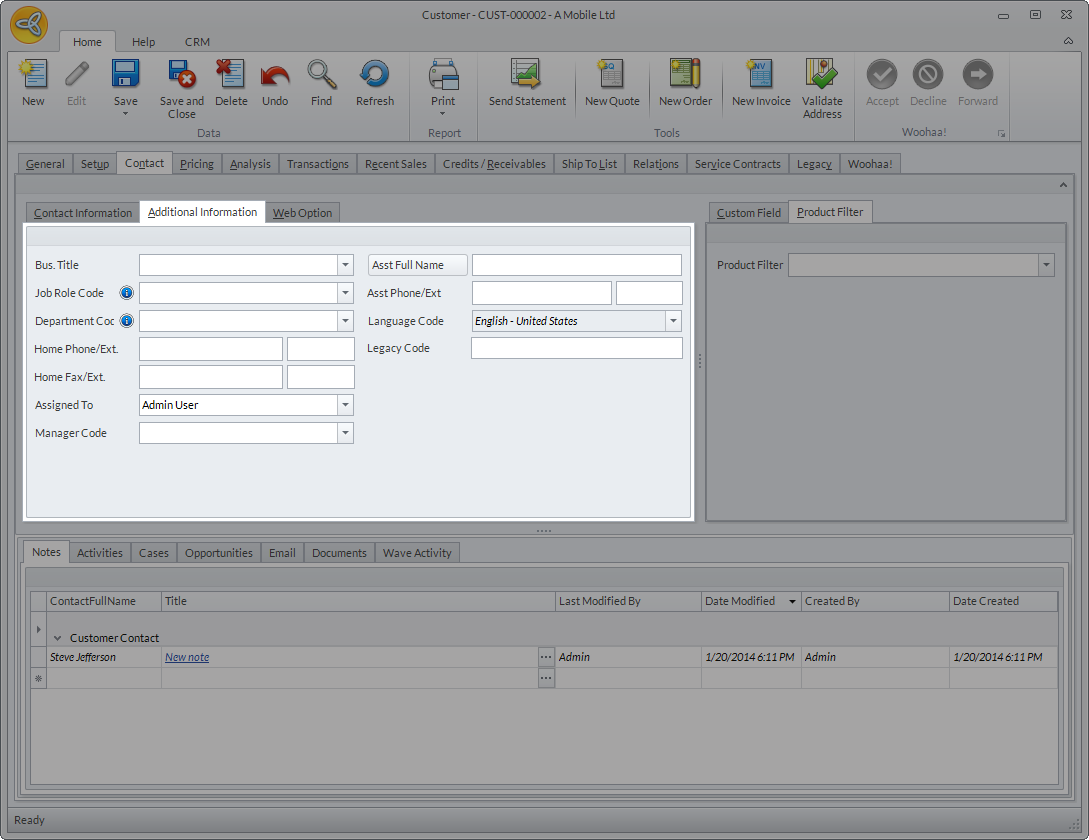
The Additional Information section shows additional contact details as indicated in the table below.
Click Image to Enlarge
|
Field |
Function/Definition |
|
Bus. Title |
Shows the business title of the contact. You can select the business title from the dropdown list. |
|
Job Role Code |
Shows the job role of the contact. You can select the job role from the dropdown list. |
|
Department Code |
Shows the department where the contact is under. You can select from the dropdown list of departments in your company. |
|
Home Phone/Ext. |
Shows the contact's home phone number and extension (if there is any). |
|
Home Fax/Ext. |
Shows the contact's home fax number and extension (if there is any). |
|
Assigned To |
Shows the user assigned to the contact. This is usually the user who created the contact information. You can select another user to assign the contact to from the dropdown list. |
|
Manager Code |
Shows the contact's superior or manager. You can select a manager from the dropdown list of existing contacts related to the entity. |
|
Asst Full Name |
Shows the assistant manager's name of the contact. |
|
Asst Phone/Ext. |
Shows the assistant manager's phone number and extension (if there is any). |
| Language Code | The default language used by the system. |
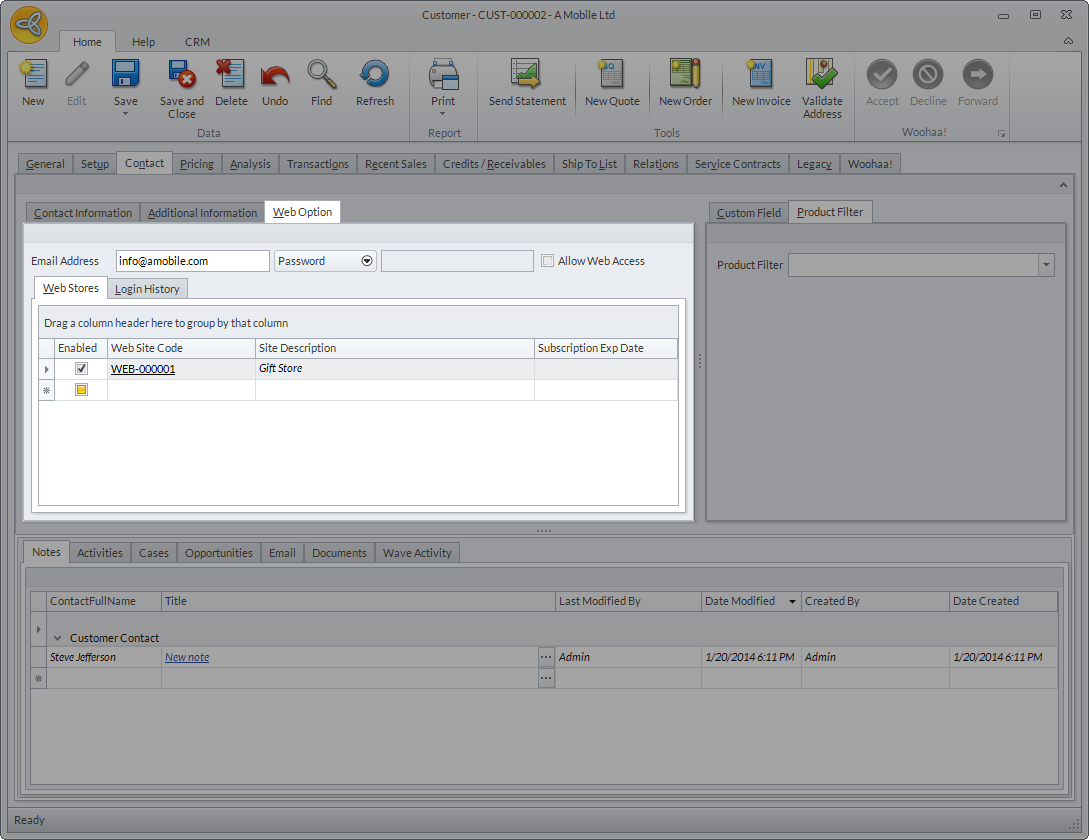
The Web Option tab shows the contacts email address and web login history. This is where you can update the contact’s email address and password as well as manage the contact’s access to the webstore.
Click Image to Enlarge
The following table shows the fields found in the Web Option tab and the corresponding function/description of each field.
|
Field |
Function/Definition |
|
Email Address |
Shows the email address of the contact. |
|
Password |
The password used by the contact to access the webstore. In case the contact forgot the password, you can click on the arrow down icon and select how you want to send the password. The options are:
|
|
Allow Web Access |
Tick this checkbox if you want the contact to access the webstore, otherwise, untick. |
|
Web Stores |
This tab shows the list of active webstores for the entity. |
|
Login History |
Shows the log history of the contact when accessing the webstore. |
|
Purge Option |
Allows you to purge the log history of the contact. You can choose to purge all the log history by clicking the Purge All button or delete specific logs by indicating the date range in the Purge From and Purge To fields, respectively. |
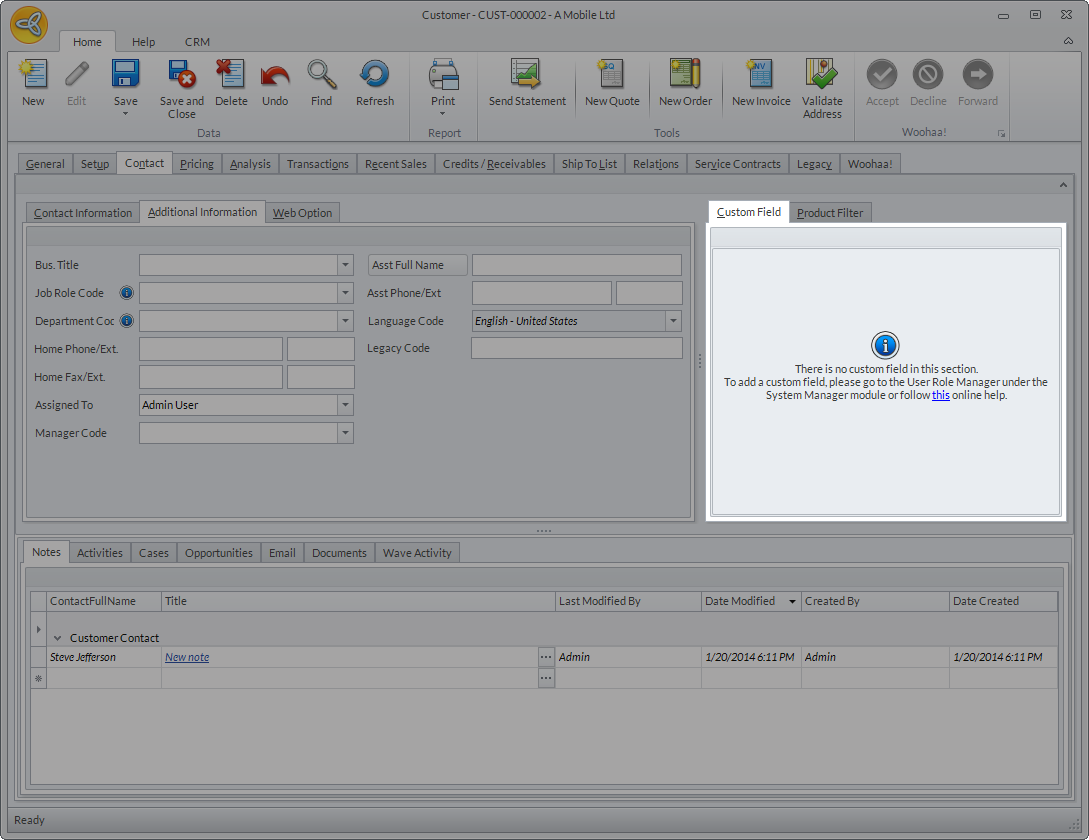
The Custom Field tab shows the custom fields added (if there is any) for customer contact use.
Click Image to Enlarge
The Product Filter tab shows the available product filters (if there is any set up) that can be assigned to the contact. See Product Filtering for more information on product filters.
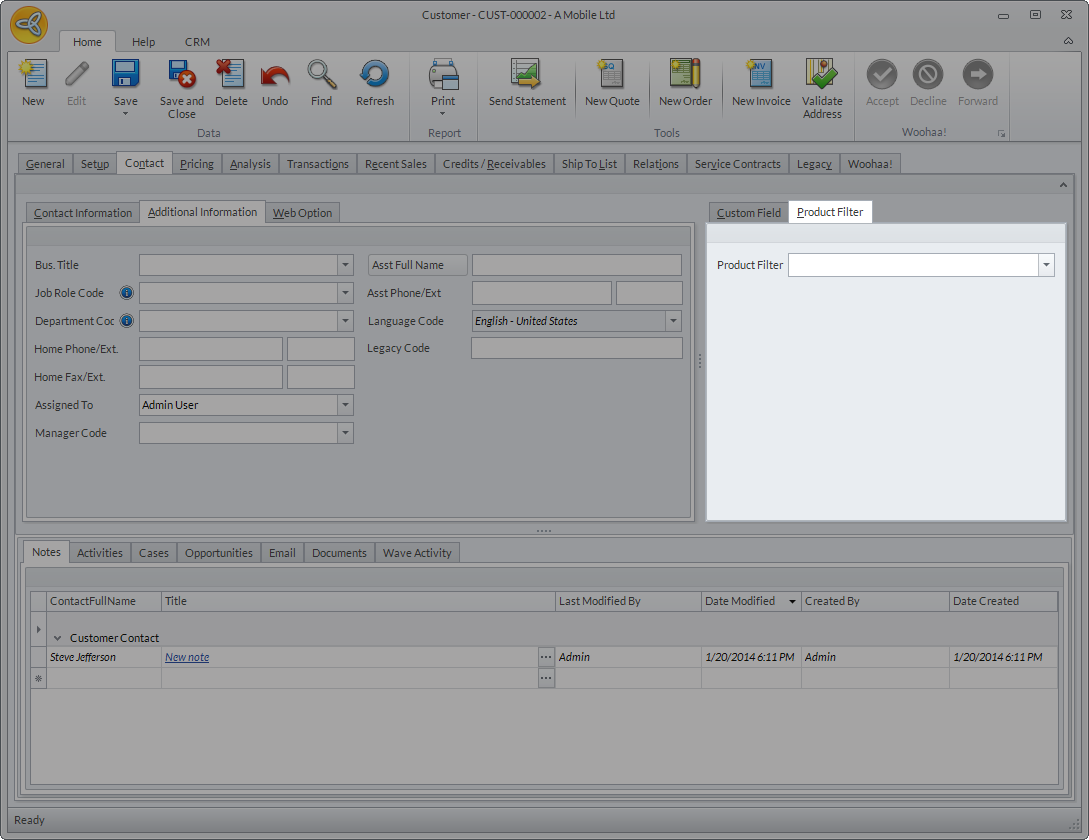
Click Image to Enlarge
You can also manage other customer-related information, such as notes, activities, cases, etc. directly from the Contact tab.
Click Image to Enlarge
The Notes tab shows the list of notes for the customer. You can create a new note by clicking the New Note button from the CRM tab.
The Activities tab shows the list of activities set for the customer. Clicking this tab automatically switches the ribbon menu to the Activities tab. You can create, modify or view the customer's activities as needed.
The Cases tab shows the list of cases for the customer. You can create a new case by clicking the New Case button from the CRM tab.
The Opportunities tab shows the progress of sales opportunities for the customer at a company or customer contact level.
The Email tab shows the list of email/fax messages sent to the customer. Clicking this tab automatically switches the ribbon menu to the Email tab. You can compose a new email by clicking New > Mail Message. This will load the Message form.
The Documents tab shows all attached documents related to the contact. You can attach a new document by clicking the New Document menu from the CRM tab.
The Wave Activity tab shows the list of campaigns where the contact participated. You can click on the Wave Name to view the campaign wave details or the contact name to view the contact details.
View Recent Sales History
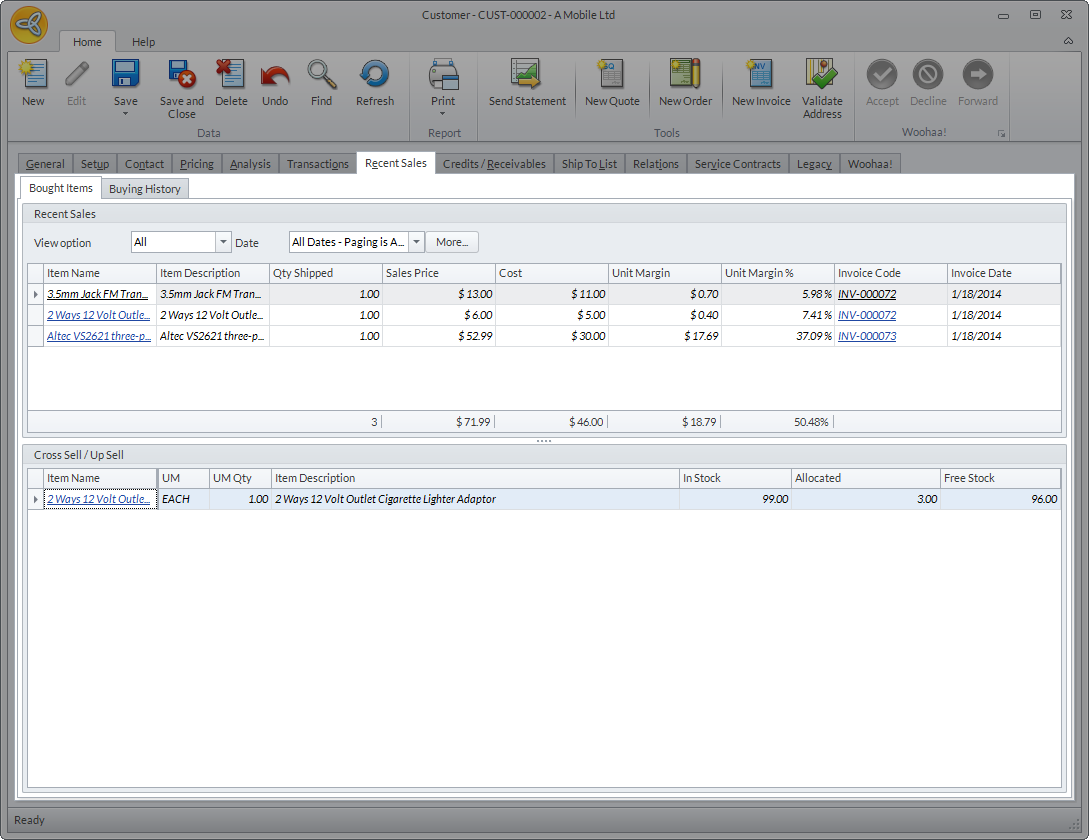
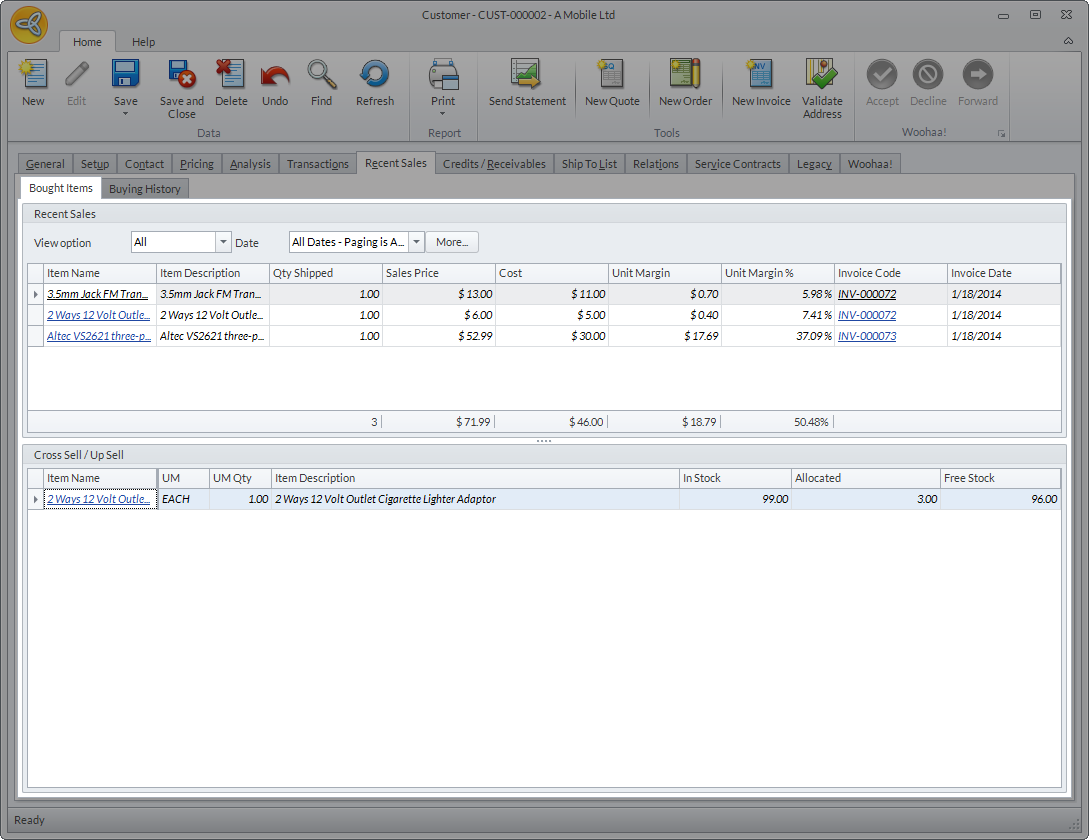
The Recent Sales tab shows the customer's bought items and buying history. It also shows the items that are set for cross sell or upsell.
Click Image to Enlarge
From the Bought Items tab, you can see all the items bought by the customer including the item details, the invoice related to the item, as well the cross sell and upsell items.. You can filter the bought items based on the transaction status (Open/Partial, Closed, All).
Click Image to Enlarge
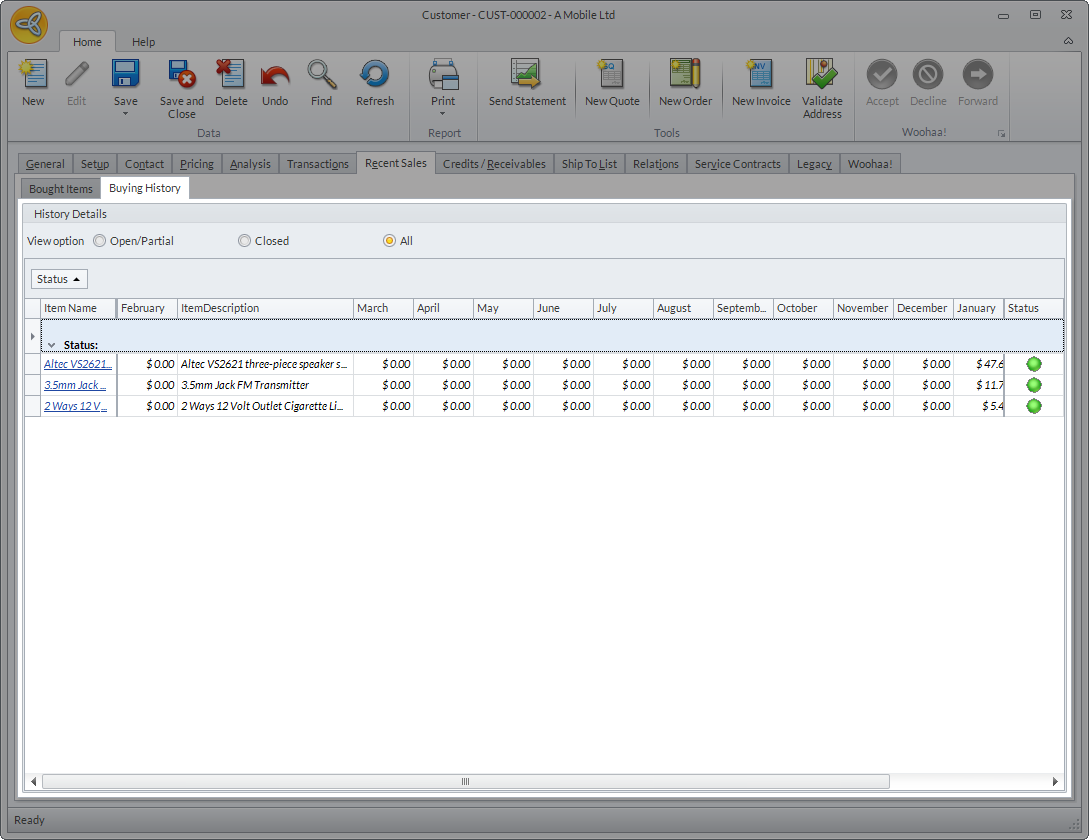
The Buying History tab shows the items bought by the customer and the breakdown of the sales amount by month and the totals. The records can be filtered by status (Open, Closed or All).
Click Image to Enlarge
Manage Customer Credits and Receivables
The Credit/Receivables tab shows the overall credit standing of the customer. From this tab, you can see the customer's credit information, the outstanding credits and receivable, as well as the days due.
Click Image to Enlarge
Review Aging of Receivables
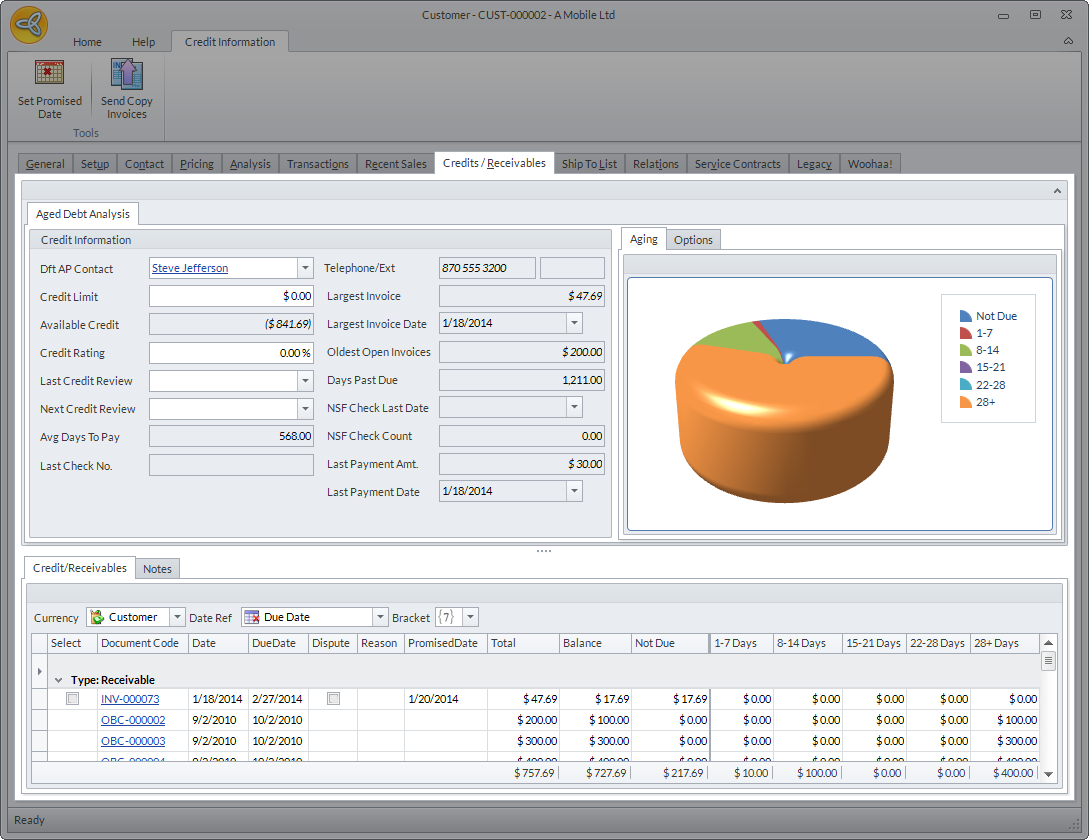
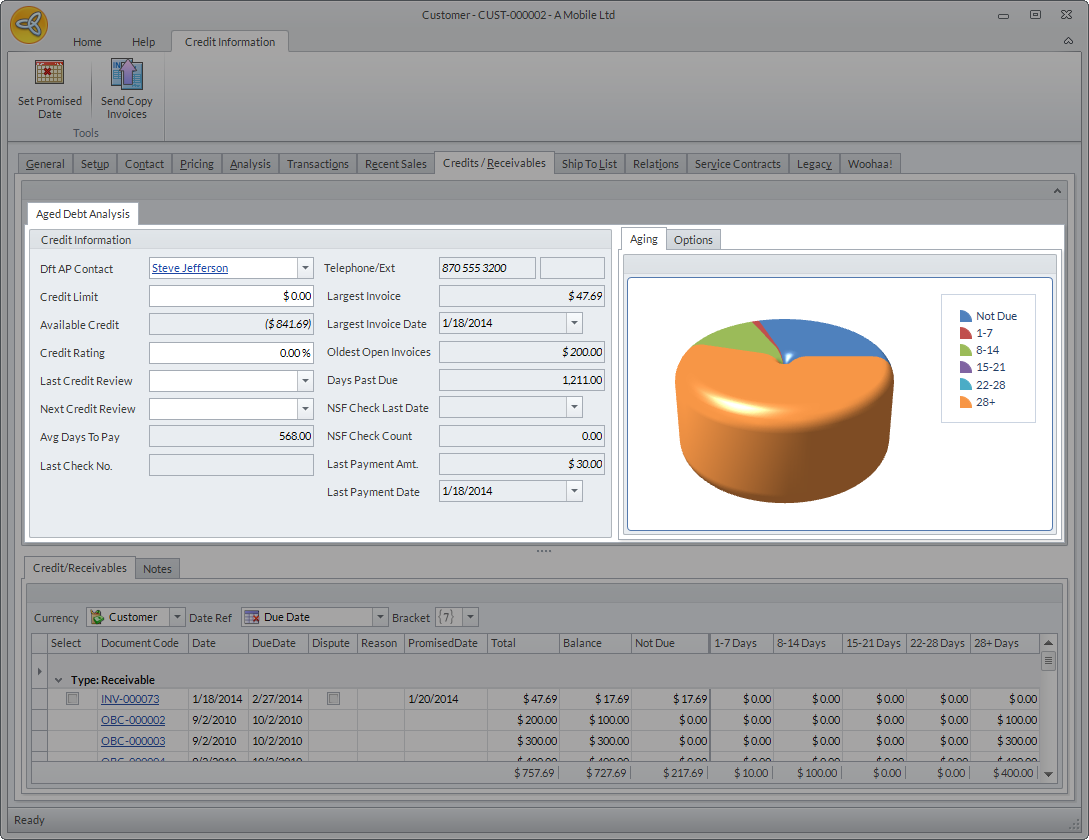
The Aged Debt Analysis tab shows the customer's credit status, including the customers aged debt and other credit information. It also shows a graphical presentation of the customer’s credit as well as the history of statements and debtor letters send to the customer.
Click Image to Enlarge
The Credit Information tab displays the customer’s current credit status and other credit information. The following table shows the fields found in the Credit Information section.
|
Field |
Function/Description |
|
Dft AP Contact |
Shows the default AP contact of the customer. This is usually the contact set as default during the customer setup unless otherwise specified. |
|
Credit Limit |
Shows the credit limit allowed for the customer. You can change limit value directly from here or from the Setup tab. |
| Available Credit | Shows the remaining available credit limit of the customer. If the customer has exceeded the limit, the value will be in negative. |
| Credit Rating | Shows the customer's credit performance rating as manually defined by the user. |
| Last Credit Review | Shows the latest date when the customer's credit was reviewed. |
| Next Credit Review | Shows the date when the customer's credit will be reviewed next. |
| Avg Days To Pay | Shows the average number of days it takes for the customer to pay the balances. |
| Last Check No. | Shows the latest check number from the customer's check payment. |
| Telephone/Ext | Shows the customer's phone number and extension (if there is any). |
| Largest Invoice | Shows the amount of the customer's largest invoice. |
| Largest Invoice Date | Shows the date of the customer's largest invoice. |
| Oldest Open Invoices | Shows the total amount of the customer's oldest unpaid invoices. |
| Days Past Due | Shows the total number of days the oldest unpaid invoices are on past due. |
| NSF Check Last Date | Shows the latest date when the customer's check returned as NSF. |
| NSF Check Count | Shows the number of times the check returned as NSF. |
| Last Payment Amt. | Shows the latest payment received from the customer. |
| Last Payment Date | Shows the date of the customer's latest payment. |
The Aging tab displays a chart presentation of the customer's aging receivables. You can click to modify the chart view. Note: No chart will be displayed unless the customer has recorded receivables and receipt transactions.
Review Customer Credit/Receivables
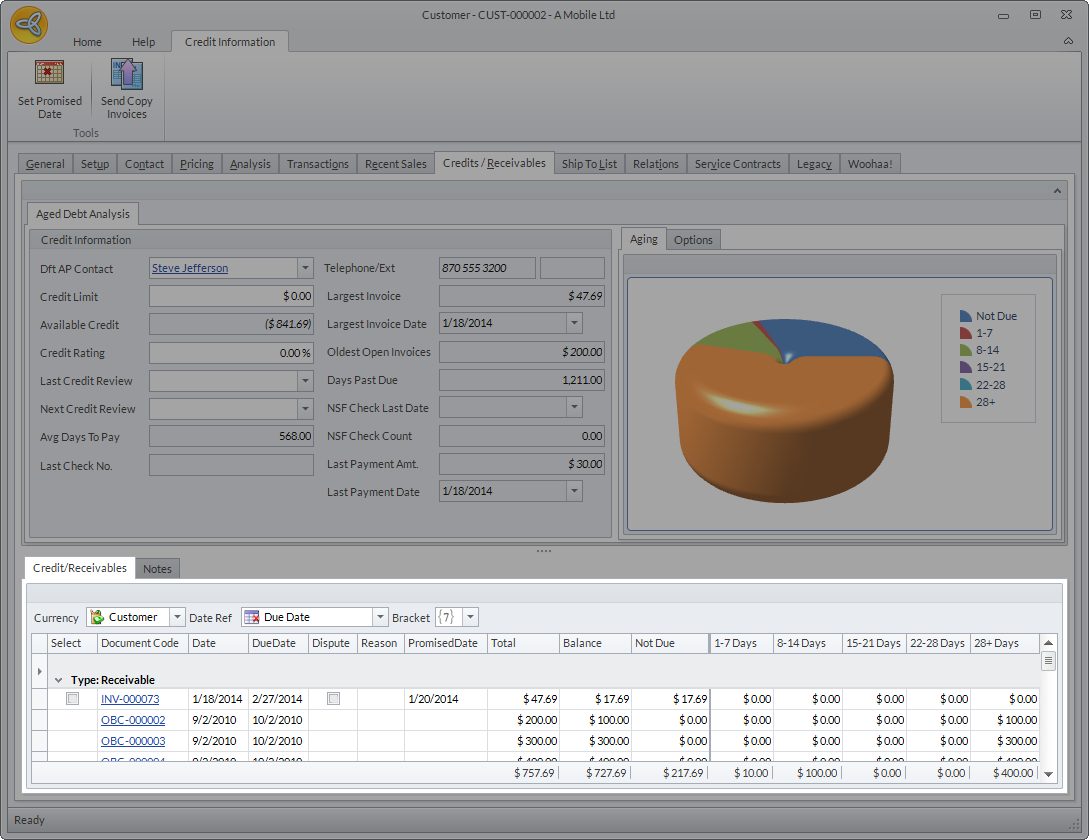
The Credit/Receivables tab shows the list of all the customer's credits and receivables which are grouped by type (Receivable, Credit). From this section, you can view all the customer’s receivable and credit transactions, including transaction balances, due date, promised dates and number of days overdue.
Click Image to Enlarge
You can sort the list by the currency used and date reference. If you want to review the list by currency, select between Customer (if you want to use the customer’s currency) or Home (if you want to use the home currency) from the Currency dropdown list.
If you want to sort the list by date reference, select accordingly from the Date Reference dropdown list. Note that changing the date reference type also changes the data presentation in the chart from the Aging section. If viewed by Due Date, the undue balances for all credits and receivables will be displayed. If viewed by Document Date, the current and future balances for all credits and receivables will be displayed.
You can also define the days of overdue displayed in the list by setting the days overdue range from the Bracket dropdown list. The ranges are: 7, 14, 28, 30.Set Promised Dates
To set promised dates for customer payments, select the invoice to be paid and click the Set Promised Date button. The Promised Date dialog box will be displayed. Enter the promised date of the customer to pay the invoice and click OK. The date will be indicated in the Promised Date column.

Click Image to Enlarge
Send Invoice Copy
You can also send copy of invoices to customer. Tick the checkbox the invoice/s to be sent and click the Send Copy Invoices button. Select how you want to send the invoice from the Print Dialog form and click OK.

Click Image to Enlarge
If you want to add notes with regards to the customer credit information, click the ellipsis button from the Notes tab and select New Note.
Customer Shipping Information Tab
The Ship To tab shows the list of the customer’s ship to contact. You can view the Ship To detail by clicking the Ship To code or click the New Ship To button to create a new ship to contact. You can also refer to Manage Customer Shipping Information for more details.
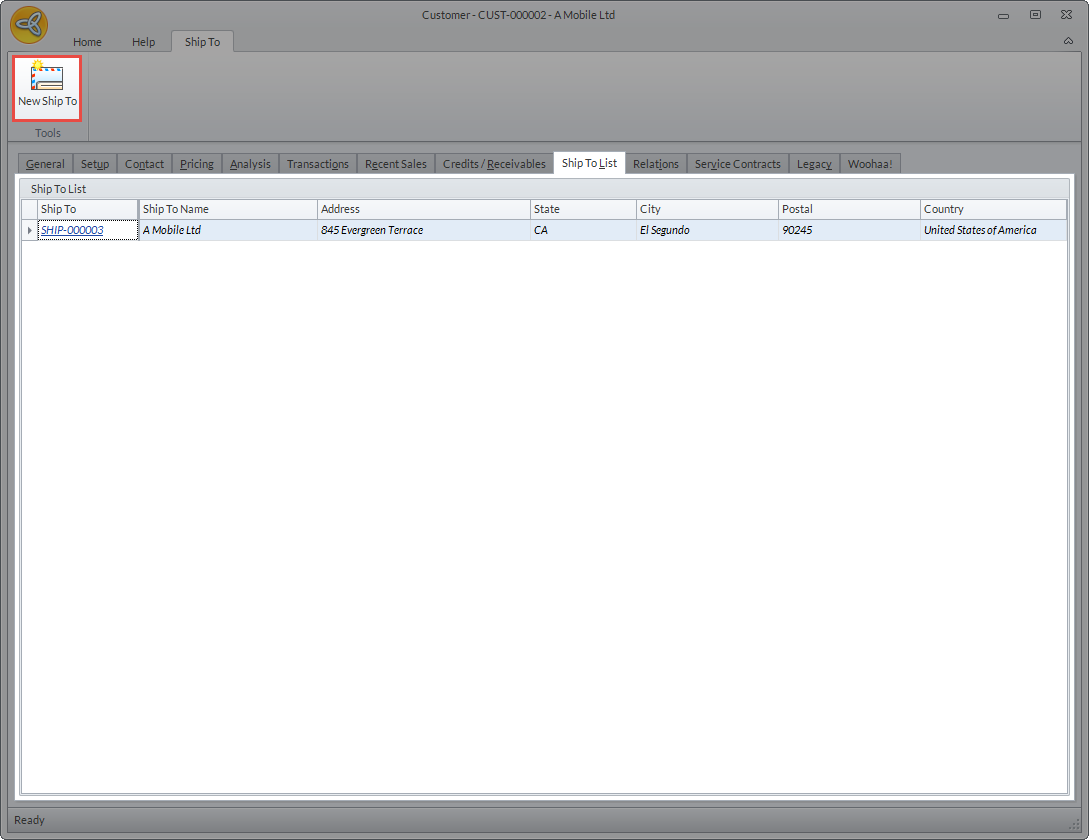
Click Image to Enlarge
When creating new transactions (e.g. sales orders), the customer details such sales rep commission, shipping method, and payment terms will come from the default customer Ship To.
View Customer Legacy
The Legacy tab shows all of the customer transactions as recorded in the user’s previous database (if there is any).

Click Image to Enlarge