Set Up Customer List
|
Content
|
|---|
|
In this process, you will be setting up the customer list.
It is recommended to set up the details e.g. payment terms, tax information and group them into class templates to speed up the set up of your customer list.
Connected Business has pre-created class templates for business and retail customers that you can modify or add to.
At the end of this session, users will set up the details for customers, group the details into class templates and create the list of customers.
Create Default Details for Customers
Set Up Customer Types
To complete this task, do the following:
- Go to Customer Module > Setup > Customer Types to bring up the Customer Type form.
- Define each customer type according to their common attributes. Below is an example of how customer types are set up:
Business Customers:
- Schools / Universities
- Sports Organizations
- Government Organizations
- Gyms / Fitness Centers
Consumers:
- Hobbyists
- Professional Athlete
- Coaches / Sports Trainers
- Fitness Trainers
- Schools / Universities
- Choose Save and New to keep adding customer types.
Set Up Delivery Routes
To complete this task, do the following:
- Go to Customer Module > Setup > Delivery Routes to bring up the Delivery Route form.
- Define each delivery route that relates with the particular area your delivery vehicles or delivery service pass through. Delivery Codes may be made up of the Zip Code, a letter for the carrier type and 3 or more numbers for the route code. Below is an example of how delivery routes are set up:
- Zip Code – e.g. 90210
- Carrier Type – C (City), R (Rural Area), B (PO Box)
- Route Number – e.g. 008. The route code would be 90210C008.
- Zip Code – e.g. 90210
- Choose Save and New to keep adding delivery routes.
Set Up GL Class Templates
To complete this task, do the following:

This task is for those who decided to split the sales analysis for revenue accounts by customer type or customer locations.
Those who chose the default account analysis in Connected Business may skip this step.
Go to Customer Module > Setup > GL Class Templates to bring up the Customer GL Class Template form.
- Let’s say you want to track your income and other revenues by customer. In order to specify a different revenue account for different customer class, you will need to create these account codes and assign them to GL Class Templates. There are 2 ways to divide the analysis by customer:
- Create Customer GL Class Templates that will to group account codes by customer location (e.g. GL Class for Customers in California)
- Create Customer GL Class Templates that will group account codes by customer type (e.g. GL Class for Sports Organizations)
- Create Customer GL Class Templates that will to group account codes by customer location (e.g. GL Class for Customers in California)
- Decide if you will track sales by customer type or customer location.
- If tracking sales by customer type, you will need to define Customer GL Class Templates. Then, assign them to Customer Class Templates.
- To track sales by customer type, you will need to do a few things first. Below is a representation of how to set up Customer GL Class Templates that will track sales by customer type:

- Define account codes to assign to the GL Class Templates (e.g. Sales – Gyms / Fitness Centers). Use the New Chart of Accounts Wizard (Accounting Module > Accounts > New Account Code) to add new account codes. You can create segments for the account codes you will create (e.g. Customer Type or Location).
- Create the Customer GL Class Templates. Go to Customer Module > Setup > GL Class Templates to bring up the Customer GL Class form. Click on the New option to create new GL Class Templates. Below is an example of how to assign account codes to the Customer GL Class.
Customer GL Class Templates
Sample Customer GL Class: Gyms / Fitness Centers Customer GL Class Template
Inventory Accounts
Account Code
Control Account - Inventory Control
Control Account – Transfers / Internal Movements
Expense – Standard/Average Cost Price Variance
Revenue Accounts
Account Code
Expense – Confirmed Cost of Goods Gold
Revenue – Sales
e.g. Sales – Gyms / Fitness Centers
Revenue – Returns
Revenue – Service/ Non Stock
- The next step is to assign the Customer GL Class Templates to Customer Class Templates. As you create new customer class templates, you can assign the Customer GL Class Templates you created.
- Set the Accounting Preferences to use the account codes assigned to customer class templates (Accounting Module > Setup >Preferences). Choose Customer Account from the Sales Analysis options.
- To track sales by customer type, you will need to do a few things first. Below is a representation of how to set up Customer GL Class Templates that will track sales by customer type:
- If tracking sales by customer location, you will need to define Customer GL Class Templates. Then, assign them to Customer Class Templates.
- To track sales by customer location, you will need to do a few things first. Below is a representation of how to set up Customer GL Class Templates that will track sales by customer location:
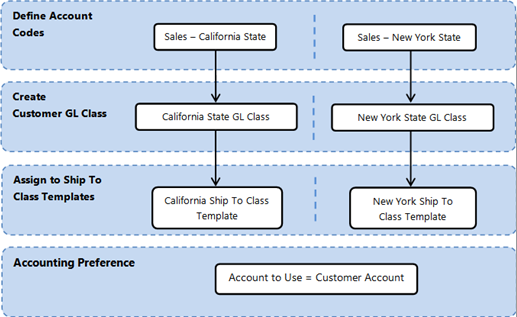
- Define account codes to assign to the GL Class Templates (e.g. Sales – California State). Use the New Chart of Accounts Wizard (Accounting Module > Accounts > New Account Code) to add new account codes. You can create segments for the account codes you will create (e.g. Customer Type or Location).
- Create the Customer GL Class Templates. Go to Customer Module > Setup > GL Class Templates to bring up the Customer GL Class form. Click on the New option to create new GL Class Templates. Below is an example of how to assign account codes to the Customer GL Class.
Customer GL Class Templates
Sample Customer GL Class: California State Customer GL Class Template
Inventory Accounts
Account Code
Control Account - Inventory Control
Control Account – Transfers / Internal Movements
Expense – Standard/Average Cost Price Variance
Revenue Accounts
Account Code
Expense – Confirmed Cost of Goods Gold
Revenue – Sales
e.g. Sales – California
Revenue – Returns
Revenue – Service/ Non Stock
- To track sales by customer location, you will need to do a few things first. Below is a representation of how to set up Customer GL Class Templates that will track sales by customer location:
- Set theAccounting Preferences to use the account codes assigned to customer class templates (Accounting Module > Setup >Preferences). ChooseCustomer Account from theSales Analysis options.
- If tracking sales by customer type, you will need to define Customer GL Class Templates. Then, assign them to Customer Class Templates.
Group Details for Customer Shipping and Billing
To complete this task, do the following:
Set Up The Ship to Class Templates That Will Group Details for Customer Shipping
Ship To Class Templates group default values for new customer shipping information. Ship To Class Templates are selected when creating new customer shipping addresses to fill up most of the information for you.
Note that Connected Business includes default ship tp class template for each new country and business type. You can modify the default class templates or create new depending on your needs.
- After creating the default details for customers (e.g. payment terms, shipping methods, sales tax, delivery routes), you can now group the details by ship to class templates. Below is a representation of how ship to class templates are set up:
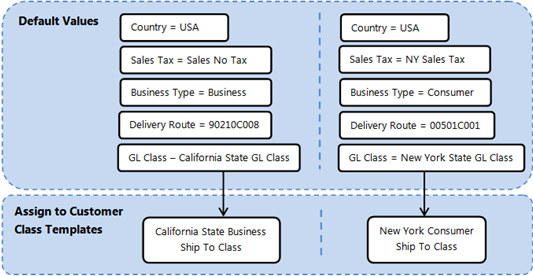
- Create the Ship To Class Templates. Go to the Customer Module > Setup > Ship To Class Templates. Below is an example of how ship to class templates are set up:
Ship To Class Templates
General
Class Code
e.g. California State Business Ship To Class
Description
e.g. California State Business Ship To Class
Setup
Country
Payment Term Group
e.g. Net Terms
Payment Term
e.g. Net30
Tax
e.g. Sales No Tax
Freight Tax
e.g. Sales No Tax
Other Tax
e.g. Sales No Tax
Shipping Method Group
e.g. Default
Shipping Method
e.g. Next Day
Warehouse Code
e.g. California Warehouse
Route
e.g. 90210C008
Sales Rep Group
e.g. California Sales Department
Commission (if commissions will be based on customer locations, select from the options)
If Ship To,
Enter the commission percent based on the customer ship to.
If Sales Rep,
The sales rep commission will be based on the commission option from the sales rep
If Default,
The sales rep commission will be based on the commission option from the customer billing
Opening Time
Closing Time
Special Instructions
Truck Size
Book Date, Time and Bay
Yes / No
Accounts
GL Class Template
e.g. Default Customer GL Class Template
Options
Is Active?
Yes
Set Up the Customer Class Templates That Will Group Details for Customer Billing
Customer Class Templates group default values and determine the default pricing for new customers. Ship To Class Templates are selected when creating new customer accounts to fill up most of the information of the customer.
Note that Connected Busines includes default customer class template for each country and business type. You can modify the default class templates or create a new one depending on your needs.
- After creating the default details for customers (e.g. customer types) can now group the details by customer class templates. Below is a representation of how customer class templates are set up:
- Set up Customer Class Templates. Go to theCustomer Module > Customer > Customer Class Templates to bring up theCustomer Class Template form.
Customer Class Templates
General
Class Code
e.g. California Business Customer Class
Description
e.g. California Business Customer Class
Setup
Country
e.g. United States of America
Currency Code
e.g. USD
Credit Limit
e.g. 15000
Default Price
e.g. Wholesale
Pricing Method (select one from the options)
If Price List,
Indicate the price list
If Markup on last Cost Price,
Indicate the markup percent to add to the cost e.g. 10%
If Last Price Paid,
The last price paid for the same item is used.
If None,
The default wholesale and retail price is used.
Discount Type (select one from the options)
If Overall Discount%
Indicate the overall discount e.g. 5%
If Discount Band
Indicate the category band discount e.g. Members Only Discounts and Specials
Source
e.g. Sales Rep
Sales Rep Group
e.g. California Sales Dept
Commission (if commission will be based on customer accounts, select from the options)
e.g. Sales Rep
If Sales Rep,
The commission will be based on the commission option from the sales rep.
If Customer,
Indicate the commission percent based on the customer e.g. 10%
If Default,
The commission option will be based on the commission option from the item.
Head Office
Rank
Team Description
e.g. Sales
Territory
e.g. California
Customer Type
e.g. Sporting Goods Retail Businesses
Is Save CC details
Yes / No
Accounts
GL Class Template
e.g. Sporting Goods Retail Business GL Class
Options
Is Active?
Yes
Is Credit Hold?
Yes / No
Is Allow Back Order?
Yes / No
Is Web Access?
Yes / No
Product Filter
Template
Assign Ship To Class Templates and Customer Class Templates by Country or Postal Code
Ship to class templates and customer class templates can be assigned to the country or postal code. You can also create a “class template rule” where you can specify whether a class template is applied to all the postal codes within the same state or county. This is especially used when assigning the tax schemes to specific a specific are e.g. city or province without having to assign to each postal code.- There are two ways to assign class templates:
- By Country:
By default, the class templates are assigned per country so that when the country is selected, the class templates will be filtered by country. Selecting the business type will filter the class templates further by country. Selecting the business type will filter the class templates further by business type e.g business or consumer. Connected Business includes default class templates assigned to each country. You can change these class templares with the new ones you defined. To do this, go to the System Manager Module > Setup > Country to bring up the Country list. Select the country from the list to view the details in the Details tab. Change the class templates for business or retail customers within the selected country.
- By Postal Code:
You can set the system to get the class templates from the postal codes. For this, you will have to set the country to prioritize the class templates from the postal code. To do this, open the Country list and check the option, Prioritize Postal Code. Then, open the postal code by going to System Manager Module > Setup > Postal Code. Select the postal code from the list to view its details in the Details tab. Then, assign the class templates to the postal codes. To create a class template rule, select any postal code in the list and go to the Class Template Rule tab.
Below is an example of how to assign the same class templates to all postal codes to any county within the state of California:General
Country
State
County
Ship To Class Template
Customer Class Template
Wholesale
Retail
Wholesale
Retail
USA
California
Any
California B2B Ship To Class Template
California B2C Ship To Class Template
California B2B Customer Class Template
California B2CCustomer Class Template

- By Country:
Set Up Customer List
Import Customer List
This task is for those who want to import their list of customers. Importing is the easiest way to create customers especially if you have your existing customer list.
To complete this task, do the following:
- If you are using any business or inventory software prior to Connected Business, you can collect the customer list and have them either printed or exported into file – Excel, CSV, HTML or XML formats.
- You will need to format the list into a template used by Connected Business. You can import your list in Excel, CSV or HTML format.
- Create an import template of your customer list or restructure your existing list into an import template used by Connected Business.
- When ready to import, go to theSystem Manager Module > Import to bring up theImport Wizard.
The column in the import files can be in any order however, the column names must not be replaced. If you will put in a lot of numbers in a column, format the column into “Text” to avoid losing the actual value.
Avoid using special symbols such as apostrophes or plus signs.
You do not need to fill up every column in the import file as the default Customer Class Template will provide the details for it. You may need to check the default ship to class templates and customer class templates and make changes when needed. - Use the Next buttons to move from each step to the next.
- Click on the ellipsis button in the Source Path field or click on the Add Files button. Then, browse for the import file and select. Make sure that the file is not opened or in use.
- Select Customer as the Destination Table. This indicates the table in the database that the imported data will be placed.
- Click Next to go to the next page and click on the Import button to start importing. The wizard will warn you of the problems that may occur during the import. If the import failed, refer to the Import Log to know which columns or rows you may need to check. You can also save the import log for reference.
- If the import was a success, continue to the last step of the wizard and click Finish to exit.
- Check for the customers you have imported. Go to the Customer Module > Customer > Find Customer.
Create New Customers Using the New Customer Wizard
To complete this task, do the following:
Create a New Customer With The Same Billing and Shipping Information
This task is for those who want to set up their customer list by setting up each customer detail.
- Go to Customer Module > Customer > New Customer to bring up the New Customer Wizard.
- Create a new customer with same billing and shipping information
- From the first page of the New Customer Wizard, select the option, Create New Customer with the Same Billing and Shipping Information.
- Enter the customer name and full name of its primary contact.
- Select the customer business type – if business or customer.
- The default country is selected. Enter the postal code of the customer location. The country and postal code will filter the customer class templates.
- Select the class template to use.
- From the first page of the New Customer Wizard, select the option, Create New Customer with the Same Billing and Shipping Information.
- Provide billing and shipping information
- In the Setup tab, you will find that most of the fields are already filled in by the class template.
- Add the customer address and contact information.
- Change the default details filled in by the class template as necessary.
- In the Setup tab, you will find that most of the fields are already filled in by the class template.
- Provide default contact information
- In the Default Contact tab, you will find that the information you entered in the previous page was copied onto this tab. Provide theContact Name and modify the details as necessary.
- In the Default AP Contact tab, you will find that the information you provided in the Contact tab was copied onto this tab. Provide the AP Contact Name and modify the details as necessary.
- In the Default Contact tab, you will find that the information you entered in the previous page was copied onto this tab. Provide theContact Name and modify the details as necessary.
- Provide beginning balance information
- In the Beginning Balance tab, you can enter the customer opening balances. You can enter opening invoice or credit balances of the customer. You can skip this step and enter opening balances of customers later using the Opening Balance option.
You can skip this step and update the customer opening balances using the Opening Balance option or importing.
- In the Beginning Balance tab, you can enter the customer opening balances. You can enter opening invoice or credit balances of the customer. You can skip this step and enter opening balances of customers later using the Opening Balance option.
- Finish or Add New
- From the last page of the New Customer Wizard, you can either finish the setup by clicking or create a new customer by clicking on the Add New option.
- From the last page of the New Customer Wizard, you can either finish the setup by clicking or create a new customer by clicking on the Add New option.
Create a New Customer With Different Billing and Shipping Information
- From the Customer Module, go to Customer > New Customer. The New Customer Wizard will display.
- Create a new customer with different billing and shipping
- From the first page of the New Customer Wizard, select the option, Create New Customer with Different Billing and Shipping Information.
- Enter the customer name and full name of its primary contact.
- Select the customer business type – if business or consumer.
- The default country is selected. Enter the postal code of the customer location. The country and postal code will filter the customer class templates.
- Select the class template to use.
- From the first page of the New Customer Wizard, select the option, Create New Customer with Different Billing and Shipping Information.
- Provide the billing information
- In the Setup tab, you will find that most of the fields are already filled in by the class template.
- Add the customer billing address information and modify the values filled in by the class template.
- Change the default details filled in by the class templates as necessary.
- In the Setup tab, you will find that most of the fields are already filled in by the class template.
- Provide the default contact information
- In the Default Contact tab, you will find that the information you entered in the previous page was copied onto this tab. Provide the Contact Name and modify the details as necessary.
- In the Default AP Contact tab, you will find that the information you provided in the Contact tab was copied onto this tab. Provide the AP Contact Name and modify the details as necessary.
- In the Default Contact tab, you will find that the information you entered in the previous page was copied onto this tab. Provide the Contact Name and modify the details as necessary.
- Enter beginning balances
- In the Beginning Balance tab, you can enter the customer opening balances. You can enter opening invoice or credit balances of the customer. You can skip this step and enter opening balances of customers later using the Opening Balance option.
- In the Beginning Balance tab, you can enter the customer opening balances. You can enter opening invoice or credit balances of the customer. You can skip this step and enter opening balances of customers later using the Opening Balance option.
- Provide the shipping information
- In the Setup tab, you will find most of the fields are already filled in by the ship to class template.
- Add the customer shipping address and contact information.
- Change the default values filled in by ship to class template as necessary.
- In the Setup tab, you will find most of the fields are already filled in by the ship to class template.
- Provide the shipping default contact information
- In the Default Contact tab, you will find the information you provided in the Setup tab was copied onto this tab. Provide the Contact Name and modify the details as necessary.
- In the Default Contact tab, you will find the information you provided in the Setup tab was copied onto this tab. Provide the Contact Name and modify the details as necessary.
- Finish or create new
- From the last page of the New Customer Wizard, you can either finish the setup by clicking Finish or create a new customer by clicking on the Add New option.
- From the last page of the New Customer Wizard, you can either finish the setup by clicking Finish or create a new customer by clicking on the Add New option.
Create New Customer Shipping Information
- From the Customer Module, go to Customer > New Customer. The New Customer Wizard will display.
- Create new shipping information
- From the first page of the New Customer Wizard, select the option, Create A New Customer Shipping Information.
- Select the customer from the list. Then enter the full name of the primary contact of the shipping address.
- The default country is selected. Enter the postal code of the ship to location. The country and postal code will filter the ship to class templates.
- Select the ship to class template to use.
- From the first page of the New Customer Wizard, select the option, Create A New Customer Shipping Information.
- Provide the setup information
- In the Setup tab, you will find that most of the fields are already filled in by the ship to class template.
- You can choose to change the ship to class template or copy information from another ship to.
- Add a ship to name and address information. Modify the information provided by the class template or the ship to you copied if necessary.
- In the Setup tab, you will find that most of the fields are already filled in by the ship to class template.
- Provide the default contact information
- In the Default Contact tab, you will find that the information you entered in the previous page was copied onto this tab. Provide the Contact Name and modify the details as necessary.
- In the Default Contact tab, you will find that the information you entered in the previous page was copied onto this tab. Provide the Contact Name and modify the details as necessary.
- Finish or create new
- From the last page of the New Customer Wizard, you can either finish the setup by clicking Finish or create a new customer shipping by clicking on the Add New option.
Update the Customer Outstanding Balances
Update Customer Outstanding Opening Balances and AR Accounts
To complete this task, do the following:
- Have your previous Accounts Receivable reports ready.
- Consider the following before creating opening customer balances:
- Check if there were entries created against the AR and Opening Balance (Equity) or if these accounts were updated by importing balances.
- Creating customer opening balances will update the AR and Opening Balance accounts.
- Check if there were entries created against the AR and Opening Balance (Equity) or if these accounts were updated by importing balances.
- Decide if you will update customer opening balances manually or import them.
Update Customer Opening Balances Manually
- Go to Customer Module > Setup > Opening Balances to bring up the Opening Balance form.
- Select the customers that you will enter opening balances for.
- Indicate the type of opening balance – if outstanding invoice or credit (any overpaid amount, chargebacks or received payment for returned items).
- Indicate the date of the opening balance. It is ideal to put the actual invoice date to track the aging properly.
- You can optionally add document references such as the Customer PO number or Alternate Order number.
- Indicate the opening balance amount.
You can enter opening balance amount for each invoice or enter the total amount of all outstanding invoices. However, when entering the total amount, the aging of the outstanding balances will not be tracked separately.
- Specify the payment term of the opening balance invoice.
Below is an example of how customer opening balances are created:
Customer Opening Balances
Customer
Type
Opening Balance Date
Total
Payment Term
Currency
e.g. Rick’s Sports Shop
e.g. Invoice
e.g. actual invoice date
e.g. $200
e.g. NET30
USD
- Review the AR account balances. Print the customer opening balance report. Go toCustomer Module > Reports Center to bring up theReports Center window. Click on theReports folder from the tree list and click on theCustomer Opening Balance Report. The preview of the report will be displayed. Click on the Print button to print the report.
![]()
Import Customer Opening Balances
This task is for those who want to import their customer opening balances.
- If importing your customer opening balances, you will need to format the list into a template used by Connected Business. You can import your list in Excel, CSV or HTML format. Then, use the Import option in the System Manager Module.
- If you are using any business or order processing software prior to Connected Business, you can collect the latest accounts receivable report and have them either printed or exported into file – Excel, CSV, HTML or XML formats.
- Create an import template of your customer opening balances or restructure your existing opening balances list into an import template used by Connected Business. You will need to format the list into a template used by Connected Business. You can import your list in Excel, CSV or HTML format.
- When ready to import, go to the System Manager Module > Import to bring up the Import Wizard.
- Use the Next buttons to move from each step to the next.
The column in the import files can be in any order however, the column names must not be replaced. If you will put in a lot of numbers in a column, format the column into “Text” to avoid losing the actual value.
The values for the opening balances will be imported in the customer’s currency e.g. USD so there’s no need to indicate the currency symbol. Avoid using special symbols such as apostrophes or plus signs. - Click on the ellipsis button in theSource Path field or click on theAdd Files button. Then, browse for the import file and select. Make sure that the file is not opened or in use.
- Select CustomerOpeningBalances as the Destination Table. This indicates the table in the database that the imported data will be placed.
- Click Next to go to the next page and click on the Import button to start importing. The wizard will warn you of the problems that may occur during the import. If the import failed, refer to the Import Log to know which columns or rows you may need to check. You can also save the import log for reference.
- If the import was a success, continue to the last step of the wizard and click Finish to exit.
- Review the AR account balances. Print the customer opening balance report. Go to Customer Module > Reports Center to bring up the Reports Center window. Click on the Reports folder from the tree list and click on the Customer Opening Balance Report. The preview of the report will be displayed. Click on the Print button to print the report.
![]()
Make Adjustments to the AR Account Balances
- Should you need to add or subtract an amount from an opening balance invoice or credit (e.g. you entered the wrong value), you can do a manual adjustment to update the AR account balances. You can do either one of the following:
- Write Off Small Amounts – write off amounts that are within your approval limit. Go to the Accounting Module > Write Off to bring up the Write Off Wizard. Select the outstanding balance invoice to write off and provide a reason. The maximum amount to write off is set in the Customer Preferences.
- Apply Historical Payments or Credits – allocate payment and credits. Go to the Customer Module > Receipts > New Receipt to bring up the Receipt form. Enter the payment amount and historical date of the payment and save. Select the opening balance invoice to apply the payment to (e.g. OBC-000001). Apply available credits by clicking on the Apply Credits link.
- Create an aAdustment Entry - You can create and adjustment entry that will add or deduct an amount to the AR account. To do this, go to the Accounting Module > Journal > New Journal to bring up the Journal form. Below is an example of how an amount is deducted from the AR account:
Journal Entry
Account Code
Debit
Credit
Description
Opening Balance
$30
$0
To correct the AR account balances
Accounts Receivable
$0
$30
- Write Off Small Amounts – write off amounts that are within your approval limit. Go to the Accounting Module > Write Off to bring up the Write Off Wizard. Select the outstanding balance invoice to write off and provide a reason. The maximum amount to write off is set in the Customer Preferences.
![]()
Configure Order Settings
Configure Settings for Order Processing
To complete this task, do the following:
- Go to the Customer Module > Setup >Preferences > Preference to bring up the Preferences form. In the Sales section of the Preferences form, you will find several options:
Sales Preferences
Stock / Order Quantity
Confirm when ordered quantity is less than the available quantity
Yes = you will be warned if the ordered quantity you entered is less than the available quantity
No = you would be able to enter an ordered quantity for an item regardless if it has no available tock
Ignore stock levels on allocation
Yes = the system will ignore the stock level in the location and would result in a negative stock quantity
Pricing
Display pricing scheme message
Yes = a message will appear upon entering items in the order to let you know what pricing scheme is used e.g. promotional price for each item line.
No = no message
Conversion
Consolidate orders
Yes = multiple sales orders can be converted into once invoice
No = you can only convert one sales order into an invoice
Off pop-up message on SOP conversion
Yes = messages to confirm conversion of sales order to invoice will not be displayed
No = message will appear to confirm sales order to invoice conversion
Auto-close source form on conversion
Yes = the Sale Order form will close after converting the sales order into an invoice
No = the Sales Order form will remain open after converting the sales order into invoice S
![]()