Create New Custom Tables
|
Content
|
|---|
You can create completely new tables (or forms) in a module of Connected Business using the Data Dictionary. In creating new tables in Interprise Suite, you will need to define properties for each column or field included in the new table and set whether the field would be the primary key.
Steps
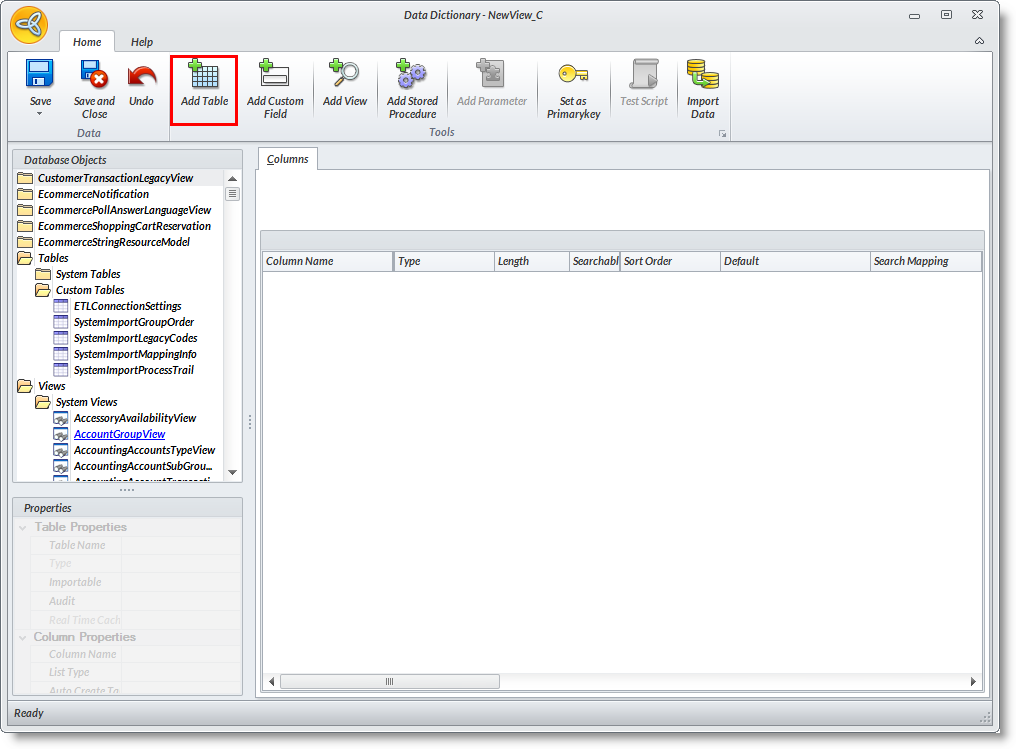
- Go to the System Manager module.
- Select Customize > Data Dictionary button from the menu. The Data Dictionary form will display.
- Select Add Table button from the menu. The new table (Table1_C) is created under the Custom Table folder. All new tables created will be listed here.
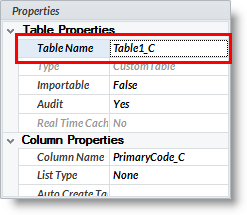
- To rename the new table, make sure the table is selected. In the Properties Pane, enter the new table name in the Table Name line.
- You may add multilingual description for the new table. In the Multilingual Properties section, type in the multilingual description of the table in the Display Label line. Select the language in the Language line to save the display name in this language.
- Click on the Save option to save the multilingual description. Repeat the steps for other languages.
- You can optionally add a bubble help text in the Bubble Help line.
- In the Columns tab, you will notice predefined columns. You may modify the column field properties, delete or add new columns. To add new columns to the table, make sure the table is selected in the Data Dictionary Objects List.
- Click on the Add Column button in the menu or from the Data Dictionary Objects list, right-click and select Add Column.
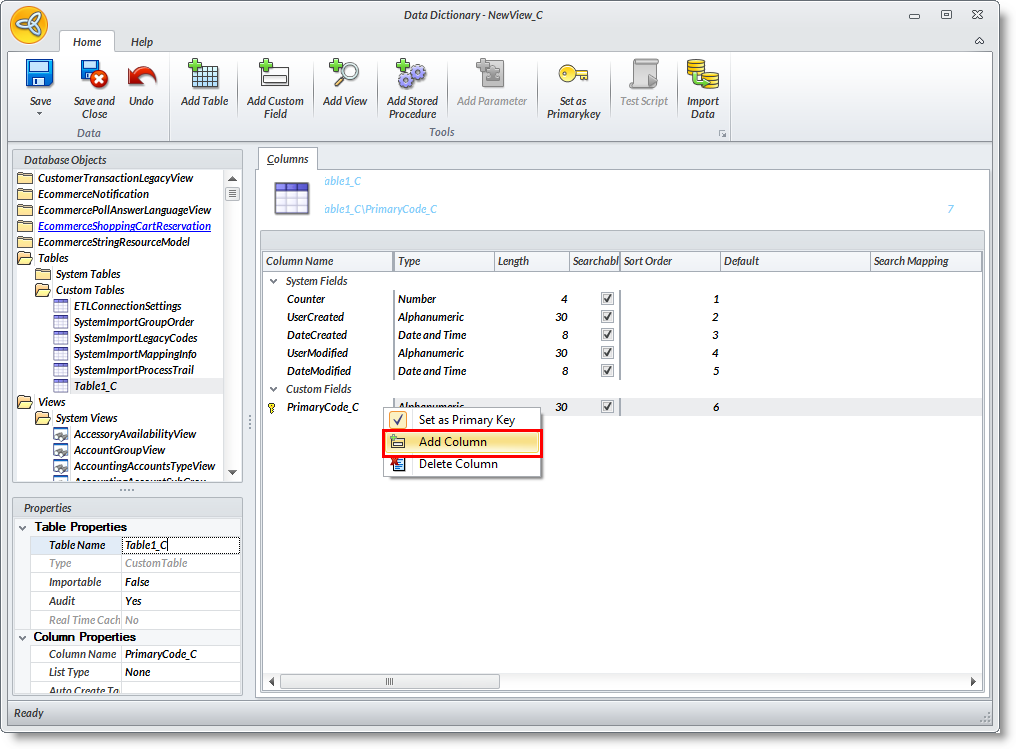
- The New Custom Field Wizard will display.
In this example, the following fields are created:Sample Column Name
Sample Value
AssociatedCompanyName Display Name – Associated Company Name
Type - Alphanumeric
Default – leave blank
Length – use default
Scale, Precision – use default
Options – Required, Searchable, Show on List, Show on Class, VisibleNote: Right-click and Set as Primary Key
BusinessType Display Name – Business Type
Type – Alphanumeric
Default – leave blank
Length – use default
Scale, Precision – use default
Options – Nullable, Searchable, Show on List, Show on Class, VisibleFounded Display Name – Founded
Type - Date
Default – getdate (to set the current system date)
Length – use default
Scale, Precision – use default
Options – Nullable, Searchable, Show on List, Show on Class, VisibleCapital Display Name – Capital
Default – 0
Length – use default
Scale, Precision – use default
Options – Nullable, Searchable, Show on List, Show on Class, VisibleNumberofEmployees Display Name – Number of Employees
Default – 0
Length – use default
Scale, Precision – use default
Options –Nullable, Searchable, Show on List, Show on Class, Visible - Continue adding new fields as desired.
- In the Columns tab, you can refine settings for each column from the Properties pane e.g. hide the predefined columns (e.g. Counter, UserCreated, UserModified).
- In the Properties pane, you may modify other column properties or add a multilingual description. To modify a column or field property, select the column in the Columns list. The column properties would display in the Properties Pane.
- Select fields to set as primary key. To set the column as primary key, right-click on the column in the Columns tab and select Set as Primary Key button.
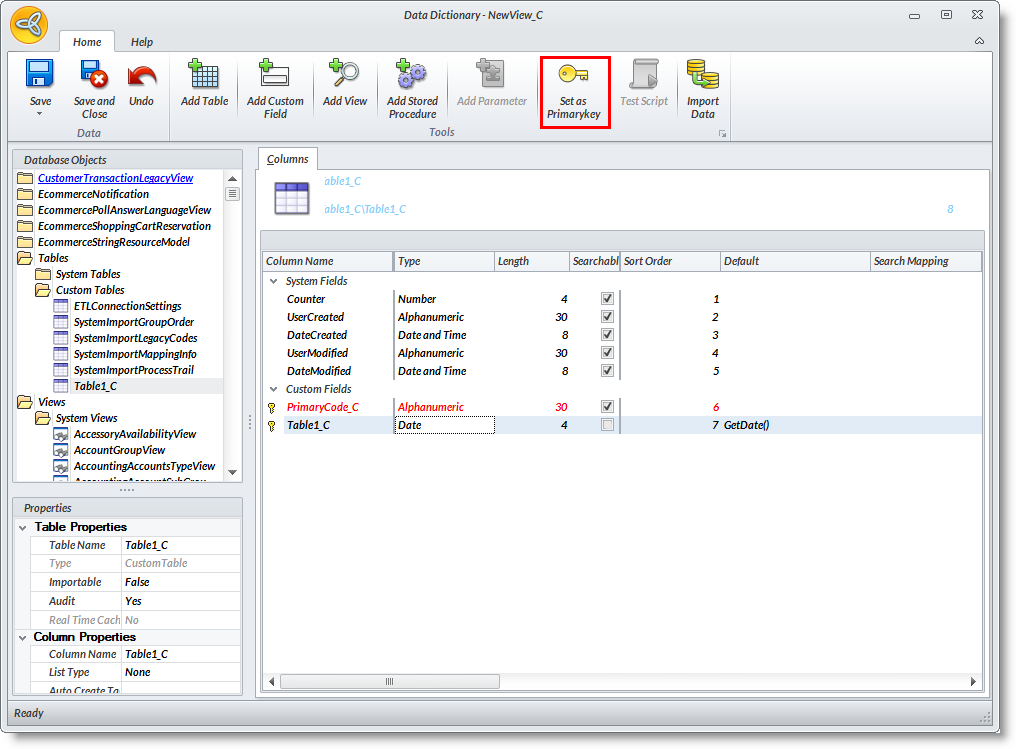

Primary keys can be a column or a collection of columns that are selected to be unique identifiers for the record e.g. CustomerCode in the Customer table (form or view). At a minimum, the primary key should be unique to the table (form or view) it belongs to, should be required and must be non-null.
- Save the changes in the data dictionary before closing.
![]()
ASSIGN A CUSTOM TABLE TO CONNECTED BUSINESS MENU
- From the System Manager, select Customize > Role. The user role search screen will display.
- Select the user role in the list to modify. The User Role form will display.
- In the Selected Modules List, drill down on the module to display the module in "Layout Mode".
- Select a menu folder e.g. Setup and right click to view the options.
- Select New Menu Item. A menu item will be added to the menu folder.
- Rename the new menu item by right-clicking on it and selecting Rename. In the Multilingual Description window, type in the description for each selling language used in Interprise Suite.
- To assign the custom table created earlier, right-click on the new menu item and select Assign Custom Table. A list of custom tables will display.
- In the custom table list, select the custom table created earlier and click OK.
- You can test the custom table by double clicking on the menu item.
To DELETE a Custom Table, select a field in the Database Objects List. Click on View > Custom View. Right click on the custom view in the list and select Drop View. Choose Yes in the prompt to drop the database object.
SEE ALSO:
Create Custom Table through the Data Dictionary Add in in MS SQL Server
![]()