Set Up Inventory and Pricing Discount Schemes
| CONTENT |
|---|
In this process, you will be setting up the various prices that you implement in your products and services.
Connected Business supports a variety of pricing methods – wholesale and retail, multi-level pricing, price lists, promotional/ seasonal pricing, discount coupons, and select customer pricing.
At the end of this session, users will set up the default wholesale and retail pricing and apply special pricing and discount schemes.
Update the Retail and Wholesale Pricing
Default Wholesale or Retail refers tothe regular wholesale or retail pricing. You can update the wholesale and retail pricing for specific items or you can use the Update Item Pricing Wizard to update the wholesale and retail pricing in a batch or import your recent wholesale/retail price list.
Set Up Default Details
To complete this task, do the following:
Update the Wholesale and Retail Price of Specific Items
- Let’s say you need to update the wholesale or retail price for just one item, to do this, go to the Inventory Module > Item > Find Item to bring up the Item Detail form.
- Go to the Pricing Tab. Update the wholesale or retail price. Change the markup values or percent or directly change the wholesale or retail price.

To update the pricing for matrix items, update the pricing for the matrix group then choose to apply the changes to the matrix items.
Update the Retail Price for Several Items
- Let’s say you need to update the wholesale or retail price for several items, to do this, go to Inventory Module > Pricing > Item Pricing > Wholesale or Retail.
- By default, the retail price will be updated for the home currency e.g. in USD and it will be applied to other currencies.
- Filter the items to update by entering a starting item in the Item From field and the ending item in the Item To field and click on Apply.
- From here, you can change the pricing method used for the item. Take note that in changing the pricing method, you will need to update the retail price too.
- Update the wholesale or retail price for the filtered items. Change the markup value or percent or directly change the wholesale or retail price.
Batch Update Wholesale / Retail Price
To complete this task, do the following:
- Let’s say you need to update pricing for a batch of items, for this, you can use the Item Pricing Wizard (Inventory Module > Pricing > Item Pricing > Item).
- On the first page, you will be asked to specify the location and define a filter. You can filter items using different criteria (e.g. Category or Item Type).
- On the next page, the items are listed according to the filter you specified. You can change the values directly from this list or you can export this list into a spreadsheet file and update the pricing from there. Then, go back to the Item Pricing Wizard and import the updated list.
You may only change the values in the Pricing Cost (base cost), Wholesale Price, Retail Price and Suggested Retail Price columns.
- Click next to start the update.
![]()
Set Up Price List / Multi-Level Pricing
Price List is a pricing scheme that applies a discount percent or marked down price on a specified price level. You can define the price levels for each item or import an existing spreadsheet of multi-level price lists.
Create Multi-Level Price List
To complete this task, do the following:
- Go to Inventory Module > Pricing > Price List to bring up the Price List form.
- Provide a label and description for the price list (e.g. Bulk Baseball Pricing).
- Set the price list to “active” status, to apply.
- Select the item from the list. In th is example, we will build a price list for a sample item, Rawlings Baseballs.
- Click on the Node button inside the Item Name column to view the other available unit measures. In this example, the item is sold in 3 different selling units – Each, Dozen and 30pc Bucket. You can create price breaks for all alternative unit measures.
- Determine the number of levels and price per level in each price break.
- Create the price levels (e.g. Level 1 – 1 to 5 will have a regular price. Anything beyond 5 will have a discount of 5%).
Below is an example of how price levels are set up:
Price List: Bulk Baseball Price
Item: Rawlings Baseball
Unit Measure 1: EACH = 1Level Min Max Pricing Method Pricing Cost Discount Unit Selling Price Net Selling Price 1 1 5 None $18 0% $22.99 $22.99 2 6 Infinity None $18 5% $22.99 $21.84
Unit Measure 2: DOZEN = 12
Level Min Max Pricing Method Pricing Cost Discount Unit Selling Price Net Selling Price 1 1 2 None $216 10% $275.88 $248.29 2 3 Infinity None $216 12% $275.88 $242.77
Unit Measure 3: 30pc Bucket = 30
Level Min Max Pricing Method Pricing Cost Discount Unit Selling Price Net Selling Price 1 1 2 None $540 15% $689.70 $586.25 2 3 Infinity None $540 17% $689.70 $572.45
You may create an unlimited number or price breaks per unit measure. You can export your price list in a spreadsheet or restucture your existing prisce list into a format used by Connected Business then use the Import Price List option to import the spreadsheet.
- Save and close when done.
You may copy the price list for similar items. To do this, create a new price list for the item and use the Copy Price List option and select the price list to copy.
![]()
Set Up Special/ Promotional Pricing
Promotional Pricing refers to special or seasonal price that may or may not have price breaks.
Apply a Promotional Pricing Over a Specified Period
To complete this task, do the following:
- Go to the Inventory Module > Pricing > Item Pricing > Promotional. Select the item in the list to bring up the Item Detail form. In this example, a promotional pricing is created for the item, Youth Baseball Fielder’s Gloves
- Upon opening the form, you are instantly directed to the Promotional tab inside the Pricing tab.
- First, select the item unit measure (e.g. Set of 6).
- Specify the duration for the promotional pricing in the Date From and Date To columns.
- Enter the special price that will apply.
Below is an example of how promotional pricing is set up:
Unit Measure Date From Date To Regular Price Special Price Set of 6 7/1/2012 7/30/2012 $169.99 $150
![]()
Customer Specific Pricing
Customer‐specific Pricing applies customer‐specific pricing and discounts to customers.
This task is for those who want to create a special pricing scheme for “select” customers.
Set Up “Select” Customer Pricing
To complete this task, do the following:
- For this task, we need to have the customer account list already set up. Customer account creation will be discussed in Set Up Customer List.
- There are two ways to choose customers for customer-specific pricing:
- Choose customers by pricing method – to filter and choose customers by pricing method, go to Inventory Module > Pricing > Customer Pricing > Customer.
- Choose a specific customer in the list – to search and select a specific customer, go to Inventory Module > Pricing > Customer Pricing > Specific Customer.
- Having chosen a customer, the Customer Detail form will display opening the Pricing tab.
- The Default Price (if Wholesale or Retail) is determined by the Customer Type (if Business or Consumer) selected for the customer. You can change the default price at anytime however, this only applies to new transactions of the customer.
- You can change the pricing method that applies to the customer’s ordered items. The options are:
- If you want to apply the regular wholesale price, leave the default Pricing Method, None.
Default Price Pricing Method Price Wholesale or Retail None Regular wholesale or retail price - If you want to apply the same markup on the last cost of any item, select the Pricing Method, Markup on Last Cost Price.
Default Price Pricing Method Sample Last Cost Markup Sample Price Wholesale or Retail Markup on Last Cost Price $169.99 10% $152.99 $29.99 10% $26.99 - If you want to apply the last price paid by the customer to the same items, select the Pricing Method, Last Price Paid. If you need to apply special pricing with price breaks for several items, you can create a Special Pricing instead.
Default Price Pricing Method Price Wholesale or Retail Last Price Paid Last price paid by the customer for the same item - If you want to apply a price list for specific items, select the Pricing Method, Price List and choose a price list in the Pricing Level field.
- You can create a customer special pricing that will run for a specified period of time. More to this, you can create a special price with price breaks for bulk orders. Below is an example of how special pricing is set up:
Unit Measure Date From Date To Unit Selling Price Special Price EACH 7/1/2012 7/30/2012 $69.99 $69.99 (no price break) DOZEN 7/1/2012 7/30/2012 $799.99 (with price break) Level Min Max Max Discount Unit Selling Price Net Selling Price 1 1 5 5% $799.99 $3799.95 2 6 Infinity 12% $799.99 $4223.94 - You can apply discount schemes that will apply to the specific customer. Discount schemes will be discussed in the next process.
![]()
Discount Schemes
Connected Business supports the following discount schemes:
- Customer Discounts - applies an overall discount percent to all customer orders e.g. Customers included in a Customer Loyalty Program can enjoy 5% discounts on all inventory items
The customer discount scheme is not applied to items that already have promotional or special pricing.
- Early Payment Discounts - calculates and applies a potential discount for early payments e.g. 5% discount if paid within 7 days.
- Category Band Discounts - applies a discount percent to a specific product category e.g. 12% discount on all items under the Clothing category
- Discount Coupons - applies discount or waives the freight charges(free shipping) when coupon code is used e.g. 5%OFFONALLSPORTING APPAREL (5% off on all sporting apparel)
- Discount Range - applies a maximum range for discounts and manager overrides e.g. ask your manager for approval when giving out discount above 50%
Set Up Early Payment Discounts in Payment Terms
This task is for those who want to apply discounts for early payments.
To complete this task, do the following:
- You can either create new or modify an existing payment term. In this example, we will create a new payment term and apply an early payment discount.
- Go to Banking > Setup > Payment > Terms to bring up the Payment Term form. Click New to create a new payment term.
- Provide the primary information for the payment term. Provide a Payment Term Code e.g. NET30 2%10 and Description (e.g. Terms 30 Days from Document Date - 2% Discount if Paid within 10 Days).
- Select the Due Type (e.g. Net Days – From Invoice Date) and enter the Term Days (e.g. 30).
- Set the Payment Type to any of the following: Credit Card, Check, Cash or Others
- In the Settlement Discount section, set up the early payment discount scheme. Select the Discount Type e.g. Percent then specify the Discountable Days e.g. 10 and the Discount e.g. 2%. Below is an example of how the discount scheme is set up:
Discount Type Discountable Days Discount Precent 10 2% - Save and close when done.
- To use this payment term, the next step is to assign it to your customers. To do this, open the customer account and set the new payment tem as their default payment term. Go to Customer Module > Find Customers > Ship To Customers Tab. Select the customer ship to from the list to display the Ship To Detail form. Change the default payment term with the new. Save the changes made to the customer. In effect, all customer invoices paid within 10 days from invoice date will be applied with the early payment discount.
Create a Category Band Discount
This task is for those who want to apply discounts to specific categories.
To complete this task, do the following:
- Go to the Inventory Module > Pricing > Discount Category to bring up the Category Discount Band form.
- Provide a Band Code (e.g. Overstock Sports Clothing) and description e.g. same as the band code.
- Select the category from the list e.g. Sports Clothing. Let’s say most of your items are assigned with more than one category.
Note that sub categories under the selected category will not be included in the band discount (e.g. sub categories - Sports Clothing and Sports Shoes will not be applied with the same discount as the parent category, Sports Apparel). If an item has more than one category that classifies it, the last category in the hierarchy should be created the discount band.
Below is an illustration of which categories to select when creating discount bands:
Category Order Parent Category - Sporting Goods
Sub Category - Sporting Apparel
Category - Sports Clothing3 2 1 - Because Sports Clothing is in the last level, we will select this category to create a category discount band.
- Then, enter the discount percent to apply to the items under the selected category. Save and close when done.
- To use this category discount band, the next step is to assign it to the customers. To do this, open the customer account and set their discount type to Band. Go to Inventory Module > Pricing > Customer or Specific Customer. Select the customer to modify to bring up the Customer Detail form. In the Pricing tab, set the Discount Type to Band and select the category band discount created earlier. Save and close the changes made to the customer. In effect, all items from this category that is bought by the customer will be applied the discount.
Discounts for “Select” Customers
To complete this task, do the following:
- Go to the Inventory Module > Pricing > Customer Pricing > Customer or Specific Customer. Select the customer from the list to bring up the Customer Detail form.
- In the Pricing tab, select the Discount Typeto apply to the customer orders. The options are:
- None – where no default discount percent applies
- Overall – where a specified discount percent applies to all customer orders. When selected, enter the overall discount percent e.g. 2% in the Discount field.
- Band – where a category band discount is applied when a customer orders an item included in the discount category band. When selected, select the category band discount in the Discount field.
- None – where no default discount percent applies
- Save and close the changes made to the customer.
Create Discount Coupons
To complete this task, do the following:
Create Compound Coupons
Compound Coupons refer to coupons that add the coupon discount to any other discount added to the order. Discounts from these coupons are compounded only for “percent on order” discounts. Below is an example computation of compounded discounts:
| Sales Price | Discount | Coupon Discount |
Compounded Discount |
| $100 | 10% from early payment or negotiated | 10% | 100 – (10% + 10%) $100-20% $100=$20 =$80 |
From the Customer Module, click on the Coupon option. A search list of coupon codes will display. Click on the New Coupon option to bring up the Coupon form. For this example, we will create 2 compound coupons where:
- Coupon 1 applies a discount percent on all customer orders.
- Coupon 2 applies a discount percent on selected customer orders with free shipping.
PART 1: COUPON THAT APPLIES A DISCOUNT PERCENT ON ALL CUSTOMERS
- Click on the New option to create a new coupon.
- Enter the coupon code (e.g. CCALL15PEROFF) and description (e.g. 15% off on all customer orders from Jul. 1 to Jul. 30 as description).
- Enter Discount Type: Percent, Discount Percent: 15% and Minimum: 1. Enter start and end dates, (e.g. Jul.1 – Jul. 30).
- SelectCompound from the options to compute coupons.
- In the Customers Tab, click on the Include All Customers checkbox. Below is an example of how the discount coupon is set up:
Coupon Code Descrioption Coupon Type Coupon Discount Applies to All Customer CCALL15PEROFF 15% off on all customer orders from Jul. 1 to Jul. 30 Compounded 15% Yes - Save the coupon when done.
PART 2: COUPON THAT APPLIES A DISCOUNT PERCENT ON SELECTED CUSTOMERS WITH FREE SHIPPING
- Click on the New button to create a new coupon.
- Enter CCSEL10PEROFFSHIPFREE as the coupon code and10% off with free shipping on selected customer orders from Jul. 1 to Jul. 30 as description.
- Enter Discount Type: Percent, Discount Percent: 10 and Minimum: 1. Enter start and end dates, (e.g. Jul.1 – Jul. 30).
- To waive the freight charges when coupon is used, click on the Discount Includes Free Shipping checkbox.
- Select Compound from the options to compute coupons.
- In the Customers tab, click on the dropdown box and group the list (e.g. by State). Select the customers you want to allow the use of the coupon. Below is an example of how the discount coupon is set up:
Coupon Code Descrioption Coupon Type Coupon Discount Applies to All Customer Free Shipping CCSEL10PEROFFSHIPFREE 10% off with free shipping on selected customer orders from Jul. 1 to Jul. 30 Compounded 10% No Yes - Save and close when done.
Create Stackable Coupons
Stackable Coupons refer to coupons that deduct any other discounts from the sales price before applying the coupon discount. Discounts from these coupons apply to both “percent on orders” and “fixed amount discounts”. Below is an example computation of stackable coupons:
| Sales Price | Discount | Coupon Discount | Stackable Discount (SP – D) + ((SP – (SP-D)) - CD%) |
| $100 | 10% from early payment or negotiated | 10% |
(100 –10%) (($100 – $100 - 10%)) – CD%) $100 – $19 = $81 |
In this example, we will create 2 stackable coupons where:
- Coupon 1 applies a fixed amount on a specified product category.
- Coupon 2 applies a discount percent on a specific item.
PART 1: COUPON THAT APPLIES A FIXED AMOUNT ON A SPECIFIED PRODUCT CATEGORY
- Enter the coupon code (e.g. SGSC15PEROFF) and description (e.g. 15$ off on all treadmills from Jul. 1 to Jul. 30 as description).
- Select Coupon Type, Products.
- Enter Discount Type: Amount, Discount Amount: $15 and Minimum: $1.
- Enter start and end dates, (e.g. Jul. 1 and Jul. 30).
Notice that you can only select Stackable from the options to compute coupon discounts. Only the stackable option is applied to “fixed amount on order coupons”.
- From the Products Tab, select Categories to filter products by category. Select Sports Clothing from the list. Below is an example of how the coupon is set up:
Coupon Code Description Coupon Type Coupon Discount Categories SGSC15PEROFF 15$ off on all treadmills from Jul. 1 to Jul. 30 Stackable 15% Sports Clothing - Save the coupon when done.
PART 2: COUPON THAT APPLIES A DISCOUNT PERCENT ON A SPECIFIC ITEM
- Click on the New option to create a new coupon.
- Enter the coupon code (e.g. PROFORM5PEROFF) and description (e.g. 5% Off On Proform Treadmill from Jul. 1 to Jul. 30).
- Select Products as the Coupon Type.
- Enter Discount Type: Percent, Discount Percent: 5% and Minimum: 1.
- Select Stackable from the options to compute coupon discounts.
- Switch to the Products Tab then select the item in the list. Below is an example of how the coupon is set up:
Coupon Code Description Coupon Type Coupon Discount Categories PROFORM5PEROFF 15$ off on all treadmills from Jul. 1 to Jul. 30 Stackable 15% Sports Clothing - Save and close when done.
Coupon codes can be used in phone-in (from the New Order option in the Customer Module), online (from the web store) and onsite (from the POS/Kiosk sales) orders.
![]()
Set Up Maximum Discounts
To complete this task, do the following:
- Go to the System Manager Module ► Accounts ► All Accounts. Select the user accounts that are given.
- In the Preferences section, you will find the options:
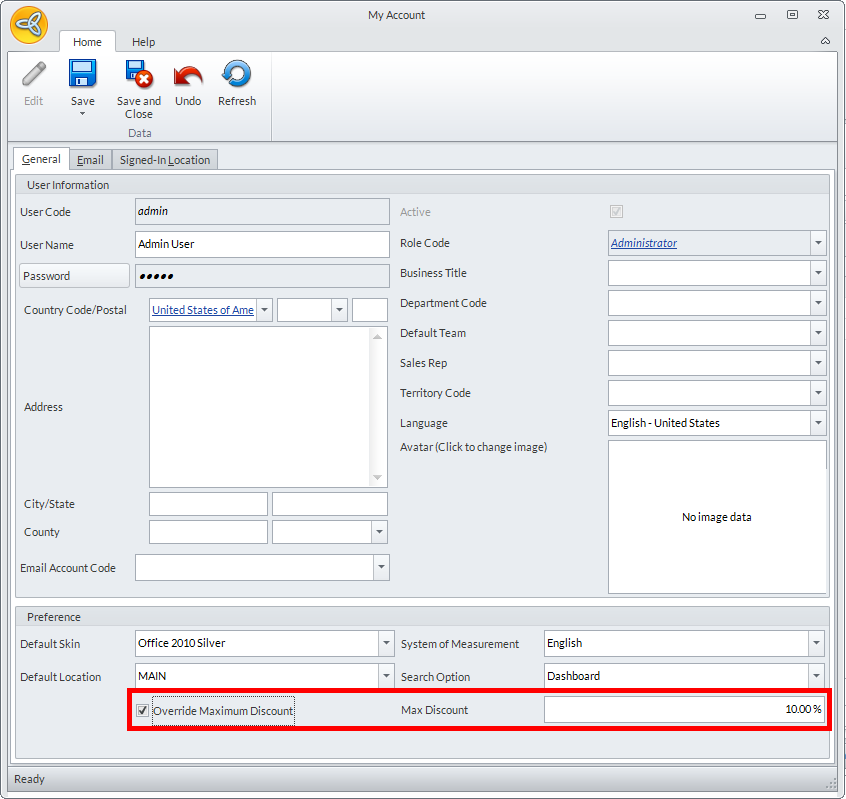
Click Image to Enlarge
- Override maximum discount – enables another user (e.g. admin user) to allow entering a discount higher than the specified maximum. When enabled, the user will have to ask for approval of his manager and when approved, the manager will have to enter his account name and password to change the discount percent.
- Order entry max discount – limits discounts entered in an order by specifying the maximum discount percent e.g. 50%
- Click Ok to save the changes.
You may also refer to Setup Maximum Discount per Item to configure wholesale and retail maximum discounts for each item.
Applying Maximum Discounts During Order Entry
- Create a new Sales Order/Sales Invoice by going to the Customer module ► Order/Invoice ► New Order/New Invoice.
- On the Sales Order/Sales Invoice form, select an item and add it on the list.
The system will not allow you to give a discount that is more than the specified maximum discount set in the User Account from the System Manager module. In this case, you will be asked for a manager override instead to give the discount.

Click Image to Enlarge
- Enter the Username and Password for the manager override. The given discount will then reflect on the order.
- You may now click Save and Close to apply the changes on the Sales Order/Sales Invoice form.
![]()