PayPal Express Checkout Payment
| Content |
|---|
In Connected Business, the PayPal option is included in the Payment Info page which works similarly to the Express Checkout button in shopping cart page. In addition, the payment type is set to credit card to make use of the PayPal credit card gateway.

To set up PayPal Credit Card Gateway, refer to Set Up PayPal Express Checkout.
Use PayPal Express Checkout
You can use the PayPal Express checkout option either from the Shopping Cart page or the Payment Info page.
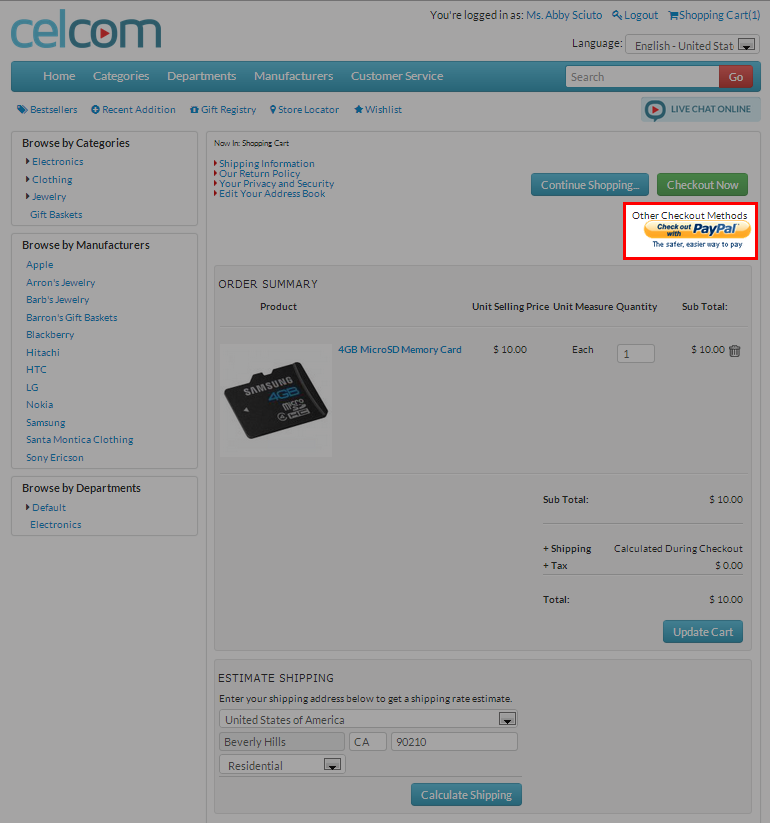
Use Paypal Express Checkout from the Shopping Cart Page
- From the shopping cart page, click on the Check Out with PayPal button and you will be directed to the PayPal page.
Click Image to Enlarge
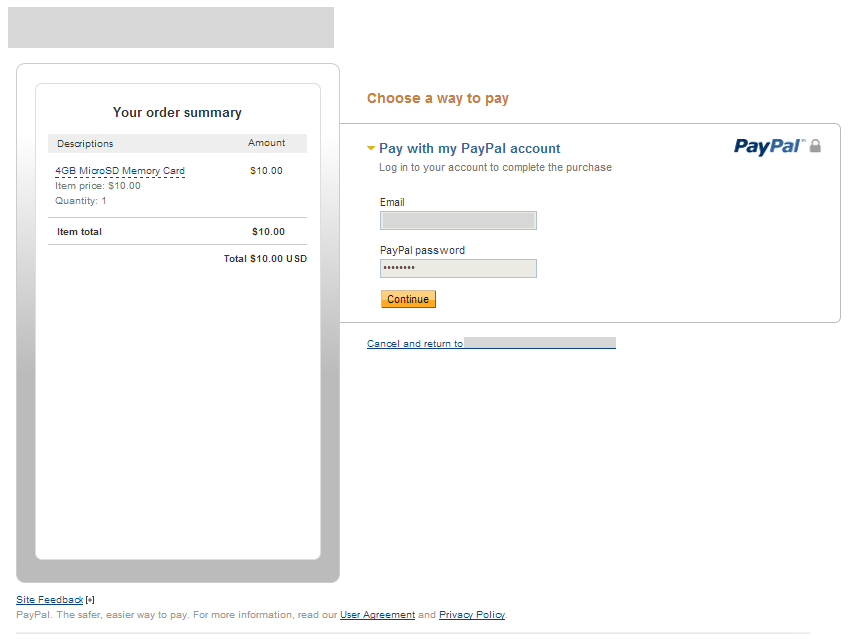
- From the Paypal login page, you will see the details of your order which include the item name, item price, quantity, and the order total in the "Your Order Summary" section of the page.
- In the Login section, enter your Paypal Email and Password.
Click Image to Enlarge
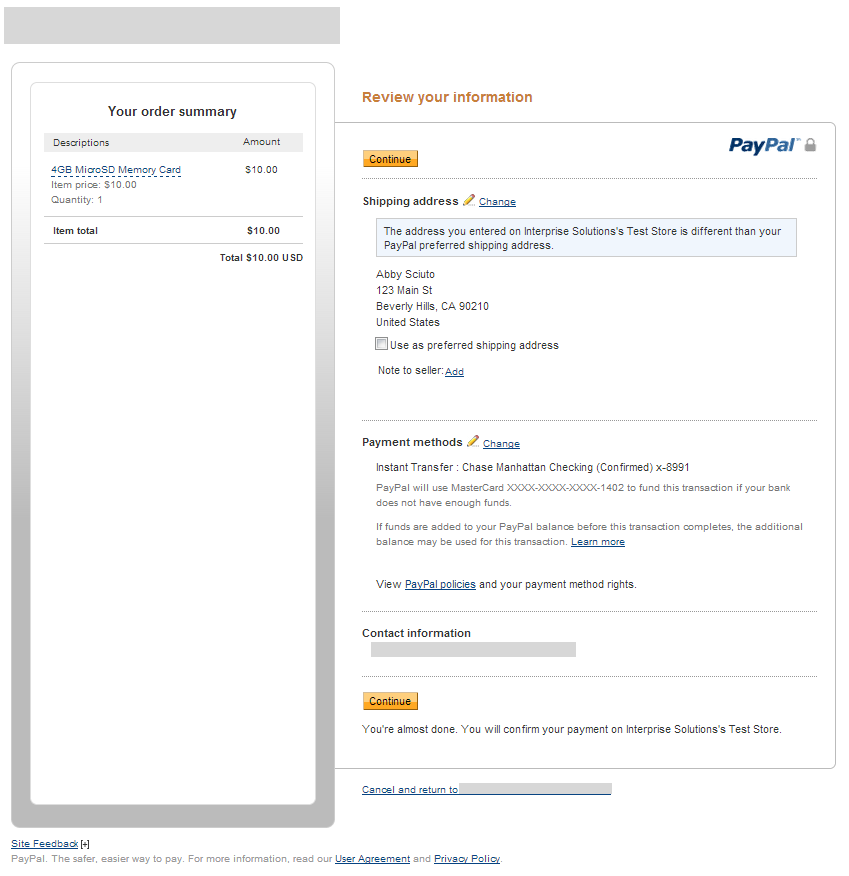
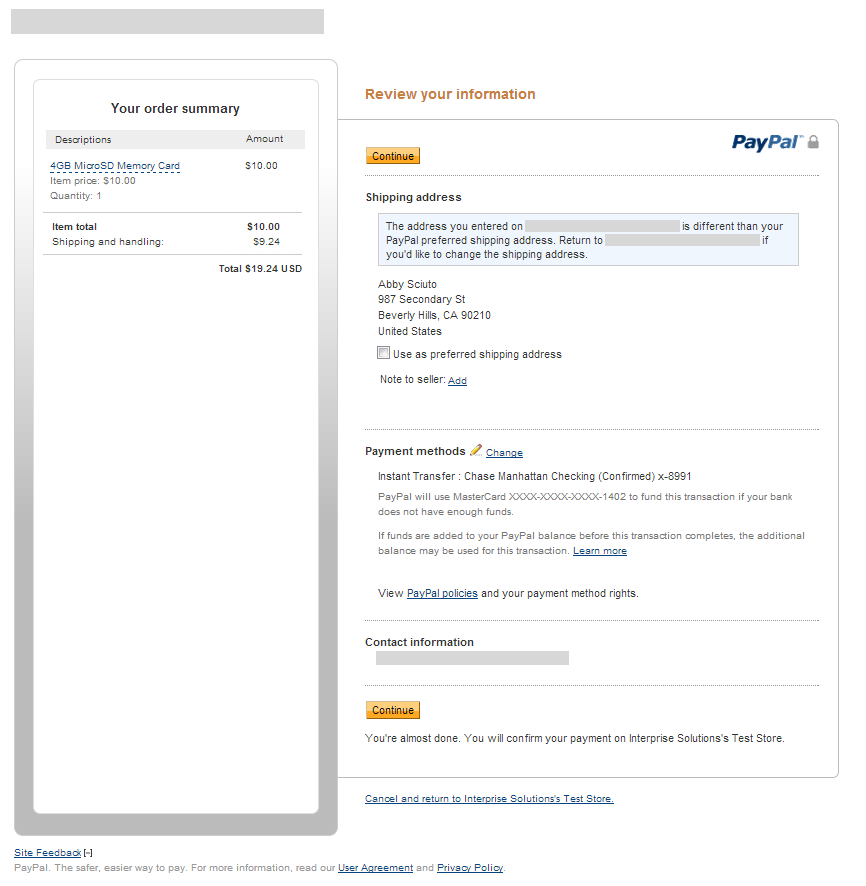
- Once logged in, you will be directed to the Review Your Information page where the details for your shipping address and payment method are displayed. You can change your preferred shipping address and payment method by clicking the Change link in the shipping and payment method section respectively.
Click Image to Enlarge
- After reviewing the information, click Continue. You will be directed back to the webstore to select your preferred shipping method, and place the order.
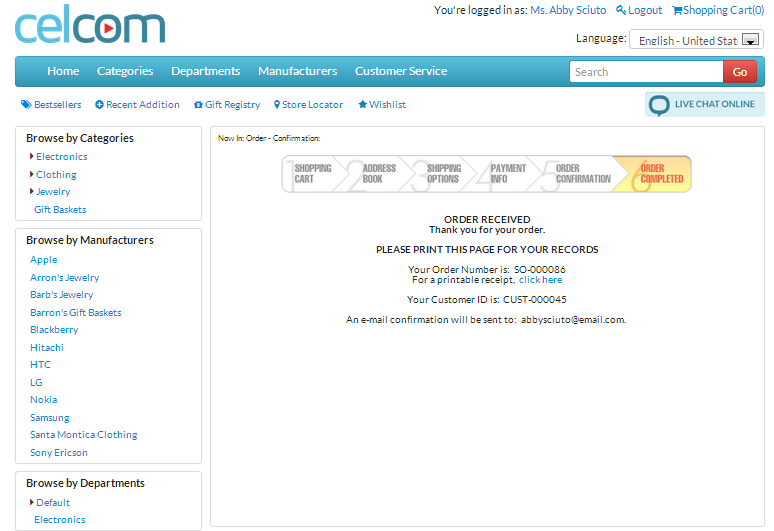
- After placing the order, an SO will be generated for processing in the Connected Business backend.
Click Image to Enlarge
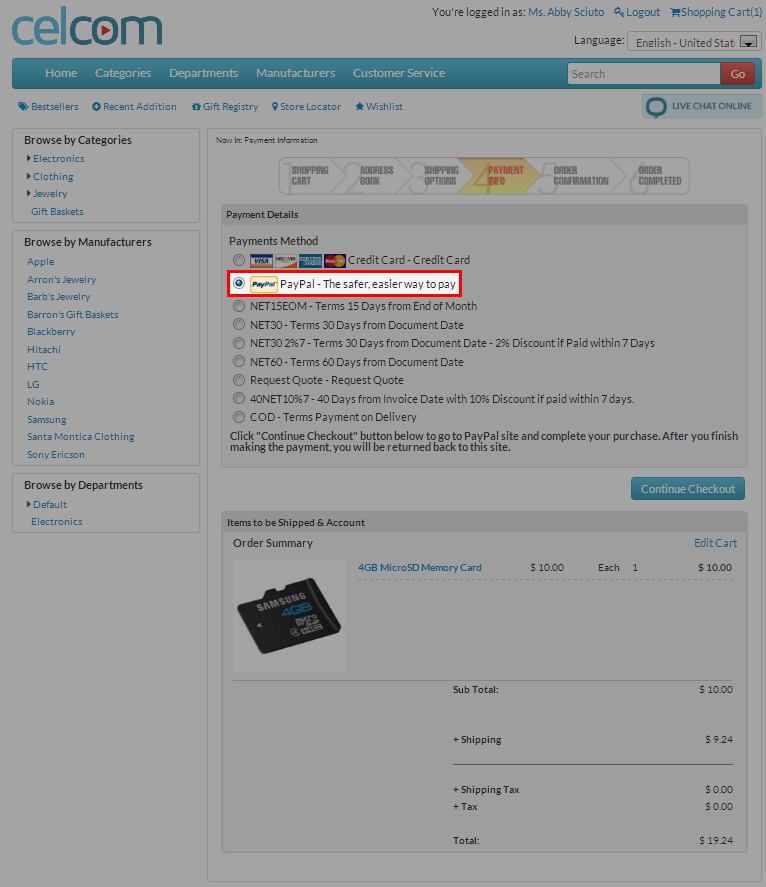
Use Paypal Express Checkout from the Payment Info Page
- From the Shopping Cart page, click Checkout Now button and you will be directed to the Shipping Options page. Select your preferred shipping method and afterwards, you will be directed to the Payment Info page.
Click Image to Enlarge
- Select "Paypal - The safer, easier way to pay" payment method and click Continue Checkout button. You will be directed to the Paypal page.
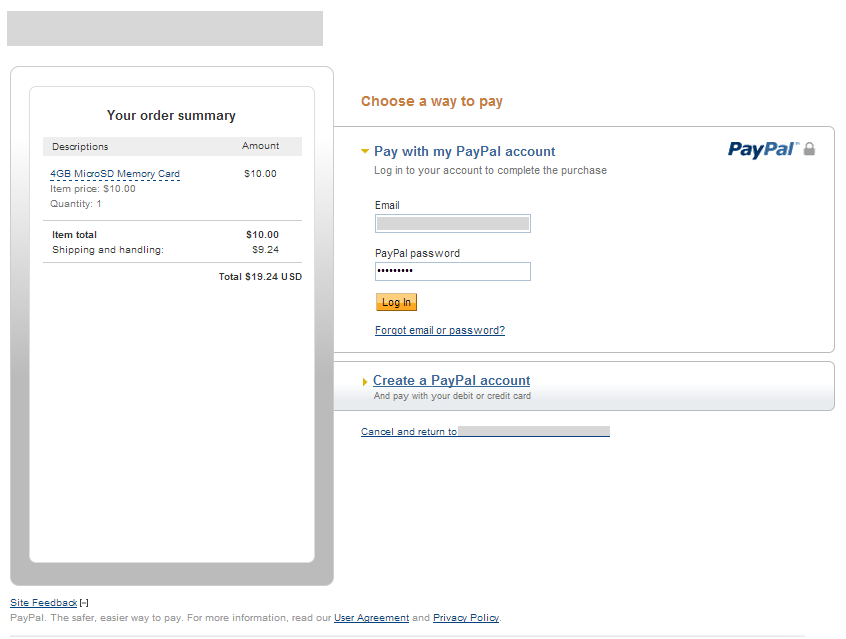
- From the PayPal page, you will see the details of your order which include the item name, item price, quantity, shipping rate, and the order total in the "Your Order Summary" section of the page.
- In the Login section, enter your Paypal Email and Password.
Click Image to Enlarge
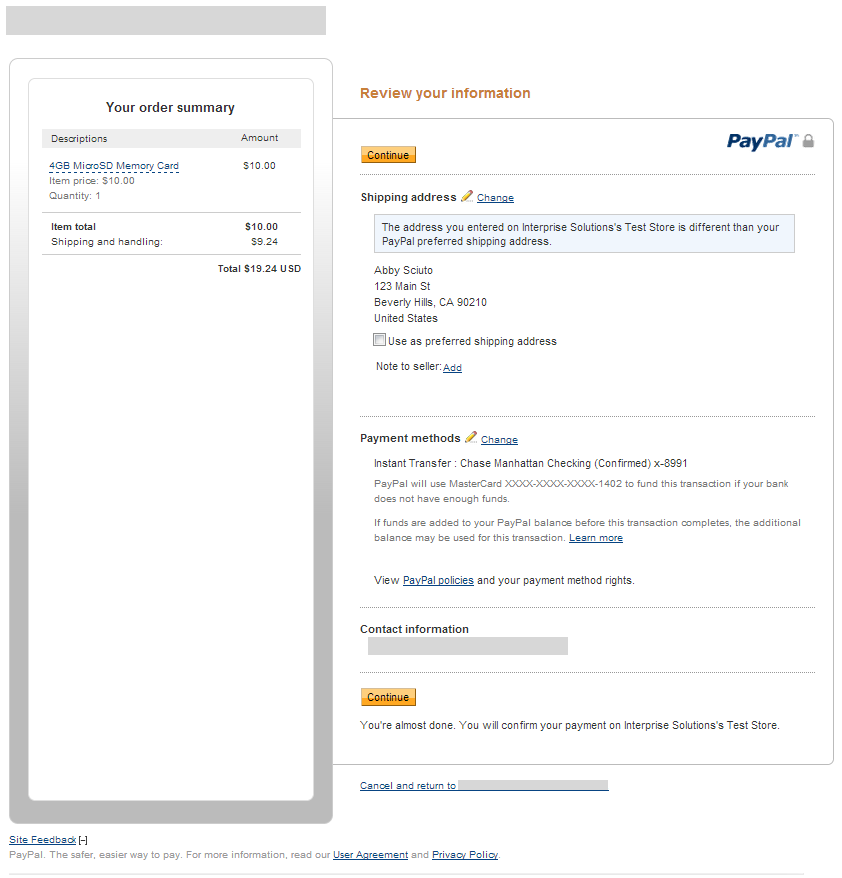
- Once logged in, you will be directed to the Review Your Information page where the details for your shipping address and payment method are displayed. You can change your preferred shipping address and payment method by clicking the Change link in the shipping and payment method section respectively.
Click Image to Enlarge
- After reviewing the information, click Continue. You will be directed back to the webstore order confirmation page to place the order.
- After placing the order, an SO will be generated for processing in the Connected Business backend.
Click Image to Enlarge
![]()
Override PayPal Address
If you want to override the shipping address stored in your PayPal account and use the address in your webstore account, follow the steps below.
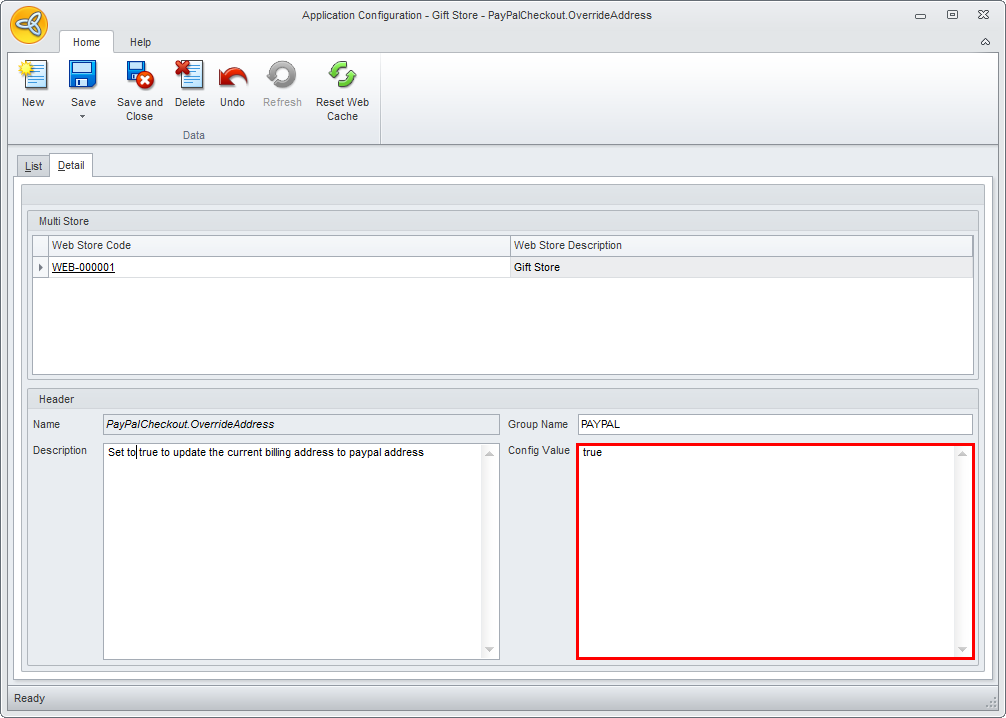
- Go to eCommerce module > Setup and select the Application Configuration option. The Application Configuration form will be displayed.
- Search for the PayPalCheckout.OverrideAddress config and set the config value to True.
Click Image to Enlarge
- Click Save and Close to apply changes.
- Place an order using PayPal Express Checkout. In your PayPal account > Review My Information page, notice that the Change link beside the Shipping address has disappeared and the default address indicated is the same as shipping address in your webstore account. A note will also be displayed indicating that the entered shipping address is different from the PayPal preferred shipping address. You can tick the Use as preferred shipping address checkbox if you want to make the currently selected address as your PayPal preferred shipping address.
Click Image to Enlarge
- Click the Continue button to be directed back to the webstore and place your order.
![]()
Process Web Orders Paid Thru PayPal Express
This section demonstrates the general workflow of processing web orders (paid thru PayPal Express) in the Connected Business backend.
Upon placing the order, the customer can check the order status in the Order Status/ History section of the Customer Profile page.
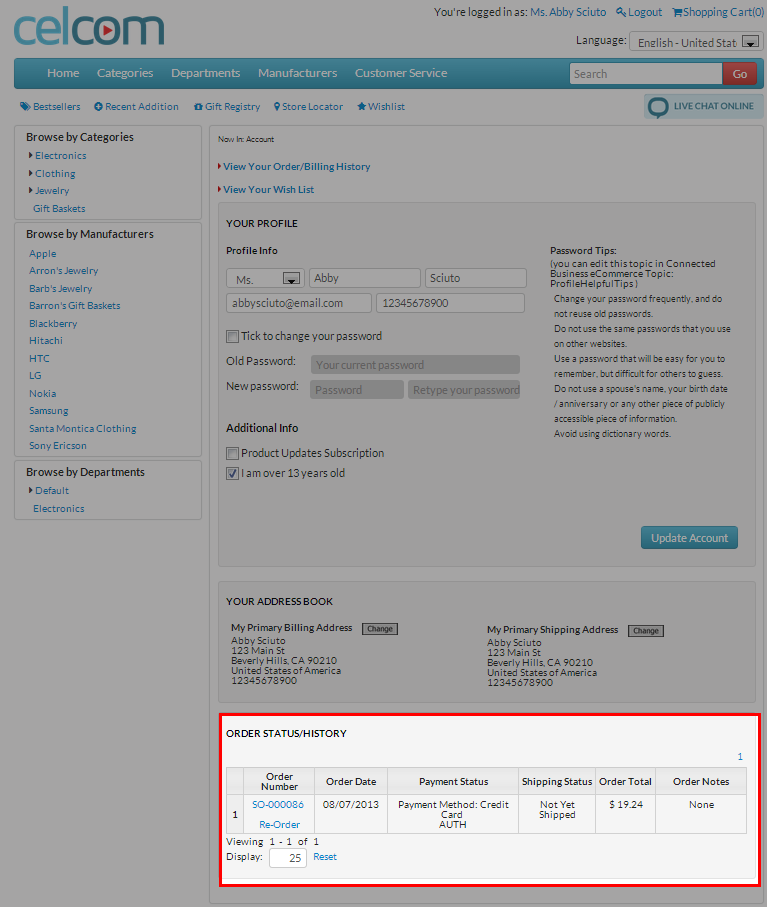
Click Image to Enlarge
Orders made in the webstore are treated as regular SO in the Connected Business backend. To find the SO, go to Customer module > Order > Find Order.
- Once the SO is generated, generate and print the shipping labels for the SO. To do this, go to the Shipping module > From SO and select the SO for the web order. The Shipment form will be displayed.

Click Image to Enlarge
- Click Get Label (F12) to generate the labels. You can also opt to print the labels once generated.
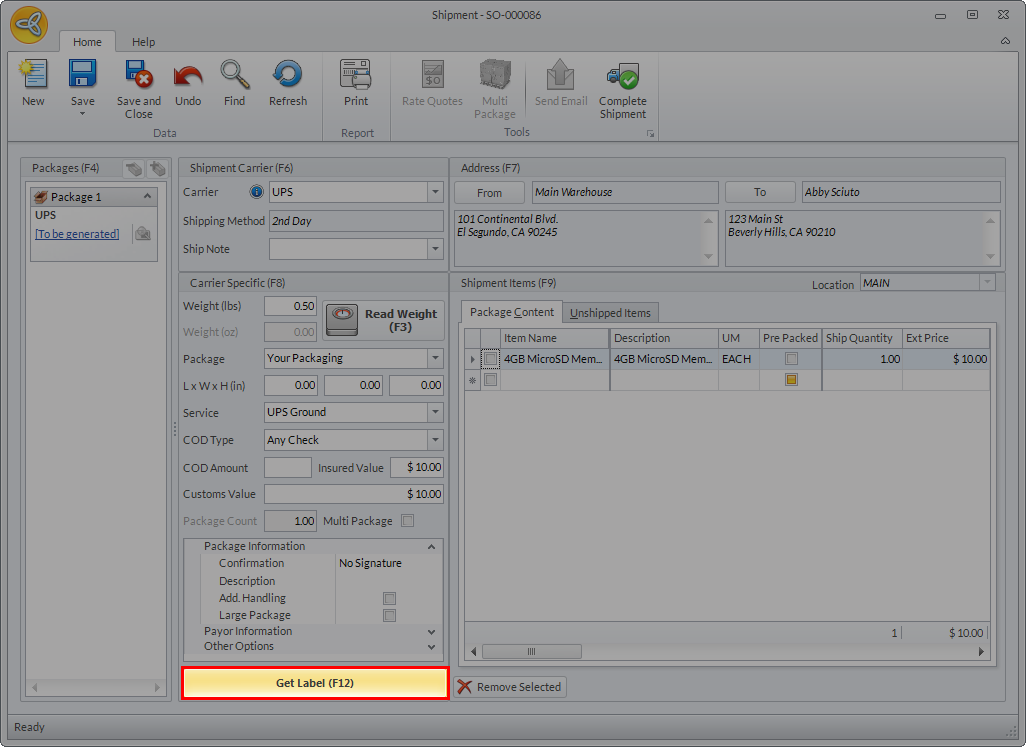
Click Image to Enlarge
In generating the shipping labels, make sure that the carrier accounts are set up correctly. Refer to Carrier Setup.
To know more about processing shipment transactions for sales orders, refer to Process New Shipment Transactions (From Sales Orders).
- Upon generating the labels, click Complete Shipment. Click Yes to complete the shipment.
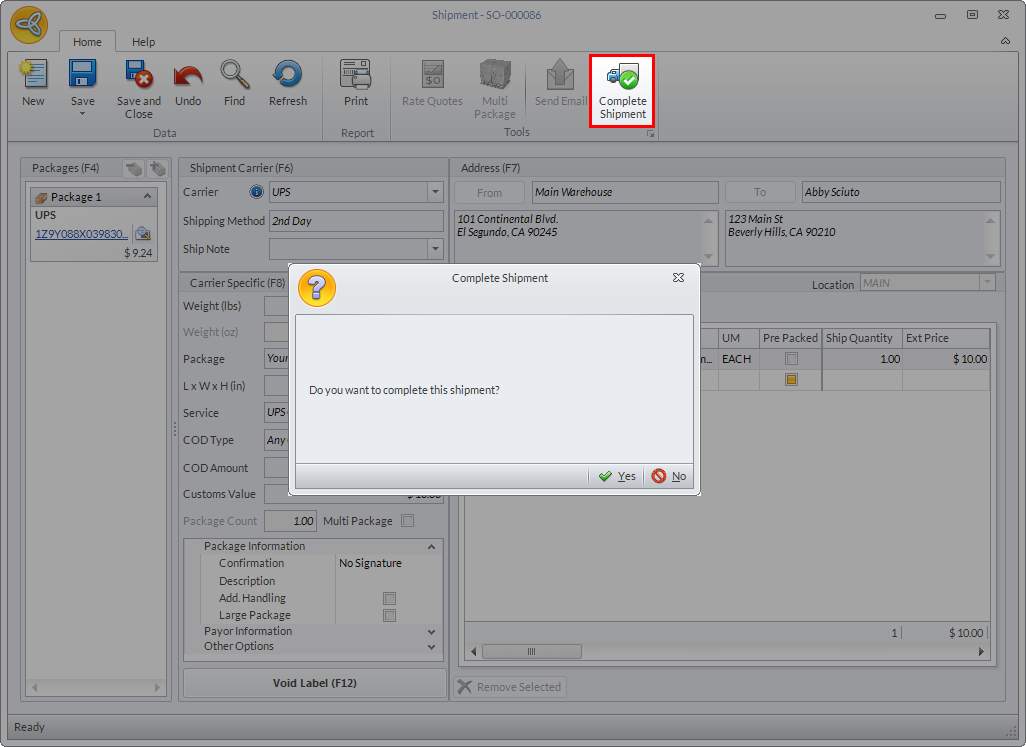
Click Image to Enlarge
- Completing the shipment automatically converts the SO to Invoice. Click Yes in the message prompt to view the invoice.
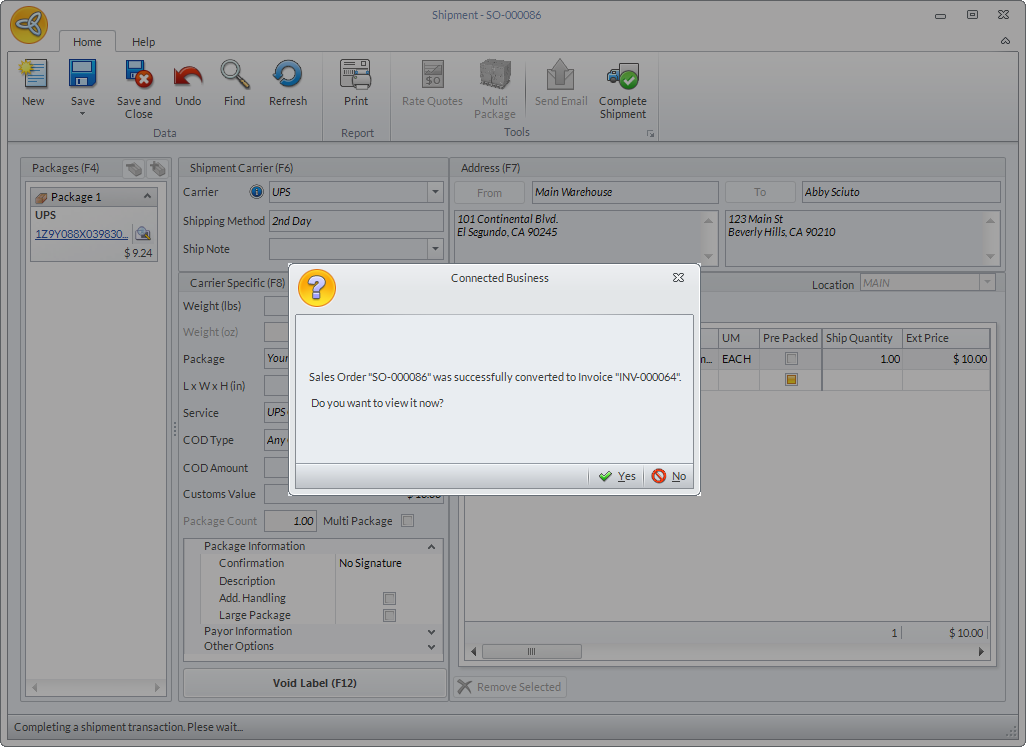
Click Image to Enlarge
- Capture the payment for the invoice. Go to Enter Payment > View Payment and the Payment form will be displayed.
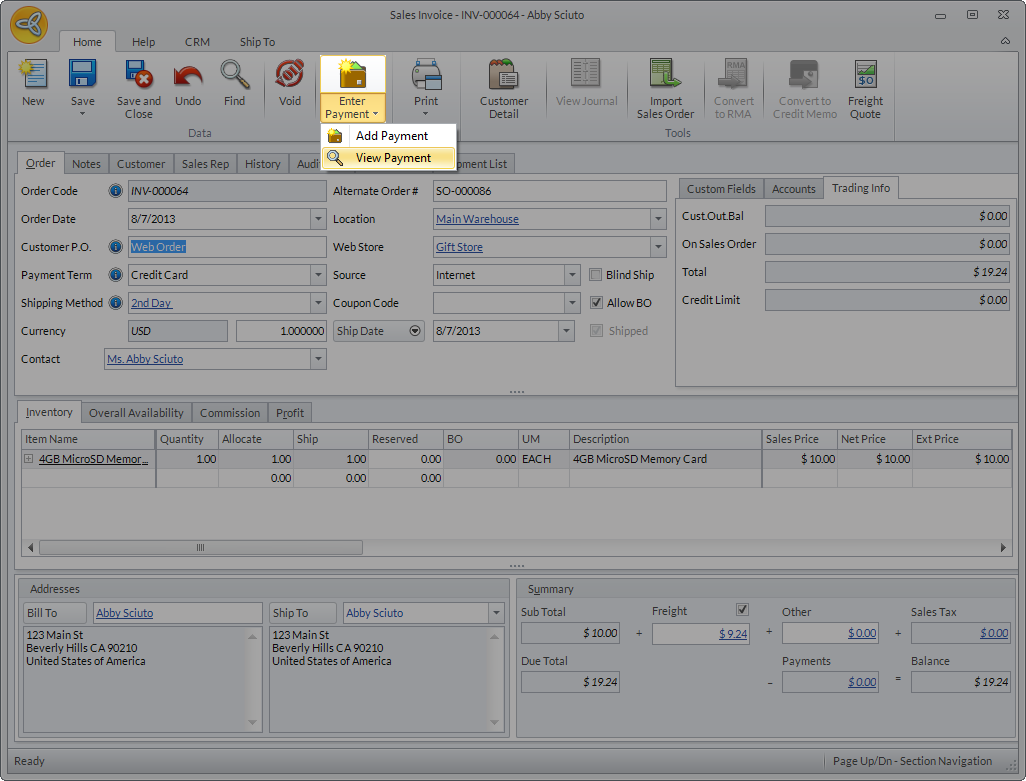
Click Image to Enlarge
The total amount for the order is indicated in the Amount Paid field. Click Capture button and select Yes in the prompt message to capture the payment.
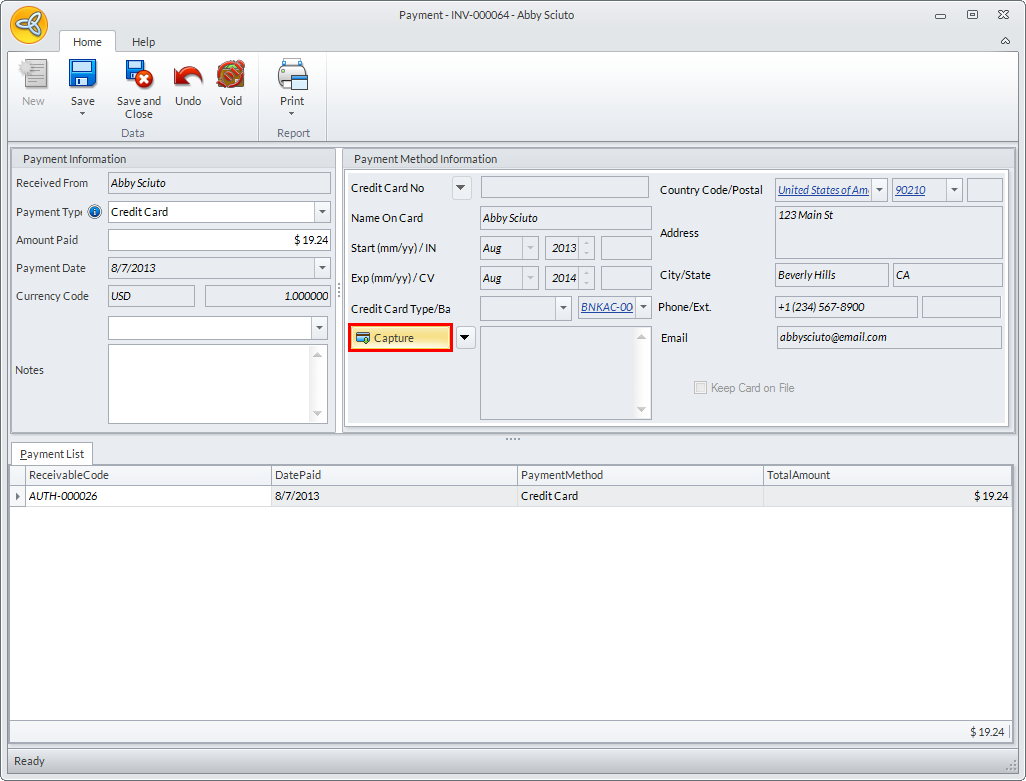
Click Image to Enlarge
- Once the payment is captured, the balance of the customer will be zeroed out and the invoice can now be posted. Click Save and Close to close the Payment form.
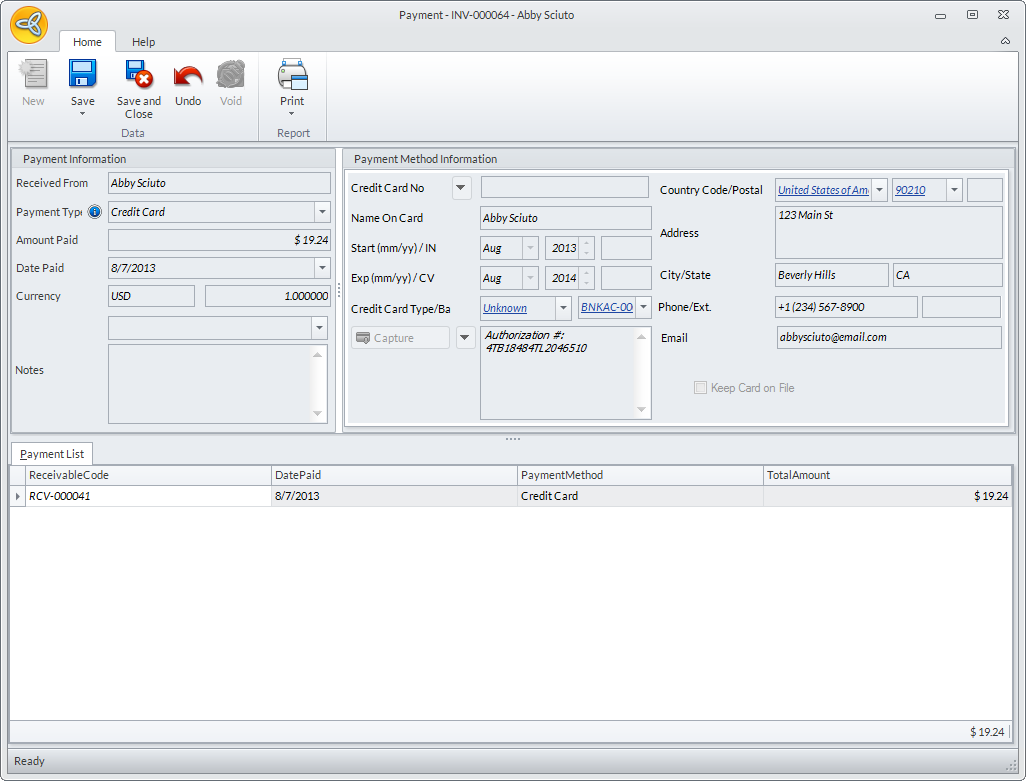
Click Image to Enlarge
Upon capturing the payment, the payment status of the order in the website will also be updated from AUTH to CAPTURED.
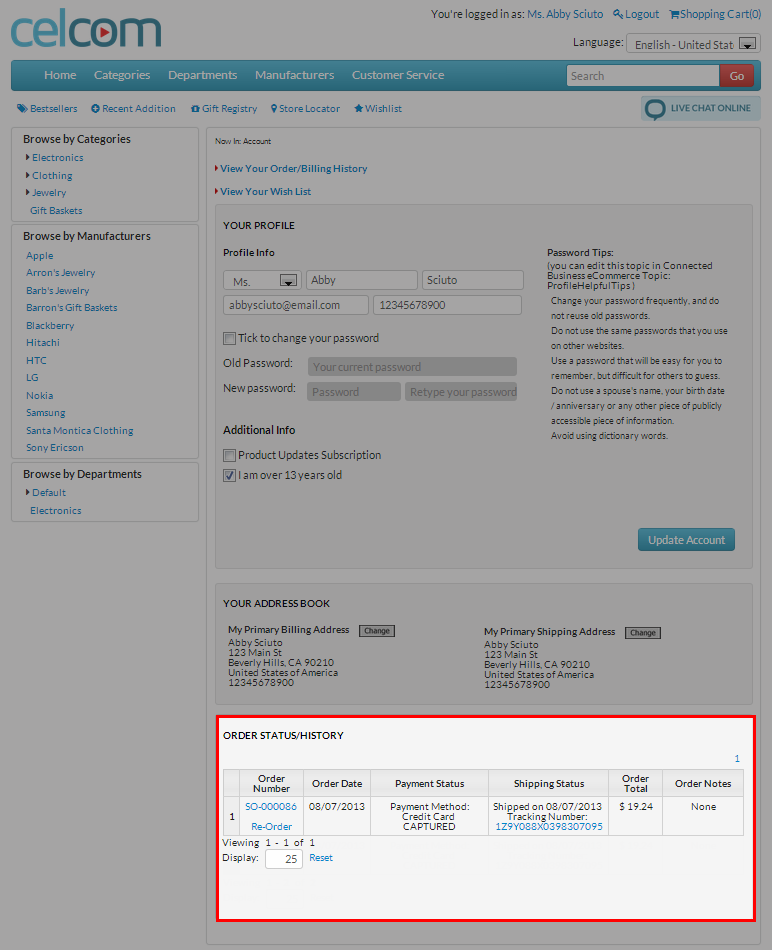
Click Image to Enlarge
- To complete the order, post the invoice by clicking Save and Post.
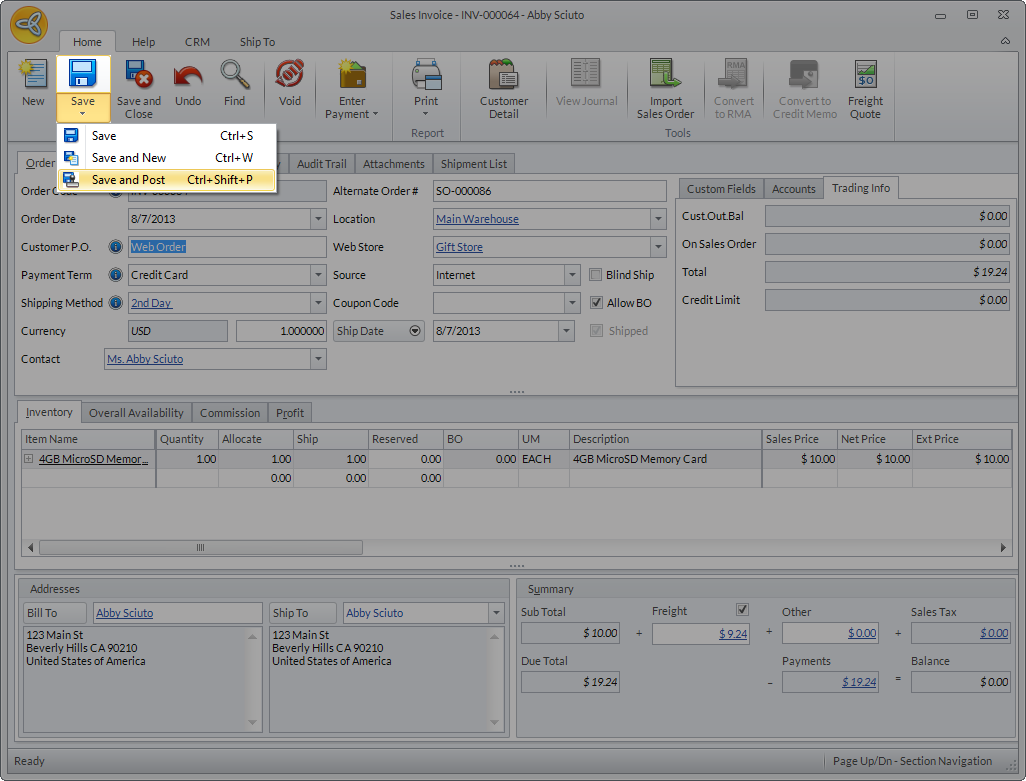
Click Image to Enlarge
Once the customer checks the order status online, it will be indicated that the payment is completed and the order has been shipped. The customer can click on the tracking number to view the shipment status from the carrier’s website.
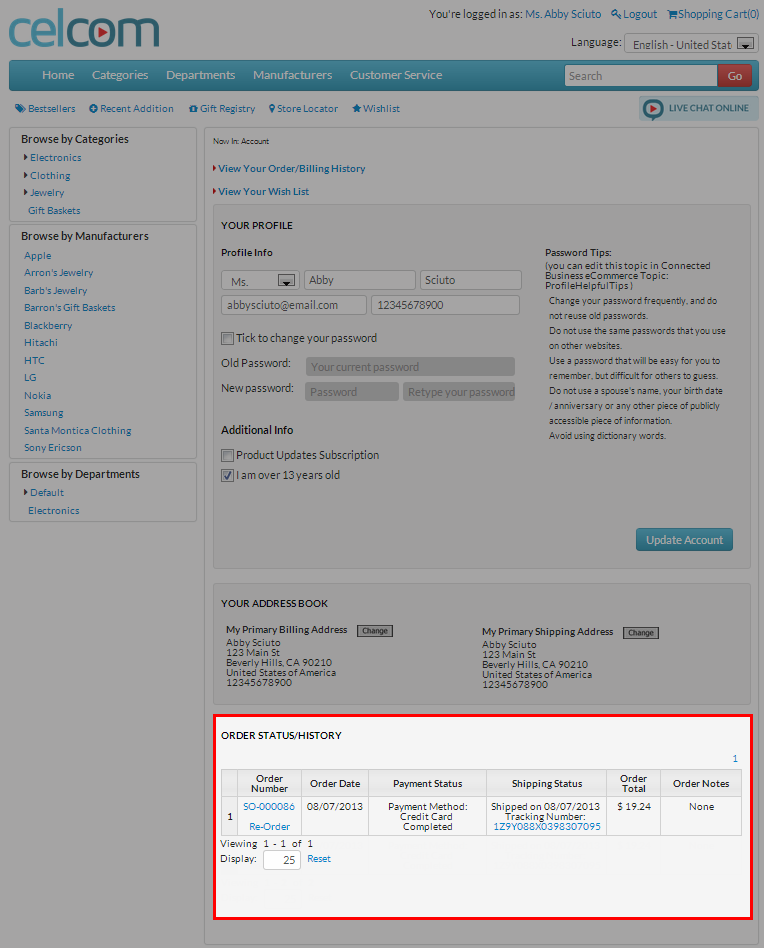
Click Image to Enlarge
![]()