
Edit and Maintain Prospect Information
Overview
Prospects are potential customers or people who has the interest to look into or buy your products or acquire services.
Edit/Maintain Prospect Information
Steps
- From the CRM module, select Find Prospect under the Prospect drop down list. A search screen of active and inactive prospects is displayed.
- Select the prospect record in the list to maintain. The Prospect detail form will display.
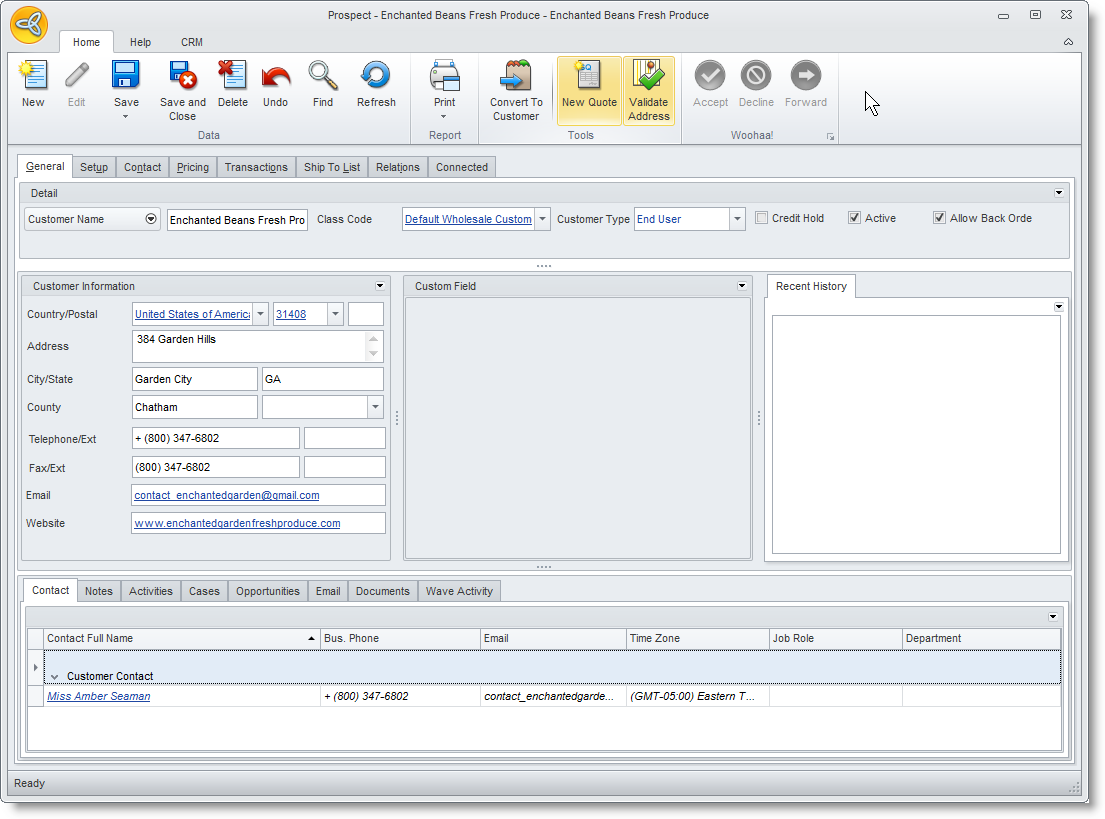
- In the Prospect detail form, you can:
- Maintain General Information
- Manage Prospect Contacts
- Manage Emails, Notes, and Documents
- Manage Activities, Cases, Opportunities and Campaigns
- Maintain Setup Information
- Manage Customer Posting Accounts
- Custom Printed Forms and Messages
- Maintain Prospect Contact Information
- Maintain Customer Specific Pricing, Part Codes and Special Pricing
- View Transaction History
- Manage Prospect Shipping Information
- Manage Prospect Relations
- Modify the details as necessary and save before closing the form.
Related Steps
Create New Prospect Information | Convert Prospects to Customers | Create Target List of Prospects for Campaigns
Maintain General Information
The General tab shows the general customer information you have set in the New Prospect Wizard.
Detail Section
The Detail Section shows the customer name and status. The fields in the details section are as follows:
|
Detail Section |
Definition |
|
Customer Name |
Shows the full name of the customer. You may change the customer name as needed. |
|
Customer First Name |
This field can be accessed by clicking the down arrow icon next to the Customer Name field. This shows the first name of the customer. |
|
Customer Middle Name |
This field can be accessed by clicking the down arrow icon next to the Customer Name field. This shows the middle name of the customer. |
|
Customer Last Name |
This field can be accessed by clicking the down arrow icon next to the Customer Name field. This shows the last name of the customer. |
|
Class Code |
This field shows the class template used in the setup of the customer record. |
|
Credit Hold |
This checkbox is used to indicate that the customer is on credit hold. When checked, the user is prompted in the creation of a sales order that the customer is currently on credit hold. |
|
Active Checkbox |
When clicked, this field indicates that the customer is currently active. Otherwise, the customer would be placed in the Inactive list. |
|
Allow Back Order Checkbox |
Indicates that the customer is allowed for back order. |
Customer Information Section
The Customer Information Section shows the billing address and primary contact numbers of the customer.
|
Customer Information Section |
Definition |
|
Country |
This field shows the country of the customer billing address. The fields in the address section may vary according to country. |
|
Address |
This field shows the address of the customer. |
|
City / State / Postal Code |
These fields show the city, state and postal code information |
|
Telephone / Ext |
These fields show the primary telephone number. |
|
Fax / Ext |
These fields show the primary fax number. |
|
|
This field shows the primary email address of the customer. You may click on the down arrow icon beside the Email field to display the Website field that shows the customer's website url. |
Custom Field Area
The Custom Field area is allotted for fields that the user may wish to add or create.
Recent History Section
The Recent History Section will list all the recent transactions of the customer grouped by transaction type. You can view the full details of the transaction by drilling down on its document code.
Manage Prospect Contacts
The Contacts tab displays a list of contacts of the customer. You may view details to the contact by clicking on the link in the Contact Name field. This switches the General tab into the Contact tabthat displays the contact details.
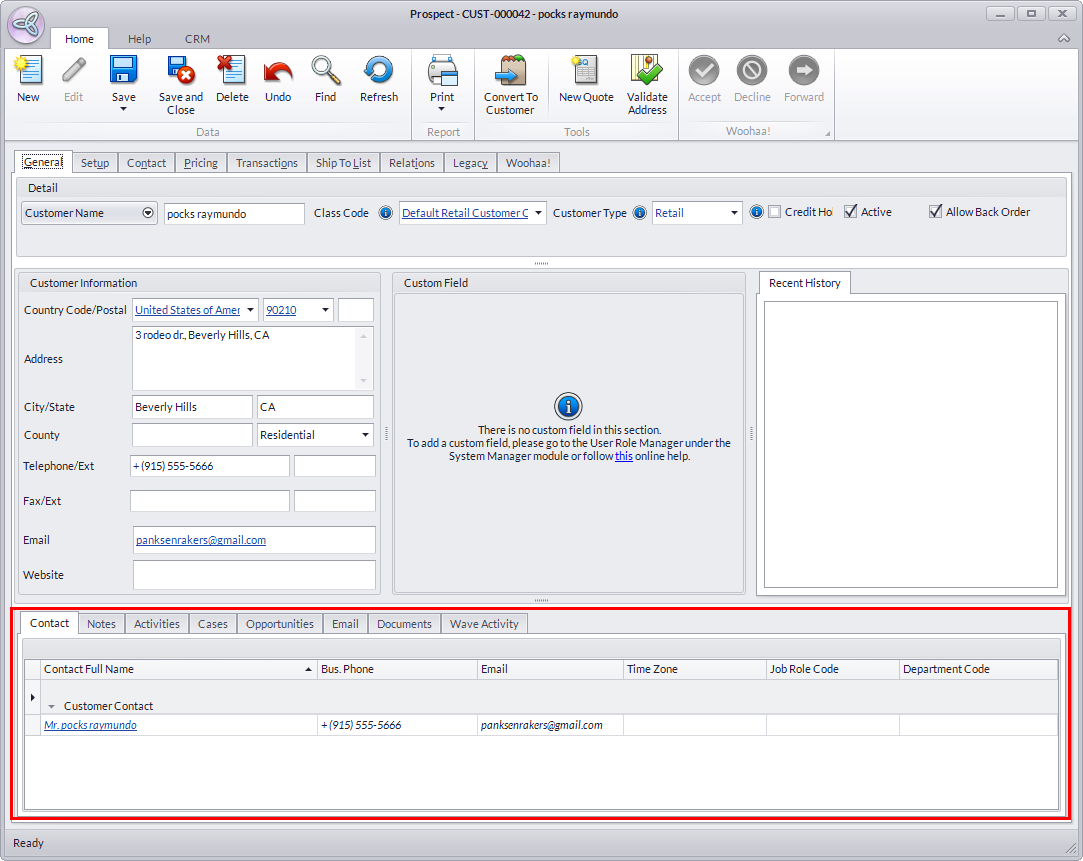
You may add a new contact by clicking on the New Contact under the Contact drop down list in the CRM module. This switches to the Contact tab of this form.
Manage Emails, Notes, Documents
Manage Notes
The Notestab displays a list of notes of the contact.
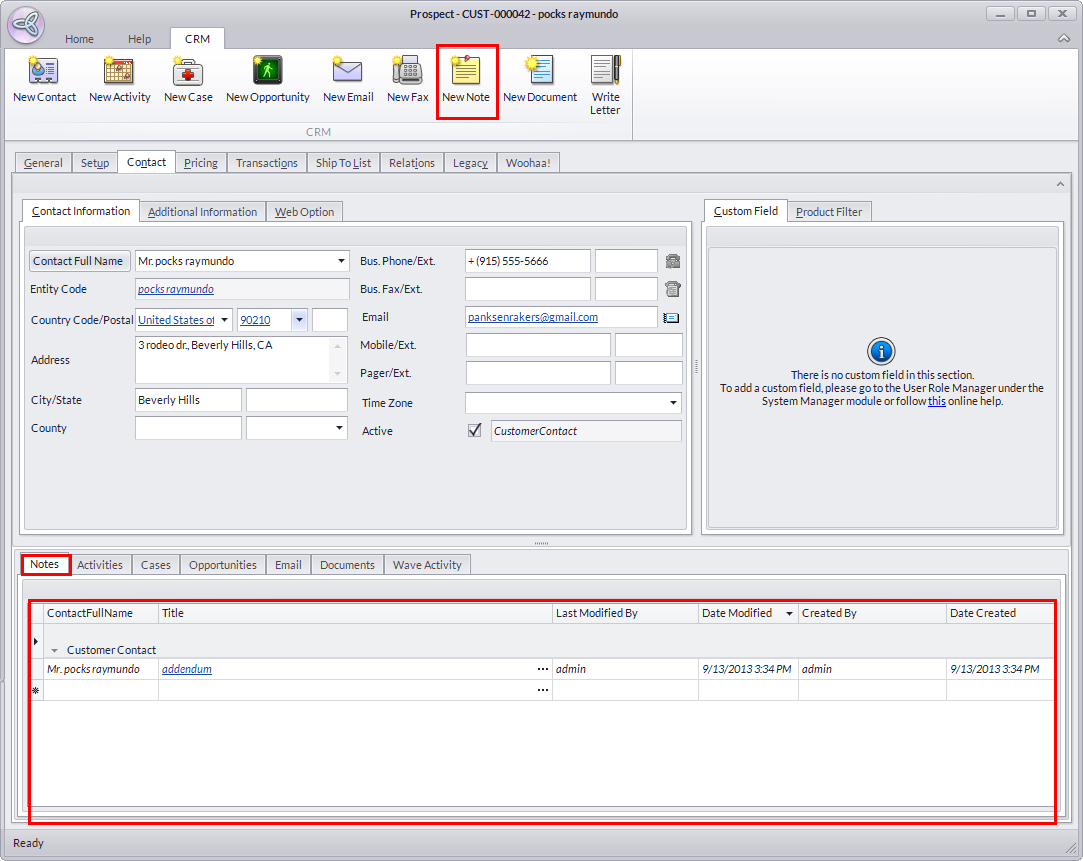
- You may create a new note by clicking on the New Note icon included in the row of CRM tool buttons. The Note form will appear and enter the needed details.
Manage Emails
The Email tabwill list all email/fax messages sent.
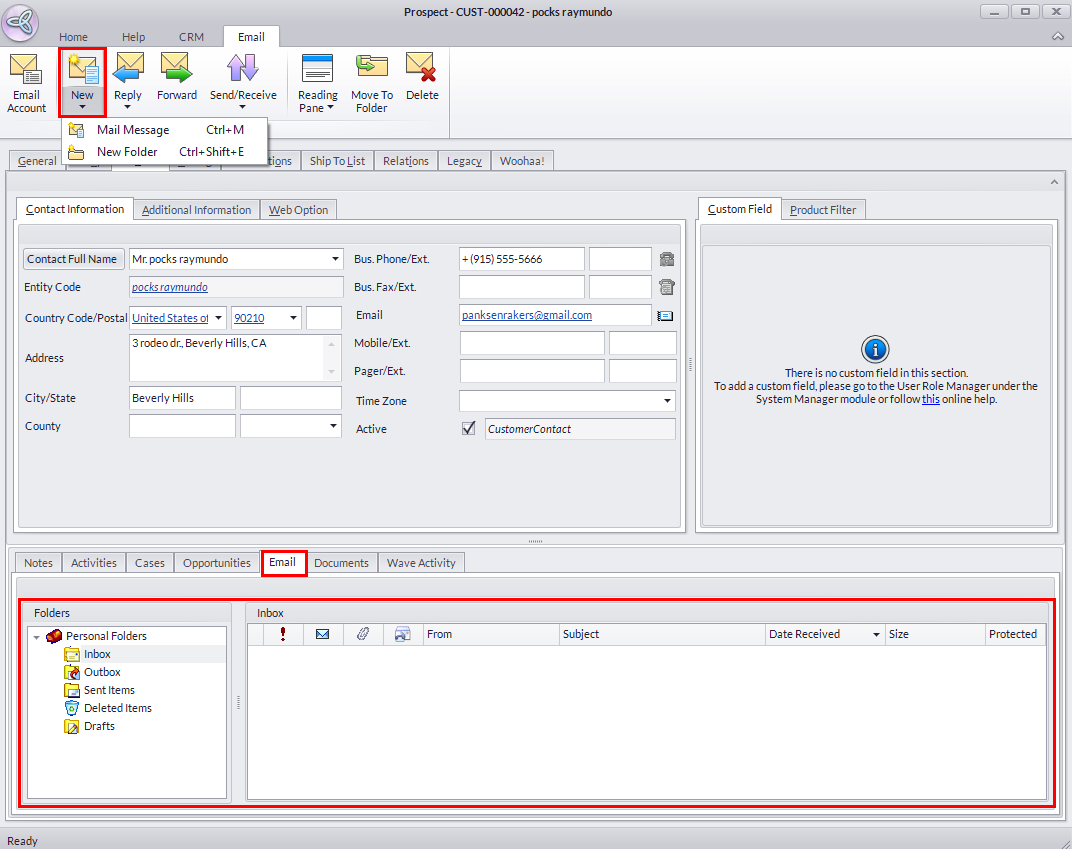
- You may compose and sent email messages by clicking on the New > Mail Message option or clicking the New Email () icon included in the row of CRM tool buttons.
Manage Documents
The Documents tabdisplays a list of documents that pertains to the contact.
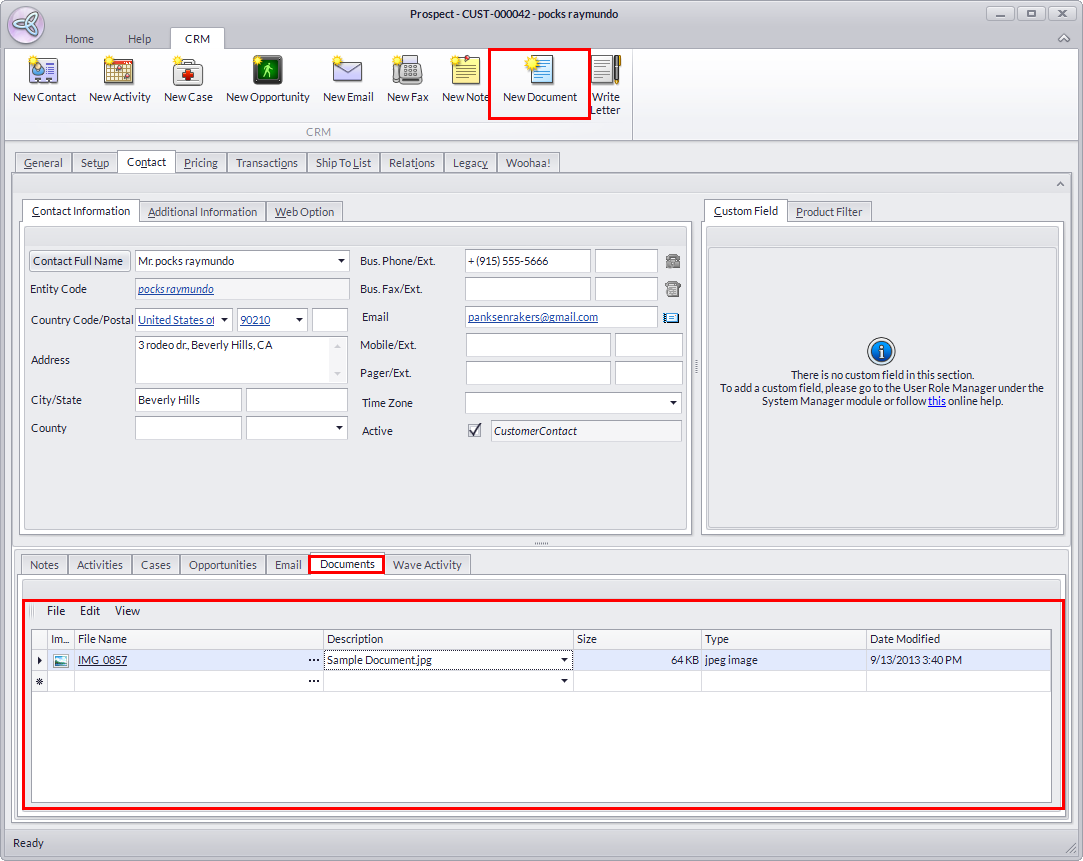
- You may add a new document by clicking on the Attach Document icon included in the row of CRM tool buttons.
Manage Activities, Cases and Opportunities
Manage Activities
The Activities tabdisplays an activity calendar that displays the activity set on the date and time.
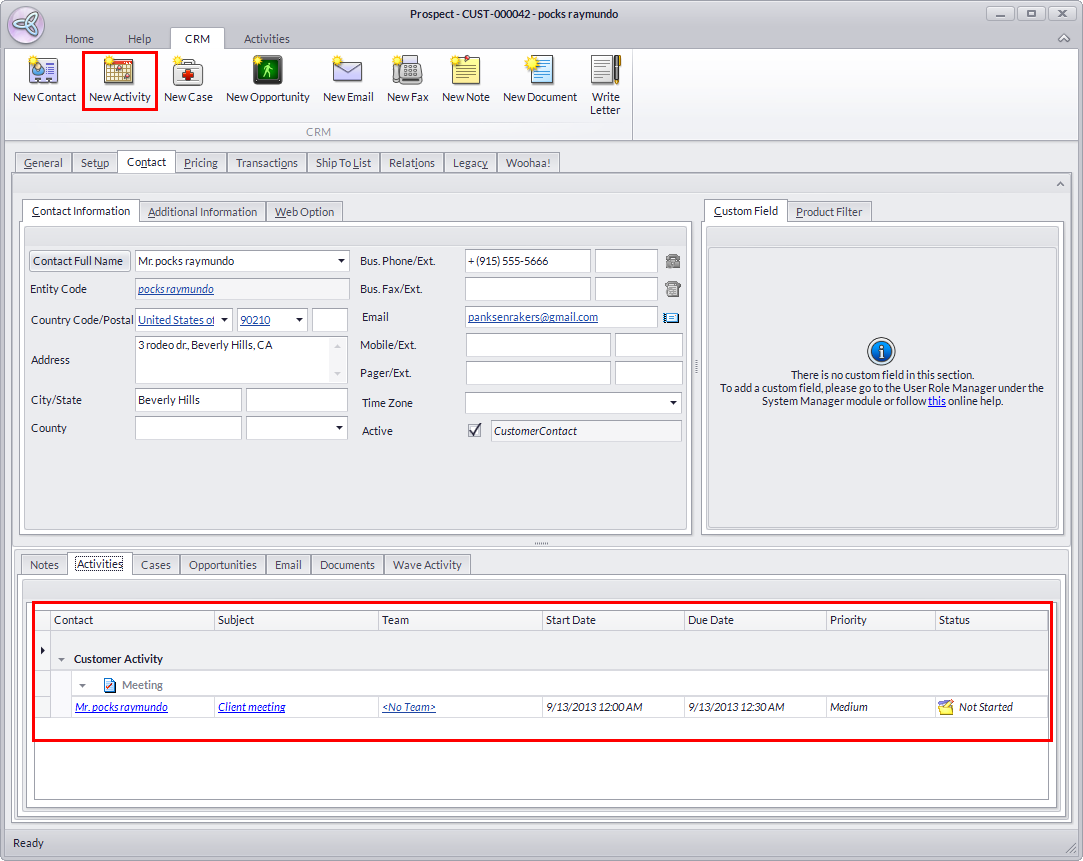
- You can use the New Activity icon or double-click on the date in the calendar and the Activity form will be displayed which you can use to add, schedule, and change an activity on your calendar.
Manage Cases
The Cases tabdisplays case records where the contact was involved.
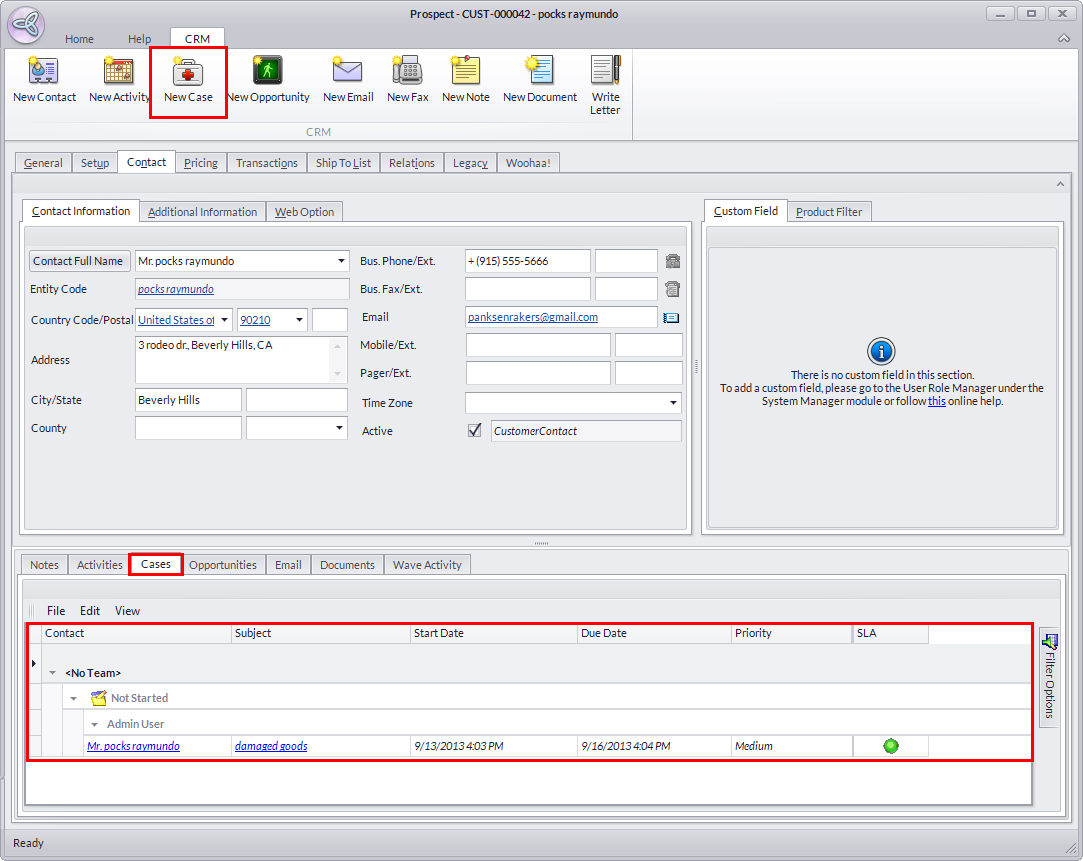
- You can record a new case by clicking on the New Case icon included in the row of CRM tools.
Manage Opportunities
The Opportunities tabis used to track sales opportunities at the company or customer contact level. It is also used to add new opportunities.
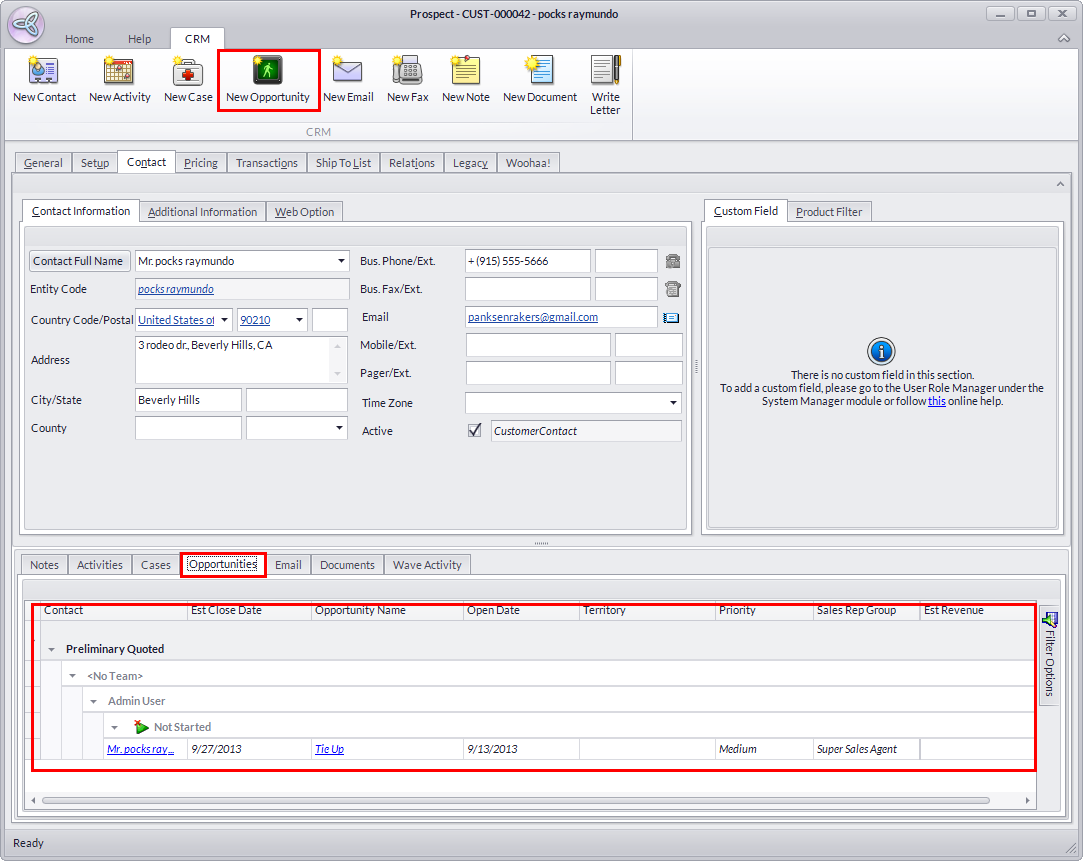
- You may record a new opportunity by clicking on the New Opportunity icon included in the row of the CRM tools.
Manage Campaigns
The Waves tabshows the campaign activities that the customer has been part of.
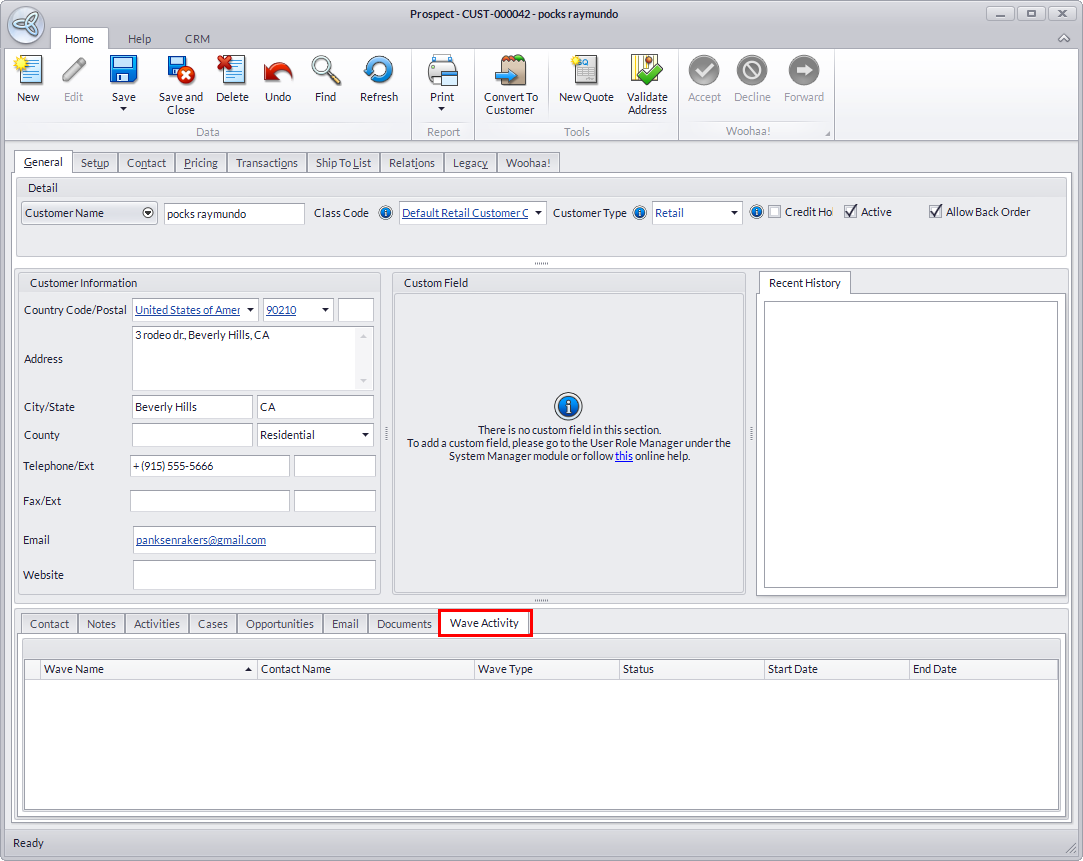
- You may view full details to the campaign activity by drilling down on the campaign wave subject.
Maintain Setup Information
The Setup tab shows various account related information. The prospect customer setup information is divided in several sections. These are:
The Setup section shows the setup information you provided from the customer setup.
|
Setup Section |
Definition |
|
Currency Code/Credit Limit |
Shows the currency setup for the customer and the credit limit allowed based on the customer's currency. Note that the currency is not amendable. |
|
Source Description |
Shows the source where the customer came to know of the company. |
|
Assigned To |
Shows the user name of the user that created the customer record. You may select another user in the dropdown list. |
|
Default Ship To Name |
Displays the default ship to (shipping address) for the customer. You may select another ship to (if any) to set as default. |
|
Default Contact |
Shows the default contact for the customer. |
|
Default AP Contact |
The AP Contact field displays the default AP Contact setup for the customer (if any). |
|
Default Contract Code |
Shows the default Contract for the customer. |
|
Credit Card |
Shows the credit card used by the customer. |
| Sales Rep Group | Shows the default sales rep group assigned to the customer. Clicking on the button beside the Sales Rep Group Name field - will show the options to show the Team Description, Territory and Customer Type fields. The Team Description field shows the default Team assigned to the customer (if setup). The Territory field shows the default territory where the customer belongs (if setup). The Customer Type field shows the customer type setup for the customer. |
| Commission / % |
Allows you to select a commission option for the customer. The options are: Customer, Sales Rep and Default.
|
| Head Office | Shows the main office or branch of the business customer. |
| Tax number / Business License | Displays the default tax setup for the customer and the business license number. This description for this field changes into VAT No./CO Reg. |
| Rank / Last Rank Calculated | Shows the customer ranking since the Last Rank Calculated date |
| Product Filter | Shows the list of products which a specific customer can view in the product listing. |
| Territory | This field shows the default territory where the customer belongs (if setup). |
| Team | This field shows the default Team assigned to the customer (if setup). |
| Customer Type | This field shows the customer type setup for the customer. |
| Blind Ship Checkbox | Click on the checkbox to enable the customer for blind ship. |
| Show Store Locator on Web Checkbox | Click on the checkbox to show store locator for a particulat customer on the web. |
Manage Prospect Posting Accounts
The GL Class tab shows the default GL class set from the Class template and its details. The GL Class is a group of accounts to use when posting the transactions for this entity. By default, the GL Class template uses the same account as in the Default Accounts unless otherwise specified in the Customer GL Class Templates. You can amend the account codes for each posting account as needed.
Get the System to Base the Account Analysis on the Customer Accounts
The Accounting Preferences allows you to specify where the account analysis will be based upon. You can specify to get the account analysis based on the customers through the Customer GL Class Templates. It is recommended to have your basis in the Accounting Preferences before you create your chart of accounts of before you create new transactions in Connected Business and that you select once to keep a consistent record in accounting.
Create Customer GL Class Templates
See Also: Customer GL Class Templates
Manage Prospect Contact Information
The Contact tab is used to add, view and edit the details of a customer contact. The Contact Information tab shows that the general contact information.
The fields in the Contact Information section are as follows:
|
Contact Information Section |
Definition |
|
Contact Full Name |
Shows the of the customer contact name. Click the Contact Full Name button to separate the salutation and prefix from the name. |
|
Entity Code |
This field shows the entity (customer, supplier, sales rep etc) related to the contact. |
| Country | This field shows the country of the customer billing address. |
| Address | This field shows the address of the customer. |
| City/State/Postal Code | These fields show the city, state and postal code information. These fields may vary according to the selected country. |
| Bus. Telephone/Ext | This field show the contact’s business telephone number. |
| Bus. Fax/Ext | This field show the contact’s business fax number. |
| This field show the contact’s email address. | |
| Mobile /Ext | This field show the contact’s mobile number. |
| Pager / Ext | This field show the contact’s pager number. |
| TimeZone | This field displays the contact time zone. By default, this is set to the system time zone of the machine where the prospect customer was set up unless otherwise specified from the prospect customer creation. |
| Active Checkbox | This field is the Contact Type field that indicates if the customer is a customer contact, supplier contact, etc. |
The Additional Information tab provides space for more information about the contact.
|
Additional Information Section |
Definition |
| Business Title | This field shows business title of the contact. |
| Job Role | This field shows the job role of the contact. |
| Department | This field shows the department where the contact belongs. The departments you see in the pulldown are the ones that you use in your company. |
| Home Phone / Ext | This field shows the alternate telephone numberof the customer. |
| Home Fax / Ext | This field shows an alternate fax number. |
| Assigned To | This field shows the user assigned to the contact; usually this is the user that creates the contact information. You may select another user in the field drop down to assign the contact to. |
| Manager | This field shows the contact’s superior or manager. You may assign an existing contact in the pulldown list as the contact manager. The contacts that you will see in the list are contacts related to the entity. |
| Asst Full Name | This field allows you to put in the assistant name of the assistant to the manager or the contact. |
| Asst Phone / Ext | This field allows you to put in the assistant's phone number. |
| Language Code | Defines the language used for the system. |
The Web Option Tab is intended for the online customers that trade with you through your eCommerce website. When the customer registers an account in your website, a customer record is created when this option enabled.
|
Web Option Section |
Definition |
| Email Address | Specify the email address of the customer. |
| Password | Allows you to create a password for the specific customer contact. |
| Allow Web Access Checkbox | When clicked, indicates that the customer is or is not allowed access into your eCommerce store. |
| Web Store Tab | This tab lists all the active websites, the description of the site and the subscription expiration date. You may select one or more websites that a user can have access to. |
| Login History Tab | This tab contains the login history. |
| Purge Option |
There are two options to choose from:
|
Maintain Prospect Specific Pricing, Part codes and Special Pricing
The Pricing tab allows you to view and edit the customer’s custom pricing settings. You may select the default price to use, if the price is wholesale or retail, pricing methods, select discount options, and set up customer special pricing.
Maintain Default Pricing
The Pricing Details section is where you can set up default pricing and discount.
|
Pricing Details Section |
Definition |
| Default Price | This field allows you to indicate the pricing to be used by the customer. The options are: Wholesale and Retail. |
| Discount Type | This field allows you to indicate the discount type (Band, Overall, None) allowed for the customer.
|
| Pricing Method | This field allows you to indicate the pricing method to use in the customer transactions.
|
Manage Customer Part Codes
In the Customer Part Codes tab, you may set up the customer item code and description for the item.
To do this,
- Select an inventory item in the Item Name column. The default description will display in the Inventory Description column.
- Then modify the values in the Customer Part Code and Customer Description columns.
Maintain Special/Promotional Pricing
In the Special Pricing tab, you may set up special pricing for the customer if they buy a specific item.
To set up special pricing,
- Select items to create special pricing for the customer in the Item Code column. The Default UM and UM Quantity are displayed. You may select another selling unit to set up a special price for e.g. Dozen.
- You may set the new selling price in the Unit Selling Price column.
- The icon next to the Unit Selling Price column indicates if you have price break setup or not. To set up quantity price breaks, click on the Node button inside the Unit Measure Code column to display the Quantity Price Break tab.
- Enter the Min Qty and Max Qty for each price break level. Then specify the Selling Price for each level in the Unit Selling Price column.
- Enter the start date and the end date of the special pricing of the items in the Date From and the Date To columns, respectively.

You will be prompted in the sales order if the special price has expired. You may remove special pricing simply by right-clicking on the item in the Special Pricing tab and select Delete.
View Transaction History
The Transactions tab shows all sales quotes related to the prospect customer. Note that when a customer sales quote is converted to a sales order, the prospect is instantly converted into a customer record.
The Quotes tab show the sales quotes related to the customer. This tab includes the View Option and Date Fields which filters the records to be displayed.
The View Option drop down has the follwoing options to choose from. These are:
- Open - Shows all open transactions.
- Closed - Shows all closed or competed transactions.
- All - Shows all open and completed transactions.
The Date field filters the date or date range of the records. Clicking the down arrow displays the Date pop up which contains various options in filtering the records. The More button refreshes the display and gathers more data.
The columns in the Sales Quote tab are as follows:
|
Sales Quote Tab |
Definition |
| Document Code | This field shows the unique document code generated for the record. You can double-click on the value inside this column to view full details to the record. |
| Reference 1 / Reference 2 | These fields provides additional information about the record. When you put in a reference in the Customer PO field, it will display as the main reference. If you put in a reference number in the Alternate Order # field, the reference number would appear in this column. |
| Document Date | This field reflects the dates that the record was created. |
| Due Date | This field reflects the estimated due date. |
| Currency Code | This field reflects the customer currency. |
| Total | This column shows the total value of the transaction. Note that this value does not include tax and other charges. |
| Base Currency | This column shows the total amount of the transaction based on your home currency. |
| Order Status | This column shows the current status of the transaction if open (yet to be converted into a sales order) or closed (converted to a sales order) or not accepted (closed or voided). |
| Attachments | This column shows if there are file attachments to the document. If the Attachment button icon appears with an X mark, it means there are no attachments. Clicking on the Attachment button would bring up the Attach Document form allowing you to view attached files or attach a file to the record. If there are documents attached to the record the Attachment button icon appears without an X mark. See Also: Manage Documents |
Manage Prospect Shipping Information
The Ship To List tab shows the list of all shipping locations of the prospect.
- You may view the shipping details by double-clicking on the link of the shipping detail’s Ship To Code.
- You may add a new Ship To detail by clicking on the New Ship To icon found on the Tools Menu of Ship to List tab.
Manage Prospect Relations
The Relations tab shows all the customer’s relations. By default, all the customer’s contacts are added to the relations.
You may add and create a hierarchy of customer relations (parent, sibling and child) and define the relationship type for each. To do this,
- Right-click on an item in the list to view the options. Here are the descriptions of the right-click options:
Customer Relationships
Definition
Add Parent This option allows you to enter a relation with other entities related to them. You may add customer, supplier or contact as entity related to the particular prospect.
When you use this option, a child entry is created under the entity. An example is adding a new contact in the list of the customer contacts.
Add Sibling This option allows you to enter a relation that is the same level as the parent or entity. You may add customer, supplier or contact as entity related to the particular prospect.
When you use this option, a relation is created in the same level as the entity. An example is another prospect customer in your record that is set as the head office of the customer or a supplier in your record that trades with your customer.
Add Child This option allows you to enter a relation under a selected entry. You may add customer, supplier or contact as entity related to the particular prospect.
Accordingly, the parent is the customer and the child relations are the contact that’s why a default relation is created for the customer with the contacts as child entries.
Delete This option allows you to remove a relation, select the entity in the list, right-click it and select Delete. Expand Node This option allows you to display the child level relations under the parent levels. The Expand All option allows you to hide all child levels under all parent level relations. Collapse Node This option allows you to hide the child level relations under the parent level. The Collapse All option allows you to show all child levels from all parent level relations. - After selecting an option, select the Relationship Type of the entity to the customer.
Manage Prospect's Subscription to Retailers
The Connected tab shows the prospect's subscription to retailers. You may view the retailer's detail such as the default currency used, tax id, business type as well as the trade references and the bank references.
See Also: Woohaa!