Create a New Sales Order
Sales Order is the part of the order process where a customer makes a request for the products you are selling. Inventory is committed and a “picking ticket” or “sales order” and a “packing list” are printed and the order is packaged for delivery. Connected Business allows you to set up your sales order through the Customer Preferences.
You can create a new sales order through one of the following options: generating sales order from a previous sales quote (when accepted by your customer) or creating a new sales order from scratch (individually).
Generate a Sales Order from a Previous Sales Quote
- From the Customer module, you can create a new sales order by clicking on the Order > New Order button from the menu. The search screen of available sales quotes and active customers and active customer ship to is displayed.
- The following are the options to create a new sales order:
- To create a new sales order from a previous sales quote, select the quote document from the Available Sales Quote tab by clicking on the checkbox and clicking OK or double clicking on your selection. If you want to create an order for another customer simultaneously, you can select another customer sales quote.

Note that multiple sales order forms are displayed.
- To consolidate multiple sales quotes into one sales order, select the sales quotes (must be of the same customer) from the Available Sales Quote tab by clicking on the checkbox and click OK.
- To create a new sales order from a previous sales quote, select the quote document from the Available Sales Quote tab by clicking on the checkbox and clicking OK or double clicking on your selection. If you want to create an order for another customer simultaneously, you can select another customer sales quote.
- After selecting any one of the options above, the Sales Order form is displayed. The Sales Order form will reflect the details in the sales quote document. You may modify the details as needed.
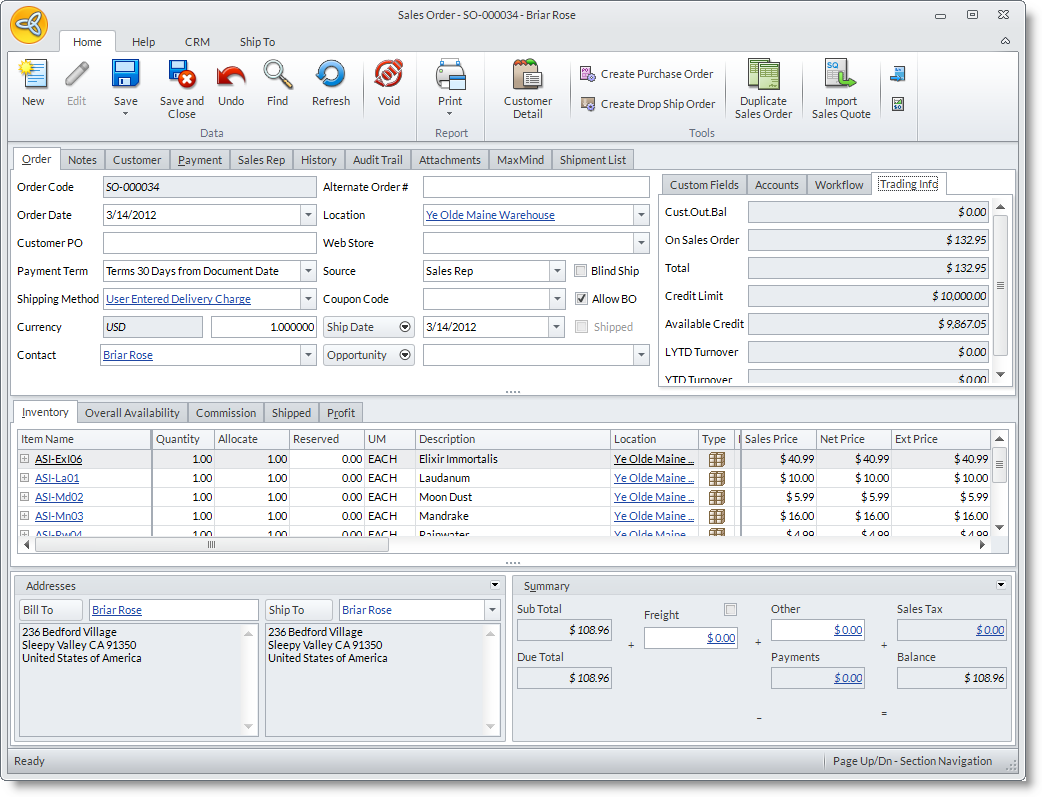
Click Image to Enlarge
- Details from the sales quote is reflected in the Order tab. You may change the information in this tab as necessary.
Sales Order Field
Description
Order Code
This field is automatically generated by the system once a sales quote.proforma is created. Alternate Order # This field is automatically filled when an order is generated from a sales quote. Order Date
This is the date when the order is first created. You may change the defualt current date as needed. Customer PO
You may add relevant document codes in this field as well as the Alternate Oder # field. Payment Term
This field sets the payment term assigned for the sales quote. You may change the payment term when needed. Shipping Method
This field sets the Shipping Method assigned for the sales quote. You may change the payment term when needed. Currency
Set the currency used for the sales quote. You may change the currency as needed. Contact
This field shows the contact assigned for the sales quote. Location
Select the default location to which the items should be picked from. Web Store Select the website assigned to the sales quote. You may change the website as needed. Source Optional: You may change the default Source for the customer. Blind Ship Checkbox Optional: Check this option if you want to automatically add the customer's ship from address on the shipping label. For more information, see: Blind Ship Coupon Code Add a coupon discount if you want are giving discounts to customers. Allow BO Checkbox Optional: Check this option if you want to automatically reserve items for the customer with a reservation code and the purchase order information. Ship Date Assign a date for the shipment to be delivered to the customer.
Click on the arrow down button to view the list of shipping date options.* Shipping Date - The date requested by the customer.
* Overall Due Date - The date the entire order can be shipped. The ship date on the line item is based on this date.
* Latest Ship Date - The latest date acceptable to the customer. This is set to the system's maximum date as this is seldom used.
Opportunity If the sales quote is generated from an opportunity record, the Opportunity Code will display in this field. You can also assign an opportunity record by selecting it from the pulldown list.
Click on the arrow button next to this field to view the Wave fields. You can select a related campaign wave to the sales quote.
- In the Inventory Item tab, select the items to include in the quote by clicking the pulldown arrow button in the Item Code column. Select item(s) by checking the adjoining check boxes on the left. You can search for items in the list by Item Name, Description, Item Type.
You can expand the Inventory Item tab by clicking on the Zoom button. Click on the Zoom button again to go back to normal size. You may also use the Page Up or Page Down keys to zoom in and out the Inventory Item tab.
- You may change the details of each line item to what you and the customer had agreed upon. You may change the default Unit Measure, Location, Tax Code and Selling Price.
- Indicate the quoted quantity in the Quantity column. You can view the availability of the item in selected location source in the Availability tab. Select an item line and click on the Availability tab to view its availability.
- You may change the default customer shipping address in the Ship To field.
- To view other tabs in the Sales Quote form, place the cursor in the Quantity column in the selected item line. The supplementary tabs are as follows:
Order Tabs
Definition
Availability shows the availability of the item in all locations History shows the invoice history. Cross-Sell shows the items that the customer bought along with the item. Extended Description shows the extended description of the item. Supplier shows the suppliers of the item with details to supplier cost, lead time and priority. (Optional)PO Reservation displays only once you have created a purchase order from the allocated number of items you want to order. - The Freight field displays the freight amount based on the freight calculation from the shipping method.
Optionally, you may change this value to the actual freight charge then tick the checkbox above the Freight field to disable the freight calculation from the Shipping Method.
- Save the details before closing the Sales Quote form.
- When approved, you may convert the sales quote to sales order by clicking on the Convert to Sales Order button from the menu.
Creating a New Sales Order from Scratch
- From the Customer module, you can create a new sales order from one of the following sources:
- Order > New Order
- New Sales Order icon from the Prospect or Customer detail form. This will load the Sales Order form instantly.
- After choosing any one of the options above, a search screen of available sales quotes and active customers and active customer ship to is displayed.
- To create a new sales order from scratch, select the customer from the Active Customer tab or Active Customer Ship To tab by clicking on the checkbox and click Ok.
- After selecting any one of the options above, the Sales Order form is displayed. The Sales Order form will display the default information setup for the customer. You may change this default information for this current order.
Enter order information in the Order Tab
- You may change the default current date in the Order Date (document date) and Shipping Date fields. You may switch to other date fields to fill in clicking on the arrow button beside the Shipping Date field.
- You may add relevant document codes and reference numbers in the Customer PO and Alternate Order #fields.
- You may change the default Shipping Method and Payment Term.
- You may change the default Location for the items. Note that you can specify a location source for each line item.
- You may also add the Web Store code for the sales order to be viewed on your website.
- You may link related records such as opportunity and campaign waves. Click on the arrow button beside theSource field to view the Opportunity and Wave fields.
- Optional: You may enter a discount coupon in the Coupon Code field if the customer availed of a discount coupon for his current order.
- Optional: You may select another contact for the current order in the Contact field.
- Optional: You can add notes about the order in the Notes tab.
Enter ordered items in the Inventory Item Tab
- In the Inventory Item tab, select the items to include in the order. Click on the pulldown arrow button inside the Item Code column. Select item(s) by clicking on the adjoining checkbox and click OK.
- Enter the number of items on the Quantity and Allocate columns.
- You may change the details to the item line to what you and the customer has agreed upon. You may change the Unit Measure, Tax Code and Selling Price.
- Optional: You may enter an overall discount percent in the Discount column or override the Selling Price.
See Also: Various Sales Order Operations > Entering discount - You may view other tabs in the Sales Order form by placing your cursor in the Quantity column. The supplementary tabs are as follows:
- Availability – shows the availability of the item in all location.
- History – shows the item’s recent transaction history.
- Ext Description – shows the extended description of the item.
- Cross-Sell / Up-sell – shows the items that other customers bought along with the item.
- Substitutes and Accessory – shows the substitute and accessory items and allows you to add them in the order. Note that the Substitute and Accessory tabs will appear if there are substitute and accessory items setup for the item. See Also: Various sales order operations > Entering substitute or accessory items.
- Supplier – shows the supplier of the items with details to supplier cost price, lead time and priority.
- Optional: PO reservation - this will only display once you have created a purchase order from the allocated number of items you want to order.
- You may change the customer shipping address in the Ship To field.
- The Freight field displays the freight amount based on the freight calculation from the shipping method.
Optionally, you may change this value to the actual freight charge then tick the checkbox above the Freight field to disable the freight calculation from the Shipping Method.
If you want to display the shipping rate after you process the shipment of this transaction, just leave this field to its default Zero (0) value.
- Save the details before closing the Sales Order form.
- Refer the Workflow tab for the next stage in the sales order workflow. Note that if you will ship items from different locations, you will need to set the workflow stage for each source location.
Import Existing Sales Quote
Note that only the line items from the sales quote are imported. These will be added to the line items in the sales order.
- If there are line items in the sales order, save the sales order before importing.
- From the menu options of the Sales Order form, click on the Import Sales Quote option. A list of available sales quotes for the customer is displayed.
- Select the sales quote to import and click OK to add the line items. You can import another sales quote if needed.
View the Customer Details and Credit Standing
- In the Sales Order form, click on the Customer tab. The Customer tab shows the customer’s credit details such as available credit, last payment and outstanding balance information. It also shows the customer’s contact information.
- You can view full details of the customer by clicking on the Customer Detail button from the menu. This displays the Customer detail form. Switch to the Credits/Receivables tab to view full details to the customer's credits and receivable transactions.
Enter Discount
Discounts can come from any one of the following sources:
- Term Discount – Note that settlement discounts are applied in the customer payment. Check for any discount setup in the Payment Term.
- Coupons – Discounts from coupons. Check for any coupons available in the Coupon Code field pulldown. The discount deducted from the sales order total is displayed in the Inventory tab as well as on thePayment field. Drill down on the value inside the Inventory tab and Payment field to view the Payment Breakdown window.
- Overall Discount – Discount from overall discount setup for the customer is displayed in the Discount column. Check if the Discount Type for the customer is set to Overall and if an overall discount percent is specified.
- Price List – The discounted selling price for the quantity price breaks are displayed in the Sales Price column.
- Category Discount Band – Discounts from the category bands are displayed in the Discount column. Check if the Discount Type for the customer is set to Band.
- Manual Discount - You can add in an overall discount percent in the Discount column of the Inventory Item tab.
Enter Freight
Freight can be added into the order:
- Automatically through the shipping method - check if the shipping method has freight calculation setup.
See Also: Shipping Methods - Manually by entering the freight amount in the Freight field - tick the checkbox above the Freight field to disable the freight calculation from the shipping method. Then enter the freight amount in the Freight field.
Enter Other Charges
From the Other Charge field, you can put in other charge amount to add to the order sub total.
- Drill down on the value inside the Other Charge field to view the Summary Options window.
- You can change the default tax to apply to the other charge in the Other Tax Code field.
- You can add a caption in the Other Caption field to describe the miscellaneous charge.
- Click OK to apply.
Accept Payment on Order
The Sales Order form allows you to accept advanced payments directly. You may accept partial payments in different payment methods using the Enter Payment from the menu options in the Sales Invoice form. To record customer payments,
- From the Sales Order form, click on Enter Payment > Add Payment.
- You may change the Payment Type used.
See Also: Create Customer Payments - Save the payment by clicking on the save options in the menu. Note that the payments created from the sales order form are not allocated until the order is converted to invoice.
View Availability
- View item availability in the source location – select the item line and click on the Overall Availability tab. This tab will show the availability of the item in the source location as well as in other zones.
- View item availability in all location – select the item line then place the cursor in the Quantity column. The additional tabs are displayed. The Availability tab will show the availability of the item in all locations.
Change the Source Location
You may change the source location by,
- Changing the default location – select another Location from the Location field in the Order tab. The default location will apply to all line items.
- Selecting the source location of the line items – You can select another source location from the Location column for each line item.
View Item Details
To view full details of the item or modify the details,
- Drilldown on the item code in the Item Name column to display the form.
- You can also do this by right-clicking on an item line and selecting the option View Item Detail.
Remove Line Items
To remove an item, right-click on the line item and select the option Delete Line Item.
Sell Items in Other Unit Measures
If you sell items e.g. per piece or per pack of 6, you can set them up per inventory item.
- To select another unit measure, select the unit measure in the UM column pulldown.
Know Where the Pricing is Taken
View the pricing method:
- In the Inventory Item tab, scroll vertically in the Inventory Item tab. You can view other details and options for the line items.
- In the Pricing column, you can view where the pricing was based on.
Display pricing scheme alerts to know what pricing option is used:
- Select Preferences under the Setup menu of the Customer module. The Customer Preferences form will display.
- Enable the Display pricing scheme message option and click OK to apply your preferences. For every line item entered in the sales order, you will be prompted of the pricing scheme used.
See Also: Pricing Options
Enter Negotiated Pricing
You may override the default pricing for an unlimited number of items on a per order basis.
- In the Sales Price column, enter the sales price that you and the customer had agreed upon. The user name would appear in the Pricing column to keep trail of the overrides made in the sales order.
Attach Document
- To attach documents to the sales order, go to the Attachments tab and click on the ellipsis button.
- Select if you will attach a document from the computer or from the CRM Document Management.
View Profit
Click on the Profit tab to view potential profit per line item.
View Tax Breakdown
To view tax breakdown per line item, drill down on the tax amount in the Sales Tax field. This brings up the Tax Breakdown window.
Send Order Acknowledgement, Picking Notes, Packing Lists or Delivery Notes
- From the Sales Order form, click on the Print button to display the Print Dialog window.
- From the Report List, select the type of document to print or send.
- In the Destination options, you can choose to email or fax the document.
- To send through email,
- Select Email as the printing destination and the customer’s default contact email address appears in the Email Address field (if there is no email address setup for the default contact then the customer’s primary email address is used).
- In the Email tab, you may modify the default email message.
- Click Ok to send the email with a PDF file of the document attached.
- To send through fax,
- To send though fax, select Fax as the printing destination and the customer's default contact fax number appears in the Fax Number field (if there is no fax number setup for the customer, the customer’s primary fax number is used).
- In the Fax tab, you may modify the default fax message.
- Click Ok to send the fax (requires registration to InterFAX) with a PDF file of the document attached.
Print Picking Notes, Packing Lists and Delivery Notes Individually or in Batches
You may print the picking notes, packing lists and delivery notes individually for a sales order or by batch using the Batch Document Printing option.
- To print the picking notes, packing lists and delivery notes for the current sales order, use the Print option from the toolbar menu. The Print Dialog window will display.
- To print in batches, use the Batch Document Printing option of the Customer module.