Create a New Sales Invoice
|
Content
|
|---|
Sales Invoice is the part of the order process when after you picked, packaged and shipped the ordered or requested items to the customer. You may submit this document along with the shipment or after the shipment has arrived to the customer. This document is submitted to the customer as a request for payment.
Creating Sales Invoice from a Previous Sales Order
- From the Customer module, you can create a new sales invoice by:
Click Image to Enlarge
- clicking on the Order > New Order button from the menu.
- Selecting sales orders to process in the Confirm Pick and Invoice under the Invoice drop down list of the Customer module. This option creates a corresponding sales invoice for each sales order.
- A search screen of ready to invoice sales orders and active customers and customer ship to is displayed. The following are the options to create a sales invoice:
- To create a sales invoice from a previous sales order, select the sales order from the Ready to Invoice tab and click Ok or double click on your selection. The Sales Invoice form will display.

If you want to create invoices for other customers simultaneously, you may select another customer sales order. A Sales Invoice form is displayed for every sales order selected.
- To consolidate sales orders into one invoice, select the sales orders (must be the same customer) from the Ready to Invoice tab and click OK. A pop up window will ask you to Assign an Invoice/Tax Date. Set the date and click OK. Click Yes in the prompt to view the sales invoices. The Sales Invoice form will appear.
- To create a sales invoice from a previous sales order, select the sales order from the Ready to Invoice tab and click Ok or double click on your selection. The Sales Invoice form will display.
- After choosing any one of the options above, the Sales Invoice form will be displayed. The Sales Invoice form will reflect the details of the sales order(s). You may modify or add to this information as needed.
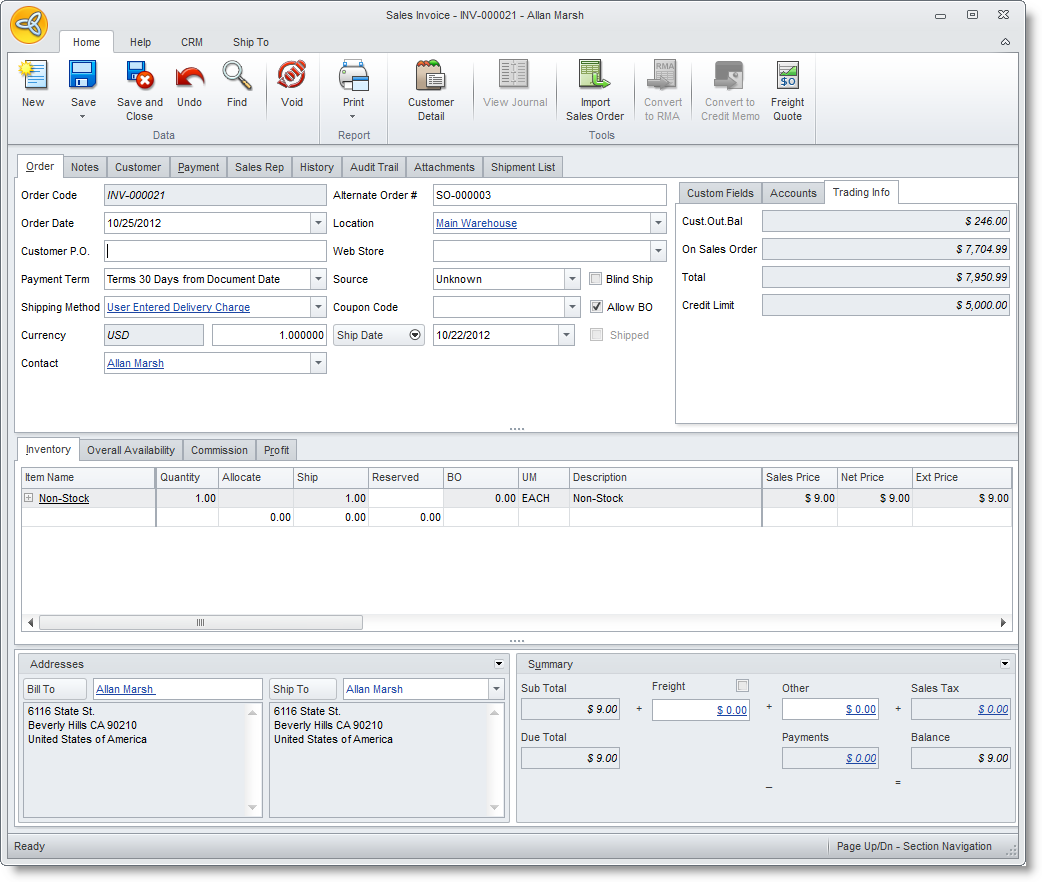
Sales Invoice Field
Definition
Order Code
This field is automatically generated by the system once a sales quote.proforma is created. Order Date
This is the date when the order is first created. You may change the defualt current date as needed. Customer PO
You may add relevant document codes in this field as well as the Alternate Oder # field. Payment Term
This field sets the payment term assigned for the sales quote. You may change the payment term when needed. Shipping Method
This field sets the Shipping Method assigned for the sales quote. You may change the payment term when needed. Currency
Set the currency used for the sales quote. You may change the currency as needed. Contact
This field shows the contact assigned for the sales quote. Location
Select the default location to which the items should be picked from. Web Store Select the website assigned to the sales quote. You may change the website as needed. Source Optional: You may change the default Source for the customer. Ship Date Assign a date for the shipment to be delivered to the customer.
Click on the arrow button next to this field to view the Latest Ship Date and Overall Due Date fields. You can assign approximate dates for these fields.Opportunity If the sales quote is generated from an opportunity record, the Opportunity Code will display in this field. You can also assign an opportunity record by selecting it from the pulldown list.
Click on the arrow button next to this field to view the Wave fields. You can select a related campaign wave to the sales quote.
- In the Inventory Item tab, the line items from the Sales Order is reflected. You may add items by clicking on the pulldown arrow button inside the Item Code column.
- Specify the number to ship in the Ship column.
- You may change the details to each item line according to what you and the customer had agreed upon. You may change the Unit Measure, Warehouse, Tax Code or Sales Price.
- The Quantity column displays the ordered quantity from the sales order(s).You can put in the shipped quantity in the Ship column for each item line.
- The Freight field displays the freight amount based on the freight calculation from the shipping method.
- Save the details before closing the Sales Invoice form. Save or post the sales invoice by clicking on any of the save options from the menu.

Creating a New Sales Invoice from Scratch
- From the Customer module, you can create a new sales invoice by:
- Invoice > New Invoice
- New Invoice icon from the Prospect or Customer detail form. This will load the Sales Invoice form instantly.
- A search screen of ready to invoice sales orders and active customers and customer ship to is displayed.
- To create a new invoice from scratch, select a customer from the Active Customers or the Active Ship To Details tab. The Sales Invoice form will appear.
- After choosing any one of the options above, the Sales Invoice form will be displayed. The Sales Invoice form will display the default information setup for the customer. You may change this default information for this current invoice. Refer to the table from Creating Sales Invoice from a Previous Sales Order.
- In the Inventory Item tab, the line items from the Sales Order is reflected. You may add items by clicking on the pulldown arrow button inside the Item Code column.
- Specify the number to ship in the Ship column.
- You may change the details to each item line according to what you and the customer had agreed upon. You may change the Unit Measure, Warehouse, Tax Code or Sales Price.
- The Quantity column displays the ordered quantity from the sales order(s).You can put in the shipped quantity in the Ship column for each item line.
- The Freight field displays the freight amount based on the freight calculation from the shipping method.
- Save the details before closing the Sales Invoice form. Save or post the sales invoice by clicking on any of the save options in the menu.
Import Existing Sales Orders
Note that only the line items from the sales order are imported. These will be added to the line items in the sales order.
- If there are line items in the sales invoice, save the sales invoice before importing.
- From the toolbar menu of the Sales Invoice form, click on the Import Sales Order option from the toolbar menu. A list of available sales order for the customer is displayed.
- Select the sales order to import and click OK to add the line items. You can import another sales order if needed.
Invoice Items per Location
For orders with items coming in from different locations, you can set the workflow stages per location. To do this,
- In the Sales Order form, click on the Workflow tab.
- Select the Warehouse that you will ship the items from and set the stage to Ready to Invoice.
- Convert the sales order to invoice by clicking on the Convert to Sales Invoice option in the toolbar menu.
- Choose Yes in the prompt to create a sales invoice.
- You can choose to view the sales invoice record or later.
Accept Payment on Invoice
The Sales Invoice form allows you to accept advanced payments directly. You may accept partial payments in different payment methods using the Enter Payment from the menu options in the Sales Invoice form. To record customer payments,
- From the Sales Invoice form, click on Enter Payment > Add Payment.
- You may change the Payment Type used.
See Also: Create Customer Payments - Save the payment by clicking on the save options in the menu. Note that the payments created from the sales order form are not allocated until the order is converted to invoice.
Print Invoices Individually or By Batch
- You may print the current invoice document by clicking on the Print button from the toolbar menu of theSales Invoice form. The Print Dialog window will display. See Also: Using the Print Dialog window
- To print in batches, use the Batch Document Printing option under the Tools menu of the Customermodule.
Send Copy of Invoices to Customer or Contacts
- From the Sales Invoice form, click on the Print button to display the Print Dialog window.
- From the Report List, select the type of document to print or send.
- In the Destination options, you can choose to email or fax the document.
- To send through email,
- Select Email as the printing destination and the customer’s default contact email address appears in the Email Address field (if there is no email address setup for the contact, the customer’s primary email address is used).
- In the Email tab, you may modify the default email message.
- Click Ok to send the email with a PDF file of the order acknowledgement attached.
See Also: Manage Emails
- To send though fax,
- Select Fax as the printing destination and the customer’s default contact fax number appears in the Fax Number field (if there is no fax number setup for the default contact, the customer’s primary fax number is used).
- In the Fax tab, you may modify the default fax message.
- Click Ok to send the fax (requires registration to InterFAX) with a PDF file of the order acknowledgement attached. See Also: Manage Fax
- To send through email,
Record Opening Balance Invoices | Record Batch Invoices