Various Sales Order Operations
In this article, we will discuss some of the various operations and processes involved in a sales order.
Enter Items in the Sales Order
Enter Non-Stock Items

Connected Business includes a default non stock item that you can enter in the sales order. You can also set up new ones from Inventory module > Item > New Item option.
To enter a non stock item in a sales order,
- Place your cursor in an empty item line n the Item Code column.
- Tab through the Quantity column from the Item Code. The system will recognize the item as non stock.
- You can enter the item details in the Description, Quantity, Sales Price, Discount, Due Date, and Tax.
- You can also change the default Sales Account for the non stock line item if needed.
![]()
Enter Kit Items
To enter kit items in a sales order,
- Select a kit item from the Item Code column and the Kit Configurator form will be displayed. This form is used to select the components for the kit and specify the details for pricing, discount, etc.
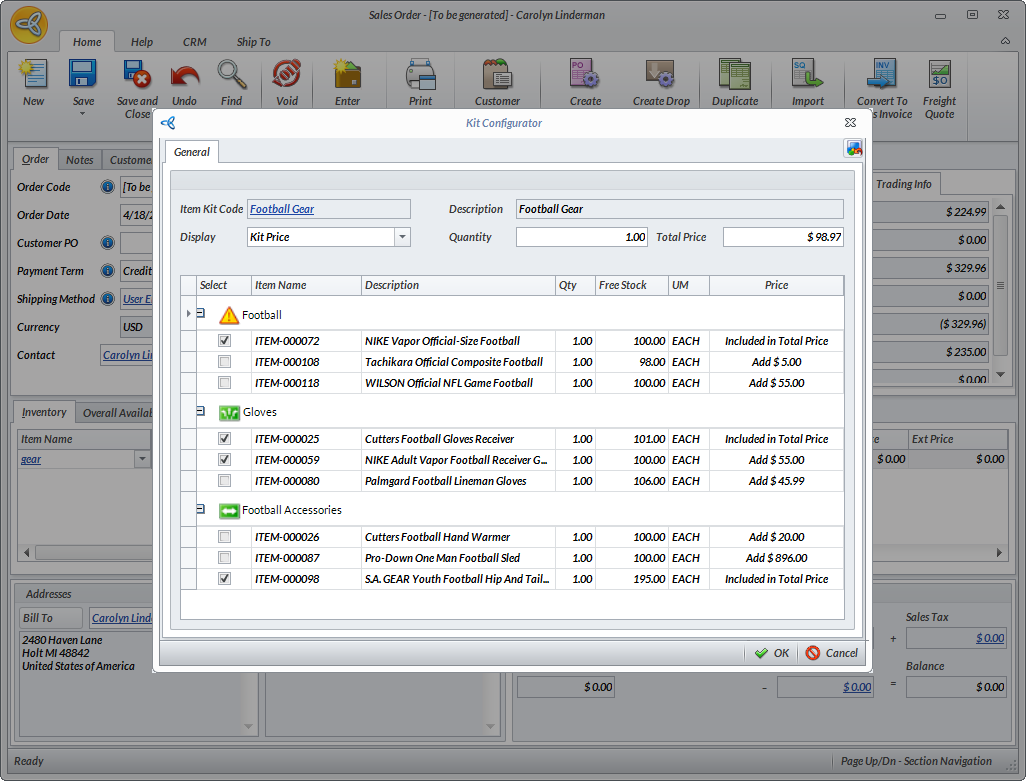
Click Image to Enlarge
- You can select the pricing type to be displayed for each component in the Display field. You can choose between:
- Kit Price - the Total Price field will display the total price of the default components selected. You can modify the value with the price negotiated with the customer.
- Item Price - the Total Price field will display the total amount of the components selected. This value cannot be modified.
- In the Quantity field, enter the total quantity of the kit items to enter in the order. The total price will be displayed.
- Select the components to be included in the kit by ticking the checkboxes under the group labels. The images next to the group labels have the following description:
- Required (
 ) - the item is a required component of the kit
 - Multi-select (
 ) - the customer may select more than one similar item in the option group
 - Optiona (
 ) - the customer can opt to include the item in their order or not.
- Required (
- The Price column displays how much will be added if the item is included in the kit.
- After selecting the items to include in the kit, click OK to return to the Sales Order form.
You can view the kit components when you click on on the node button beside the Item Code name.
If you want to modify the selection of components in the kit, simply right click on the kit item and select the Edit Item Kit option. The Kit Configurator form will be displayed. Select your preferred kit components or simply click Reset to adjust your selections.
![]()
Enter Matrix Items
To enter a matrix item in a sales order,
- Select matrix items directly from the item list or select a matrix group. The Item Matrix Entry form will be displayed.

Click Image to Enlarge
- Set the attribute code to choose from in the Horizontal Attribute field.
- In entering the order quantity, you can either enter the quantity in each attribute row or enter the quantity in the Set All Quantity To field and click Applybutton to set the order quantity across all the items.
If the value in the attribute row appears in red, this means that there is no stock available for the matrix item.
- You can amend the sales price for the matrix item in the Sales Price tab.
- You can also add discount information for the matrix items in the Discount tab.
You can modify the matrix items that have been included in the Sales Order. To change or update the matrix items, you can either
- Remove or Replace the Matrix Item
- To remove the matrix item, right click on the line item and select Delete Line Item.
- To replace the matrix item, select the item in the Item Code column pulldown.
- Pull up the Item Matrix Entry Form
- To pull up the Item Matrix form, right click on the matrix item and select the Edit Item Matrix option.
![]()
Enter Substitute or Accessory Items
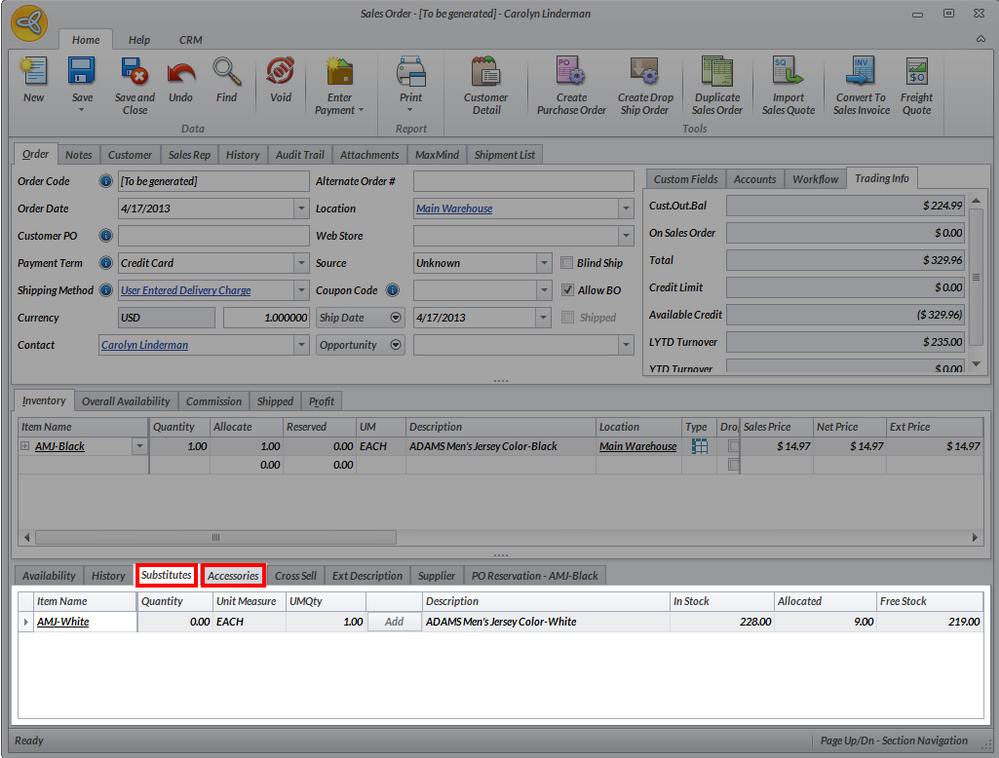
Click Image to Enlarge
Substitute and accessory items must be set up first for the item to view the Substitute and Accessory tabs.
To add Accessory Items,
- Click on the Accessories tab.
- Select the item from the list.
- Specify the Quantity to add and the Unit Measure to use.
- Then click on the Add button to include the accessory item to the order line items.
To add Substitute Items,
- Click on the Substitutes tab.
- Select the item from the list.
- Specify the Quantity to add and the Unit Measure to use.
-
Then, click on the Add button to include the substitute the item to the order line items.

Enter Cross-Sell or Up-Sell Items
Items for cross-sell and up-sell are assessed in a “customers-who-bought-this-also-bought-this” within Connected Business and suggests to you what customers buy when they are considering ordering a particular item.
- Select the line item in the sales order.
- Tab to the Quantity column to view the supplementary tabs below the Inventory Item tab.
- Click on the Cross-Sell/Up-Sell tab.
- Specify the Quantity to add and click on the Add button to add the cross-sell item to the sales order
You can find out what items are recently bought by the customer by going to the Customer Details option from the menu. On the Customer Detail, click on the Recent Sales tab to view the Bought Items History and the related cross-sell or up-sell items.
![]()
Enter Negative Quantities on Orders
The Sales Order form allows you to accept negative quantities on selected item types. Manual entry of negative quantities on are limited only to non-stock items and service item types.
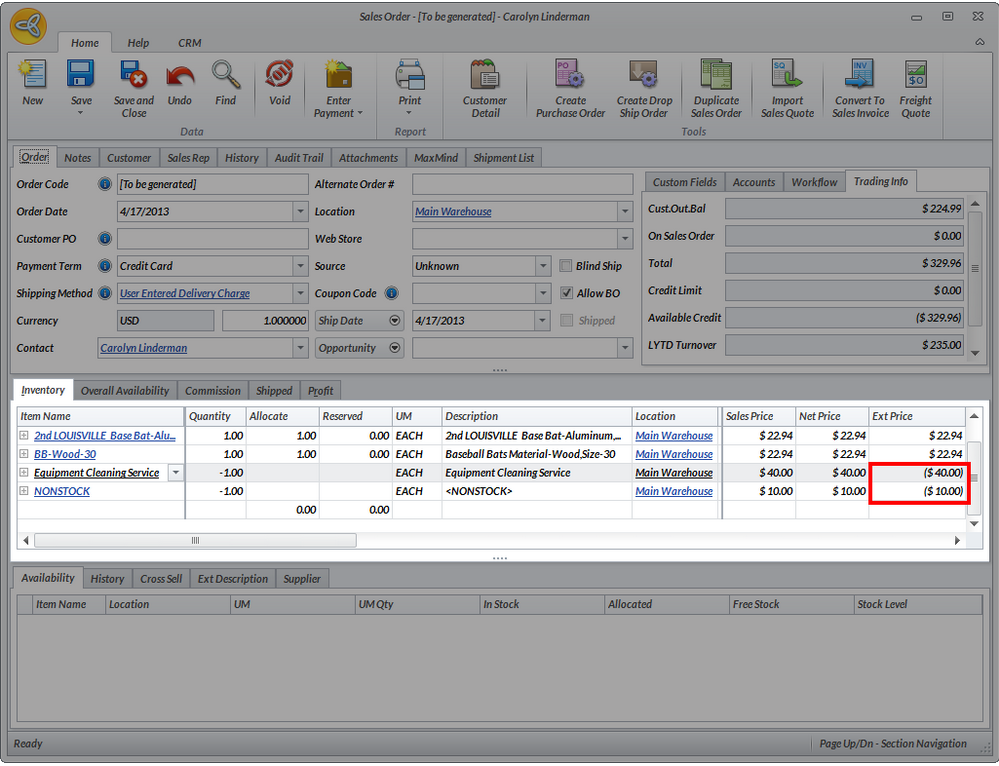
Click Image to Enlarge
To enter negative quantities on sales orders,
- Add items on the sales order form e.g. non stock item type or service item
- On the quantity column, enter a negative quantity.
- Save the Sales Order.
It should not allow you to save the sales invoice when the due total is still negative. You have to add another item i.e. stock to make sure that the Due Total for the sales invoice is positive.
- The negative quantity is displayed in parenthesis. For line items with negative quantities, creating a drop ship or a purchase order is not allowed since the drop ship checkbox is disabled.
This feature is also useful when you want to provide line item discounts on sales order or restocking fee on returned items.
![]()
Enter Sales Reps and Commissions
To set up the sales reps and commissions in the Sales Order form, you can use the Sales Rep and Commission tabs in the Sales Order form.
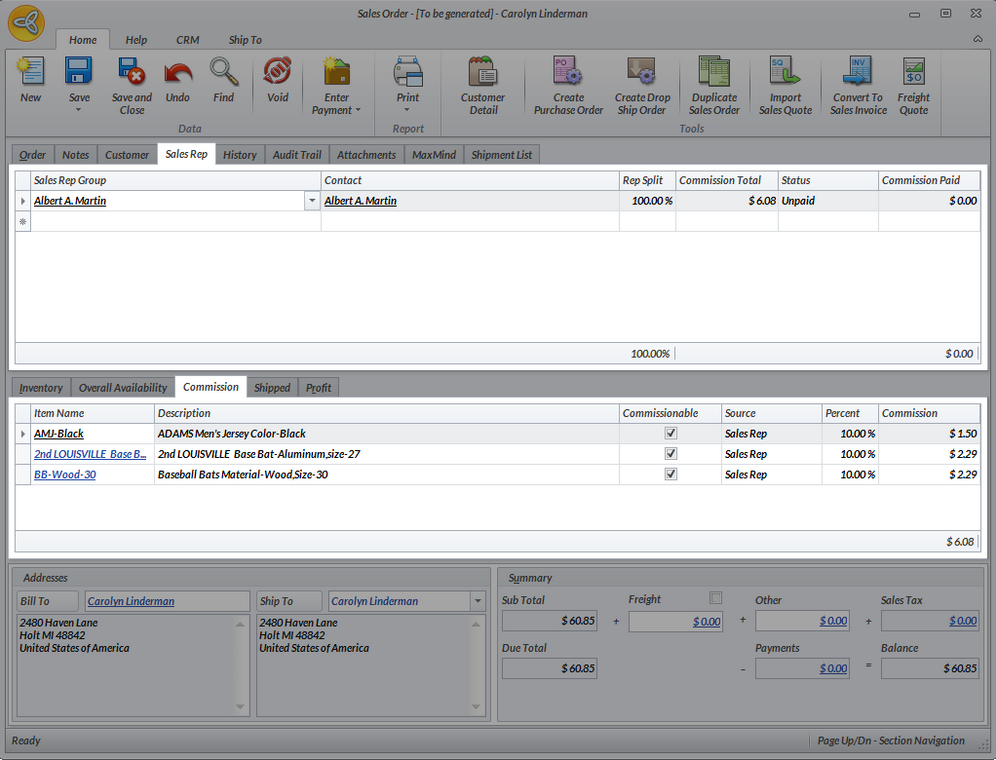
Click Image to Enlarge
In the Sales Rep tab, you will find the default sales rep group assigned to the customer. To select another,
- Select the sales rep in the Sales Group column pulldown.
- In the Contact Name column, select the contact or sales rep.
- The default commission percent will display in the % Split column. You can change the default commission percent.
- You may view the commission percent, commission value and source for each line item in the Commissions tab. You may also change the default commission percent in the Percent column for each line item.
Commissions can be set up from a number of sources. It can be set up per item, per customer, per customer ship to or per sales rep group. You can check the Commissions tab > Source column to view where the commission is coming from.
Split Commissions Among Sales Representatives
Note that sales reps must be set up as contacts for a Sales Rep Group.
- Select the sales rep group from the Sales Group column and select a contact (sales rep) from the Contact column.
- In the next line and so on, select the sales rep group and select another contact to split the commission to.
- For each sales rep, enter the commission percent in the % Split column. This value must add up to 100%.
Manually Enter Commissions for Line Items
- Go to the Commissions tab.
- Click on the Commissionable checkbox (if not enabled).
- Enter the percent commission percent in the Percent column.
- The Source column will identify it as “Manual”.
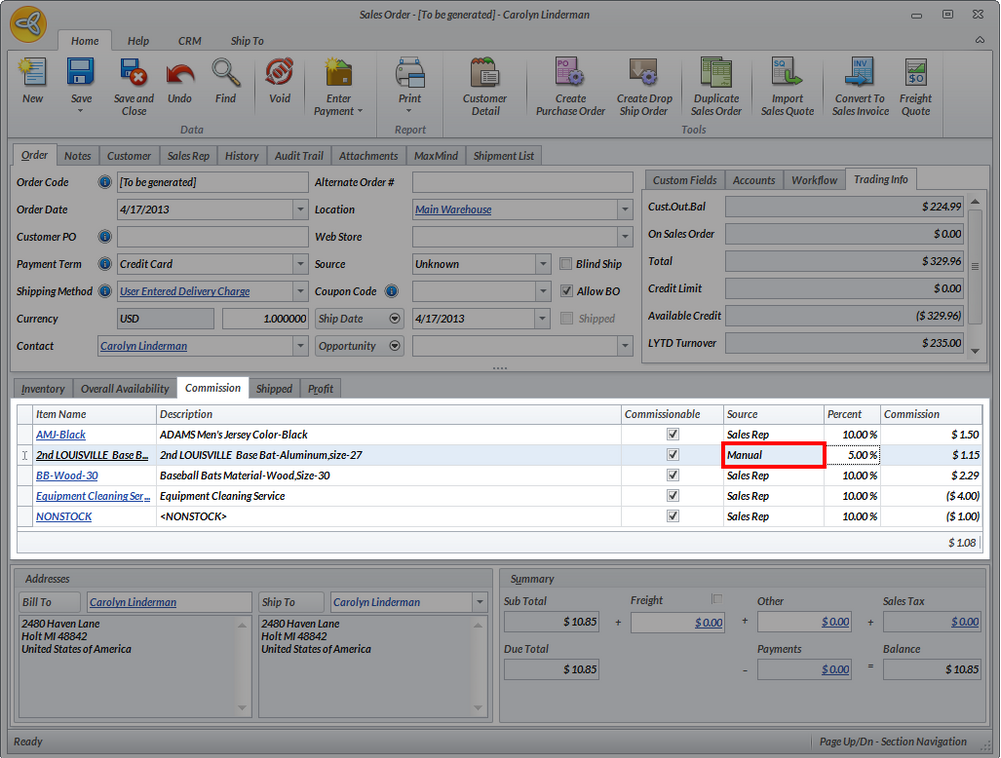
Click Image to Enlarge
For more info on processing sales rep commissions, refer to Process Sales Rep Commissions.
![]()
Stock Allocation During Order Entry
The stock allocation process during order entry of ordered item quantities is enhanced starting from Connected Business 13. In Interprise Suite 6.0, by default, upon creating an order the allocated quantity will always be the same as the ordered quantity regardless of the free stock in your physical inventory.
Prerequisite: Make sure that the Ignore Stock Level on Allocation is enabled. To enable this, go to Customer module ► Setup ►Preferences. The Customer Preference will be displayed. Once enabled, you may now be able to take orders.
To order items,
- Create a new Sales Order/Sales Invoice.
- On the Sales Order/Sales Invoice form, enter a quantity (which can be greater than or equal to the number of free stocks) in the Quantity column. The system automatically fills the Allocate column with a value that is equal to the available free stock.
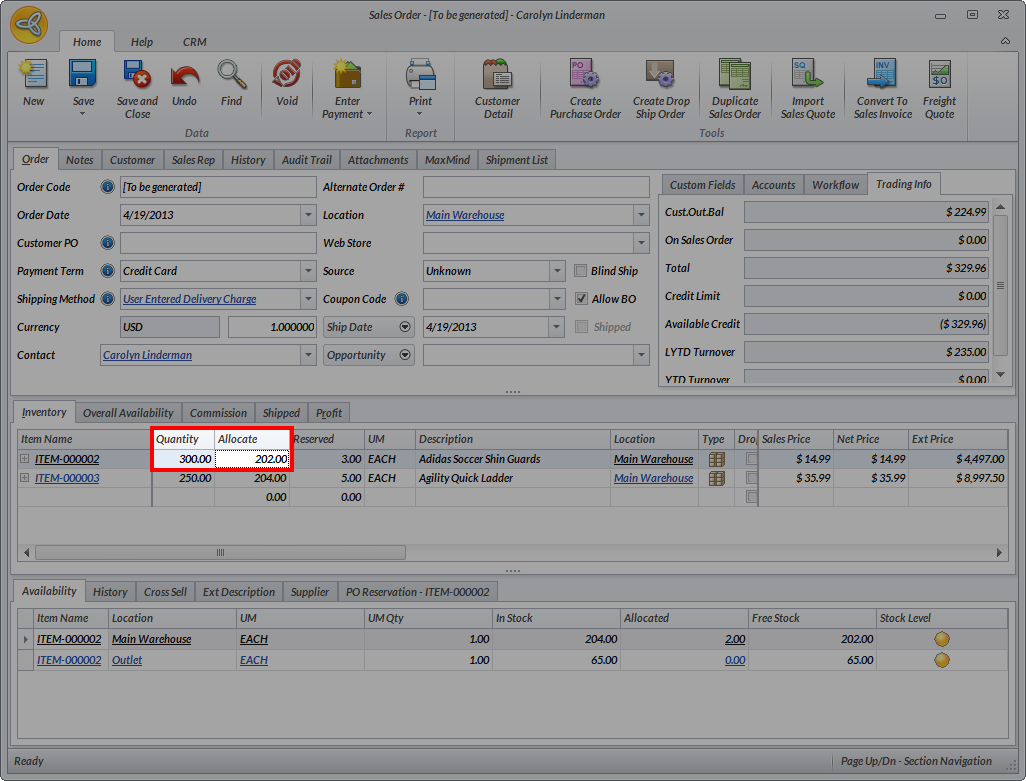
Click Image to Enlarge
If Ignore Stock Level option is set to True, you can override the allocated quantity.
![]()
Reserve Items on Sales Orders and Purchase Orders
Order reservation allows you to reserve incoming purchase orders to sales orders, back order and sales invoices when inventory items do not have enough free stock.
Here are some keypoints when making item reservation for a sales order:
- Reservation is automatically applied for recurring transactions in sales order, purchase orders or sales invoice.
- Due date of the purchase order should be less than or equal to the due date of the sales order line item.
- Reservation under the reservation code can also be manually changed.
- Item reservation only applies for purchase order if it has the SAME warehouse with the sales order.
Reserve Free Stocks on Sales Orders
To reserve free stocks on sales orders,
- Create a new sales order by going to Customer module > Order > New Order. Select from the list of Ship To, Bill To and Available Sales Quote to load the New Sales Order form.
- On the Inventory tab, enter the item(s) to order.
- On the Quantity column, enter the number of items to order. The Allocate column field will be automatically filled with the same number as the items ordered in the Quantity column.
- Check the allocated quantity under the Allocated column in the Availability tab. If there is a change in the number of free stocks in the Free Stock column, this means that the item has been allocated based on the quantity ordered.
- You can also check if it the item has been reserved through the PO Reservation tab.
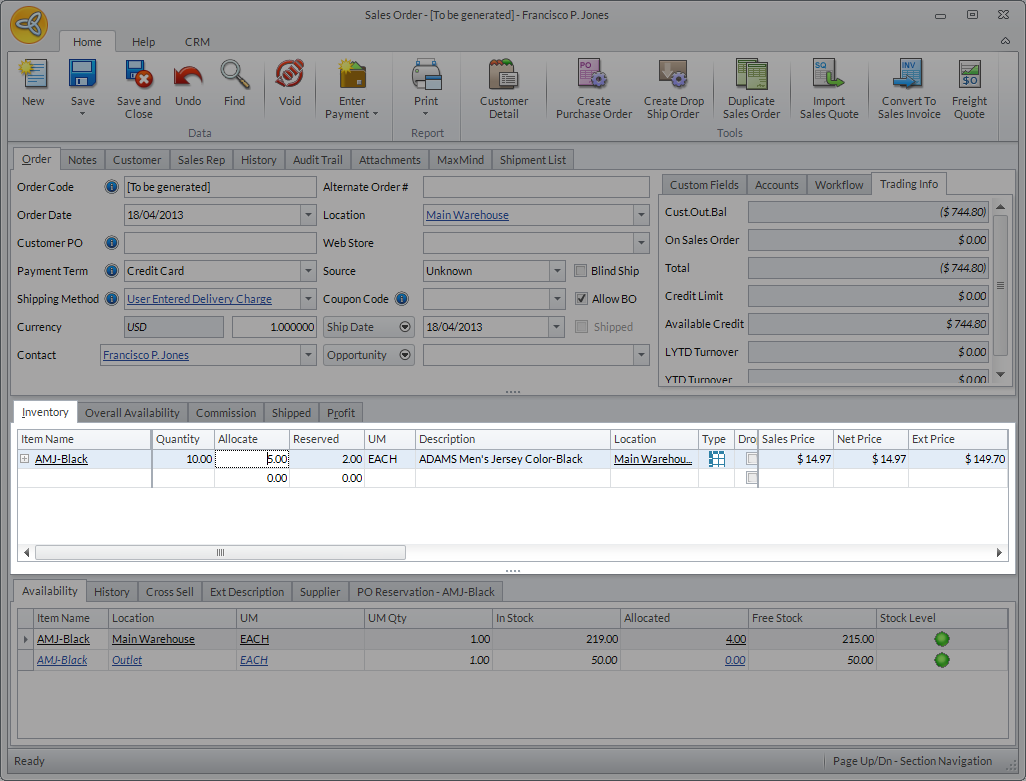
Click Image to Enlarge
- Save the details before closing the form.
Reserve Incoming Stocks on Purchase Orders
When creating a sales order or sales invoice, the items allocated should be less than the quantity ordered. If there is not enough free stock, go to the Supplier module.
The Reserved column is automatically filled with the same number as the allocated items given there is enough free stocks for the item.
To reserve free stocks on purchase order,
- Create a new purchase order by going to Supplier module > Purchases > New Purchases. Select from the list of suppliers to load the New Purchase Order form. Enter the same items ordered in the sales order above.
- On the Inventory Item tab, enter the quantity to be ordered in the Ordered column. The Reserved and Reserved in Base columns will be automatically filled with the same quantity in the Ordered column.
- Click the item and you will see in the Item Reservation tab that the Sales Order/Sales Invoice is already attached . Save and close the purchase order form to reflect changes on the sales order form.
You cannot make any changes on the purchase order once it has been saved.
- Similarly, on the Sales Order/Sales Invoice form you can check if the item is already reserved through the PO reservation tab. The purchase order form is also attached to the sales order form.
The due date of the sales order should be greater than the purchase order to give the supplier time to deliver the ordered items before the indicated due date on the sales order/sales invoice form.
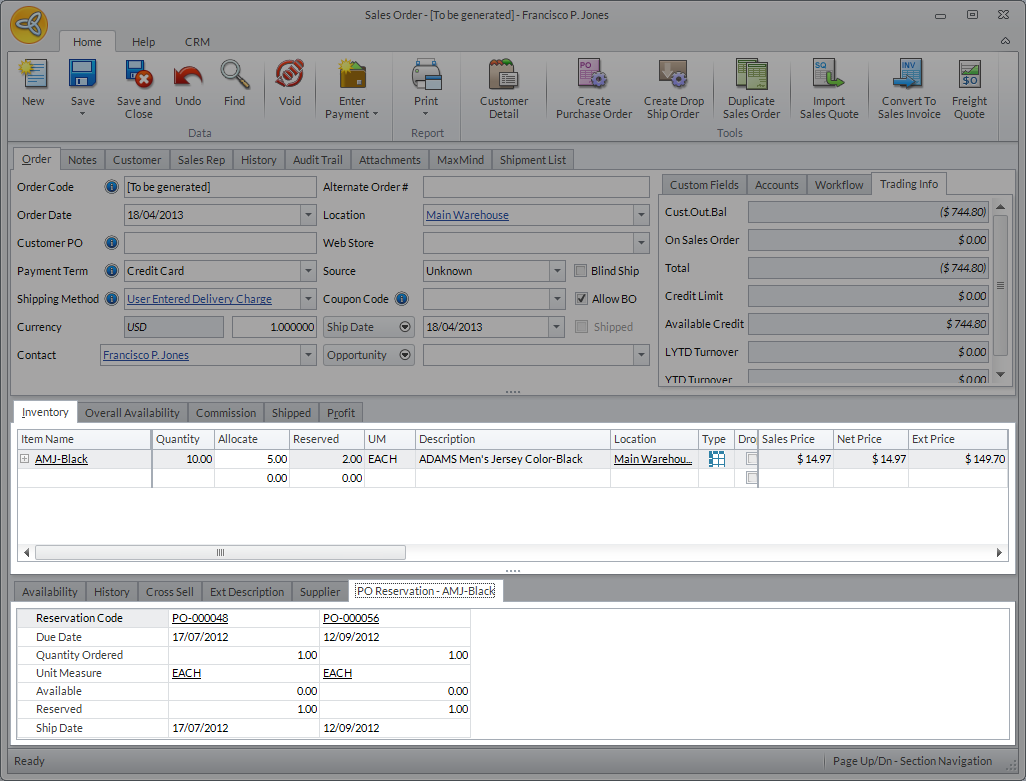
Click Image to Enlarge
There are a few limitations when ordering items in the purchase order,
- When ordering kit items in the purchase order, the reservation can only be made if the whole kit item is ordered, not just the kit components..
- If you change the unit measure in the Purchase Order, it will recalculate the quantity in the Ordered and Reserved columns except the quantity in the ReservedinBase.
![]()
Set Up Autoallocation and Reservation from Voided Sales Orders
To set up autoallocation and reservation from voided sales orders,
- Go to the Customer module > Setup > Preferences > Advanced Preferences. The Customer Advance Preferences form will be displayed.
- From the list of preferences, select IsAutoAllocateReservePOComingFromVoidedSO to view the preference details.
- On the Details tab, enter the appropriate value on the Value field. For voided Sales Order, there are two options:
- 0 - Do Not Reserve – will not reserve the item to the succeeding sales order.
- 1 - Auto allocate – automatically reserve the item to the succeeding sales order.
![]()
Manage Allocation and Reservation Concurrency
The Customer Advanced Preference option allows you to manage several concurrencies when allocating and reserving items on sales order, invoice and purchase order transactions. To manage allocation and reservation concurrency,
- Go to Customer module > Setup > Preferences > Advanced Preferences. The Customer Advance Preferences form will be displayed.
- From the list of preferences, select AllocationAndReservationConcurrencyAction to view the preference details. Choose how you want to manage the allocation and reservation concurency from the following options.
- Automatically adjust the allocation and reservation of all the items that encountered concurrency during saving of the transaction.
- For allocation concurrency, this option automatically adjusts the allocated quantity of the items that encountered concurrency.
- For the reservation concurrency, it will automatically adjust the reserved quantity of the item based on the available quantity to be reserved.
- Manually adjust the allocation and reservation of the first item that encountered concurrency in the stock management form.
- This will show the allocation and reservation concurrency form and display the first item that encountered the concurrency. Allocation and Reservation Concurrency manager form will display for each items.
- Have the system check all the items that encountered concurrency and let the user manually adjust allocation and reservation in the stock management form.
- This option will display ALL the items that encountered concurrency on the allocation and reservation concurrency form.
- Automatically adjust the allocation and reservation of all the items that encountered concurrency during saving of the transaction.
- Enter the preferred value in the Value field and click Save before closing the form for the changes to be applied.
Here are some of the scenarios when reserving items in a purchase order:
Scenario 1: Item Reservation when Receiving Items in Partial Quantity
- From the Purchase Order form, select Receive Item button on the Tools menu page group.
- You have the option to modify the quantity of the items received by entering the quantity of the items received under the Received column.
- A pop-up message will confirm if you have entered a quantity less than the outstanding quantity ordered. Click Yes if you want to change, No if you received the right quantity ordered. Click Save and Post.
- The Received quantity will automatically adjust the Ordered quantity in the Purchase Order form associated with the GRN.
Scenario 2: Item Reservation when Receiving Items in Full Quantity
- The Received quantity will automatically adjust the Ordered quantity in the Purchase Order form associated with the GRN.
Scenario 3: Void a Purchase Order with Item Reservation
-
When you void a Purchase Order, the reservations made on the purchase order will be adjusted. This means that the quantity reserved will become zero. Thus, the reservation on the sales order/Sales Invoice associated with the Purchase Order will automatically be withheld.
Allocate Free Stock to Sales Orders
The Allocate Free Stock Routine allows you to automatically allocate inventory items to orders that are prioritized or orders from customers belonging to a common delivery route. You can filter the records according to warehouse, line item due date, overall due date, customer, customer ranking and common delivery route.

Click Image to Enlarge
To allocate free stock on sales orders,
- Go to Customer module > Allocate Free Stock Routine. The Auto Allocate Free Stock form will be displayed.
- Filter the inventory items according to warehouse in the Warehouse Code field. Set filter criteria in the Search By field to filter the records further. You can select from the following filter criteria:
Criteria Description Line Item Due Date Filters the documents by due date. Set the date in the Date Criteria field. Customer Ranking Filters the documents by customer ranking. Select records by using the All option or set a range in the Range option. Customer Filters the documents by customer. Select records by using the All option or set a range in the Range option. Sales Order Filter the documents by sales order code. Select records by using the All option or set a range in the Range option. Overall Ship Date Filters the documents by overall ship date. Set the date in the Date Criteria field. Route Filters the documents by common delivery route. Select records by using the All option or setting a range in the Range option. - After specifying the filter criteria, click the Go button from the tools menu to search for the inventory item records. The results will be displayed in the grid.
- Select the documents you want to allocate to.
- Click the AutoAllocate button on the menu page to allocate the item's free stocks to the sales orders.
Notice that the values in the Allocated column matches that of the values in the Ordered column.
- You may choose to deallocate the orders by clicking the Deallocate button on the menu page and specify the quantity to allocate for each item by entering a value in the Allocated column.
- Click the Close (X) button to save the changes.
![]()
User SO Notification Over Changes in Stock Allocation
When the picking ticket is already printed for partially allocated orders, a notification will be displayed on the sales order form if there are changes in the warehouse. e.g. new items received that will complete the orders.
Follow the steps below on how a Connected Business user will be notified on any changes in the stock allocation.
The items ordered must be less than or equal to the free stock available to fulfill the order.
- On the Sales Order form, enter an item in the item line. For an item that has limited free stocks available, it will automatically allocate the number of items available on the Allocate column. Make sure that “Ignore Stock levels on Allocation” option is unchecked to automate this process. Notice that the Reserve column has no reservation yet.
- Save the Sales Order.
You will need to print a picking ticket when an order has been saved.
- To fulfill the order, you have to purchase the remaining quantity from your supplier. By creating a purchase order, the system will automatically reserve the purchase order to the partially allocated sales order. Check the Sales Order on the list within the Special Order form.
- The Sales Order will now have a reserved item and the linked purchase order. Suppose the shipment of the newly created purchase is in transit, you may now pick the quantity of items that is available in your inventory. In the Sales Order form, go to the Print menu and check on the Print Picking Ticket option to print the picking ticket.
- On the other hand, while the items are already picked, there could be a scenario where the items are already received in the warehouse. You may click on the Receive Items button from the Purchase Order form, and once the Good Received form is posted, the changes will be reflected on the linked Sales order form.
- Notice that the line item appears in red after the sales order is reloaded.
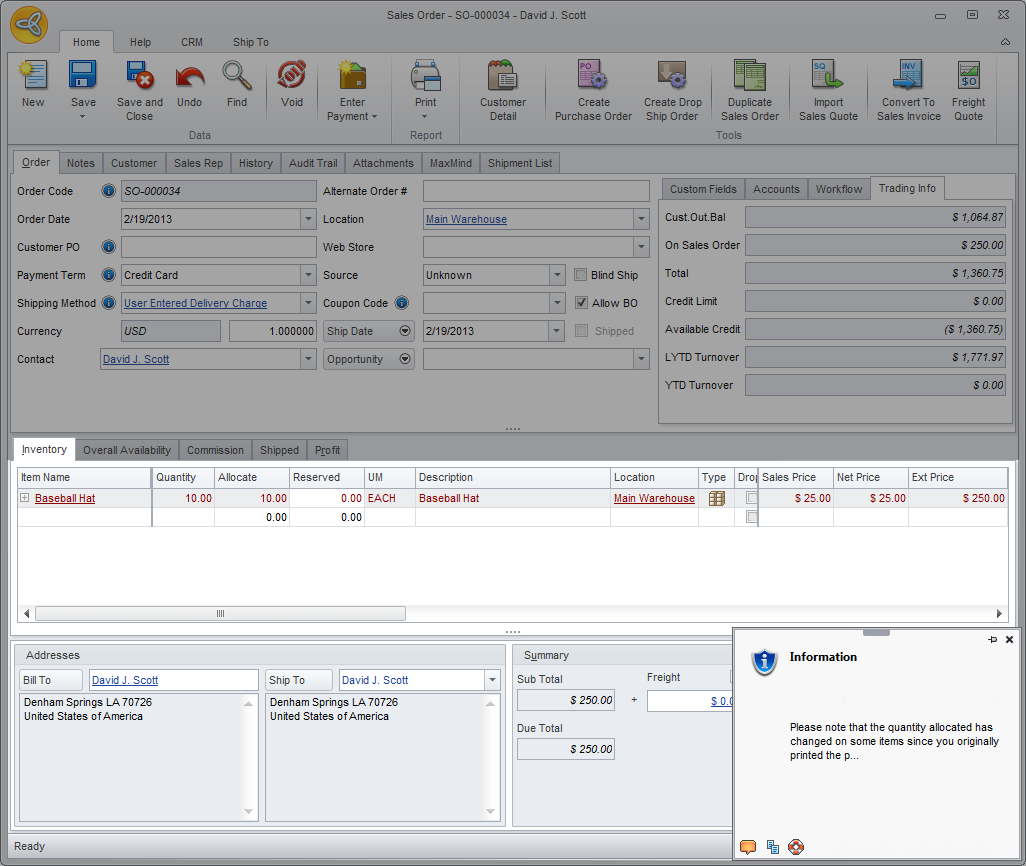
Click Image to Enlarge
There are two options you can do to fulfill this order:- Pick the received items and ship all the items together to your customer (provided you have notified the customer of the estimated shipping date, you may refer to PO Ship Date Enhancement)
- Create a backorder.
- Pick the received items and ship all the items together to your customer (provided you have notified the customer of the estimated shipping date, you may refer to PO Ship Date Enhancement)
![]()
Shipment Date Changes in Sales Order Stock Reservation
Estimated shipment dates are automatically updated in the Sales Order based on any changes made on the linked Purchase Order. Changes made in the Purchase Order Ship Date fields will automatically be reflected in the Ship Date Field of the Sales Order form. By definition,
- Due Date is defined as the date indicated in the Purchase Order form as to when the items can be received on the Seller’s end.
- Ship Date is defined as the date indicated in the Sales Order/Invoice form as to when the items can be shipped or delivered to the Customer.
In Connected Business, updating a ship date for a Sales Order has the following keypoints:
- When receiving items from Purchase Order(s) with the same due dates, the Sales Order/Invoice ship date will be updated equal to the due date the items are received.
- When receiving items from Purchase Order(s) with the different due dates, the Sales Order/Invoice ship date will be updated depending on the selected order ship date. Order Ship Date can either be the Earliest Possible Date or the Latest Possible Date depending on the customer's request.
The following steps demonstrates how to process order reservation with updated shipping date on the Sales Order.
- Create a purchase order. Add items to the Purchase Order, where items does not have stock or diminishing quantity of stock on your physical inventory.
The due dates of the purchase order can be modified in different dates or same dates. For this discussion, we will set different due dates for each purchase orders to show the process on which dates you can apply in the sales order.
- Reserve the purchased items to an order. Create a sales order with items that are recently purchased through the purchase order made.
- Receive the Purchase Order. To receive the purchase order,
- Go to the Supplier module > Received > New Goods Received.
- Select the recently created purchase order on the Available Purchase Orders tab and click OK to load the Goods Received form.
- Click on Save and Post.
- While posting the Goods Received form, a Choose Order Ship Date window will display. You can choose either the Select Earliest or the Select Latest date option. This will reflect the ship date on the reserved Sales Order. Click OK to continue.
- Go to the Supplier module > Received > New Goods Received.
- Check the ship date of the linked Sales Order o see if the changes are applied.
![]()