Upgrade Connected Business eCommerce
This article will guide the user on how to upgrade the Connected Business eCommerce. The Connected Business eCommerce is constantly updated to streamline current processes that allow the user to maximize the usage of system resources and enhance productivity. Included in every update are fixes for specific issues, enhancements, and/or new features. Note that an update only works on a specified version of CBE.
The following summarizes the upgrade procedure.
-
Make a FULL BACKUP of your webstore and database.
-
Install the entire feature of the eCommerce components in the new version
-
Upgrade your company database.
-
Copy or merge existing customizations from the old webstore to the new webstore.
-
Set up your database connection.
-
Configure settings for the Internet Information Services (IIS) Manager.
-
Synchronize item images to the upgraded webstore.
How To Backup Webstore / Company Database
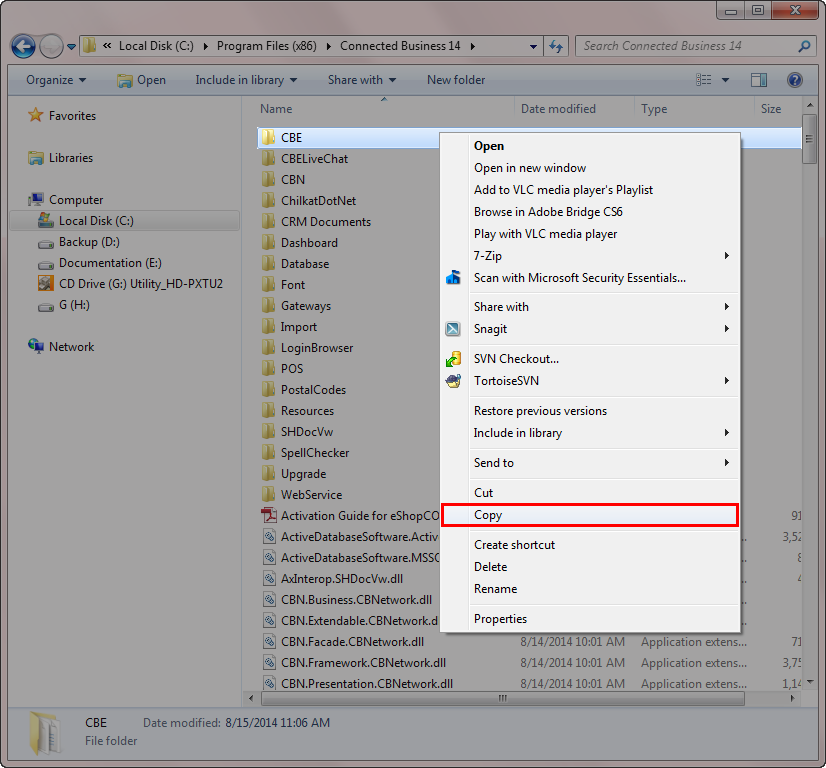
To create a backup of your current webstore, copy the CBE folder from the Connected Business installation folder (e.g. C:\Program Files (x86)\Connected Business 14) and save it to another location in your computer.
Click Image to Enlarge
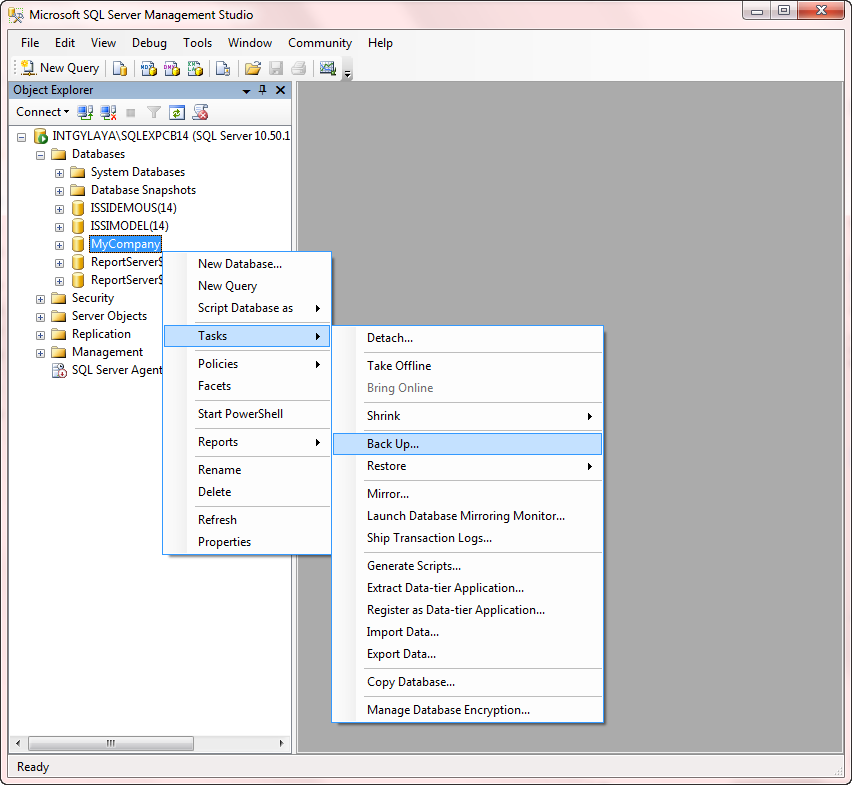
To create a backup of your company database,
-
Open MS SQL Server Management Studio and enter your login credentials.
-
From the Databases folder, select the company database.
-
Right click on the database name then select Tasks > Backup.
Click Image to Enlarge
The Back Up Database window will be displayed.

Click Image to Enlarge
-
In the Source section, verify the database name. You can also select another database to backup from the dropdown list.
-
For the Backup Type, select Full.
-
For the Backup Component, tick Database.
-
In the Backup Set section, you can leave the default name for the backup set as is or enter a new name. You can also enter a description for the backup set (optional) if preferred.
-
In the Destination section, select the backup destination. By default, this is set to the same location where the Connected Business application is located. If you want to select another backup destination, click Add.
-
Once you have selected the backup destination, click OK to start backing up the database.

For more information on how to create a full database backup in MS SQL Server, refer to Create a Full Database Backup (SQL Server).
![]()
How To Install The eCommerce Components
-
Download the new version of the Connected Business installer. You can refer to Download the Connected Business Installer for more information.
-
After downloading, launch the Connected Business installer. You can refer to Installing Connected Business for more information.
-
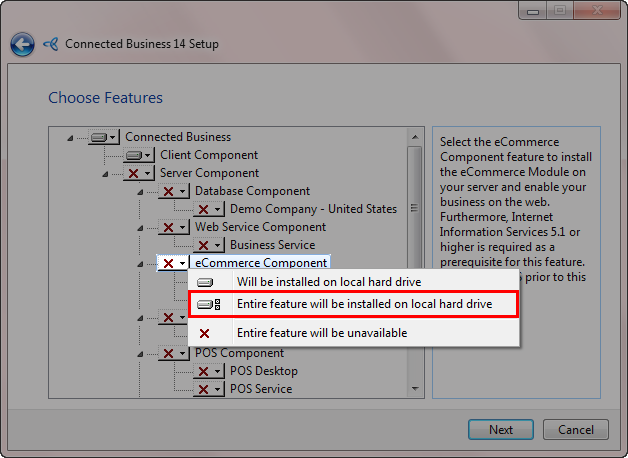
In the Choose Features page of the installation wizard, make sure to select the entire feature for the eCommerce Component. You can also select to install the entire suite of components on your computer.
Click Image to Enlarge
-
After selecting the components, go through the whole wizard to install the new version of the Connected Business application.
![]()
How To Upgrade Company Database
After installing the new version of Connected Business, upgrade your company database.
-
Open the Connected Database Management Console by going to Start menu > All Programs > Connected Business 14 > Tools > Connected DBMC 14. The Connected Database Management Console window will be displayed.
-
Enter your login credentials (Server Name and Login Authentication) to establish connection.
-
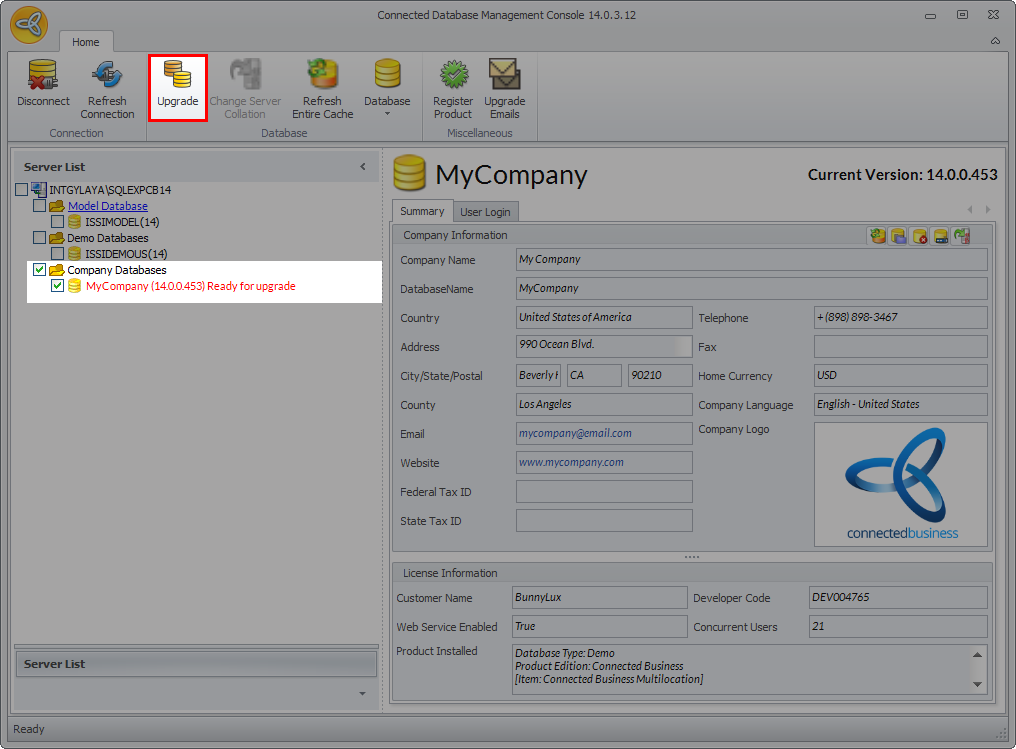
From the Server List Panel, the databases to be upgraded are marked as Ready for upgrade. Select the company database to be upgraded then click the Upgrade menu from the Database toolbar.
Click Image to Enlarge
-
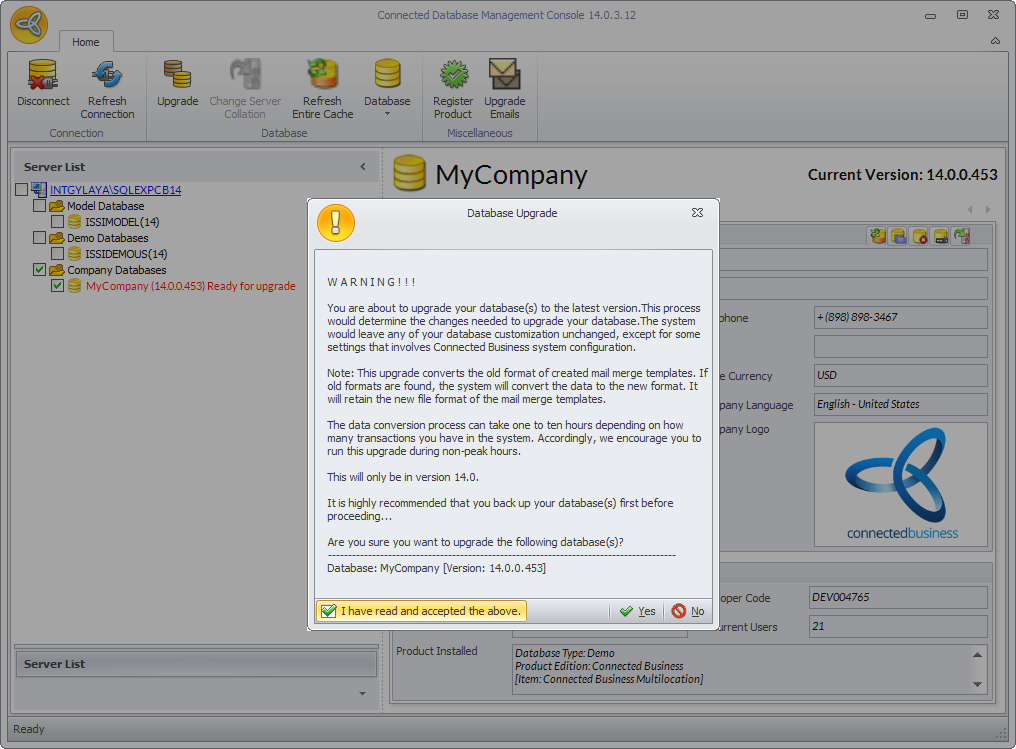
The Database Upgrade pop-up window will be displayed indicating the changes to be applied to the database during the upgrade.
Click Image to Enlarge
-
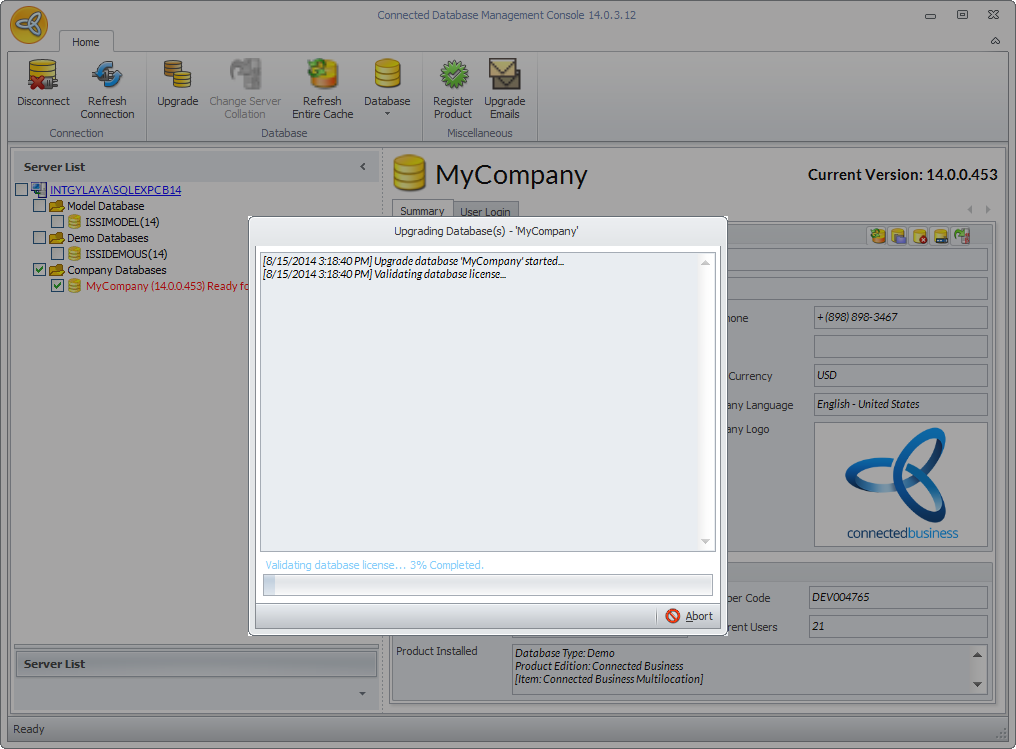
Tick the I have read and accepted the above checkbox and click Yes to start the upgrade. The Upgrading Databases window will be displayed showing the upgrade progress.
Click Image to Enlarge
-
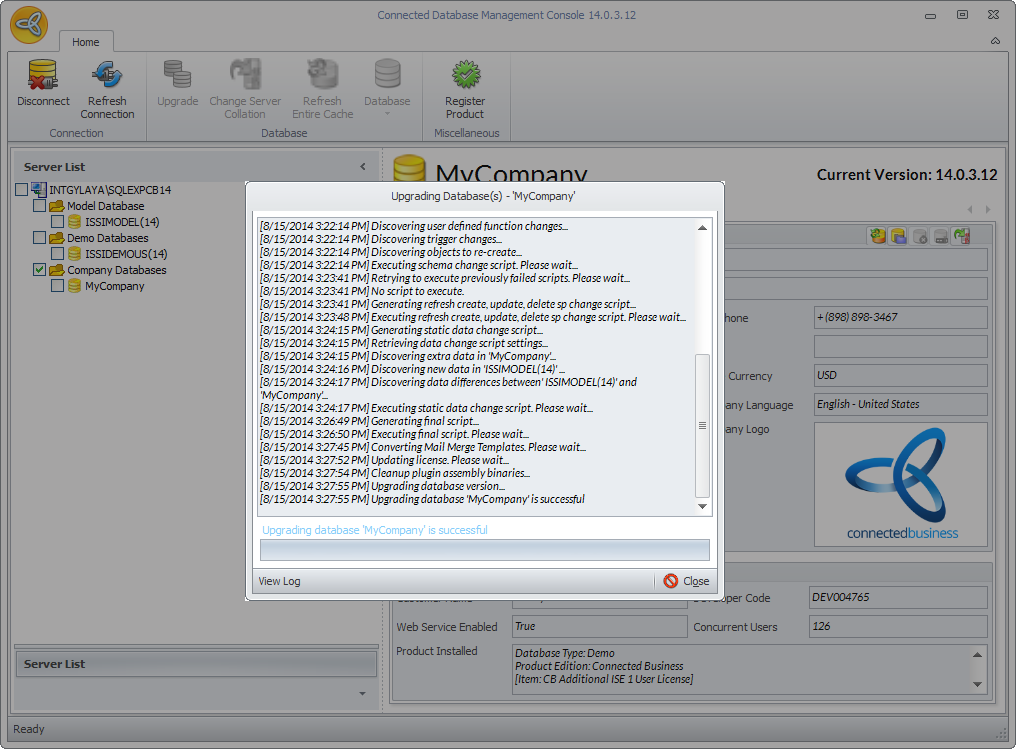
Once the upgrade is successful, the database version number will be updated.
Click Image to Enlarge
Refer to Upgrade Database for more information.
![]()
How To Copy/Merge Existing Customizations To The Upgraded Webstore
When upgrading the Connected Business eCommerce, all customizations made in the old version, except for the skin templates, can be manually or automatically applied in the new version.
If there are any customizations made on the CBE folder in the old version, you can either manually apply your existing customizations line by line or file by file, or merged the customizations by copy and replace function in the new version (make sure to check the logic before merging the files to avoid any compatibility issues).
As for the skin templates, it is recommended to use the default skin in the new version and manually apply the existing customizations from the old version.
![]()
How To Set Up the Cache Database
Once the database is upgraded, you need to set up the cache database that will facilitate several processes for your e-commerce site. To set up your cache database:
-
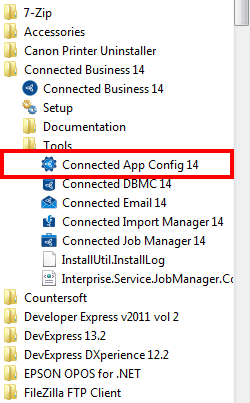
Open the Connected Application Configuration tool. Go to Start menu > All Programs > Connected Business 14 > Tools > Connected App Config 14. The Connected Application Configuration Tool will be displayed.
Click Image to Enlarge
You can also click on the Connected App Config 14 shortcut icon from your desktop to open to tool.
-
From the Company Setup, select the company database to configure (e.g. My Company).
-
After selecting the company database, load the web configuration file. Go to File > Open > Configuration File.
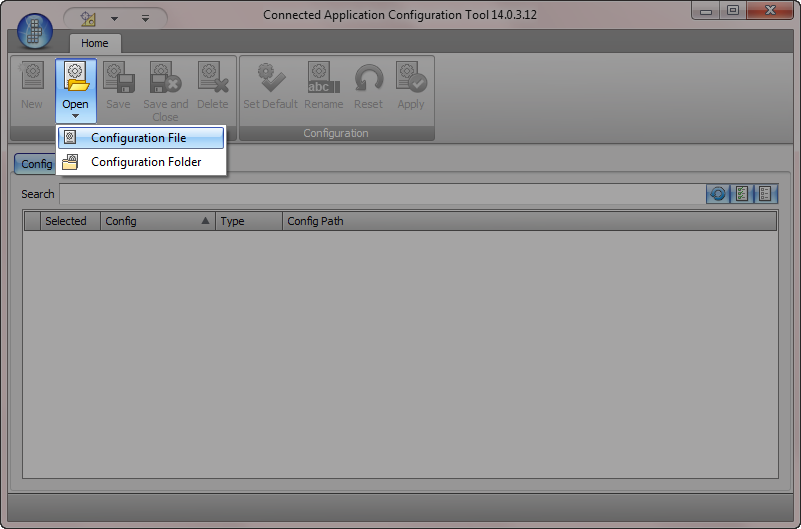
Click Image to Enlarge
A dialog window will be displayed. Open the web configuration file web.config which is usually located in the Connected Business installation folder (e.g. C:\Program Files (x86)\Connected Business 14\CBE\Web).
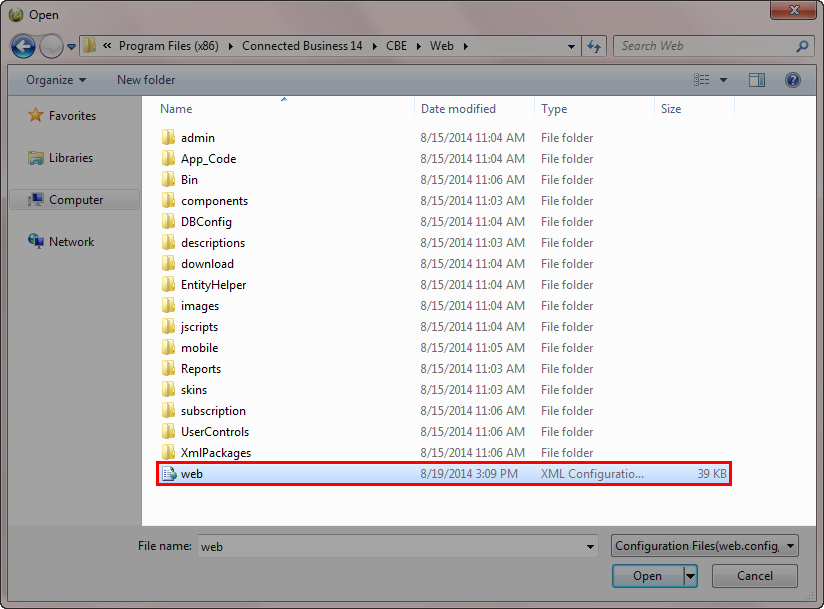
Click Image to Enlarge
-
A dropdown menu lists the different connection options. Choose Use LAN Connection only.
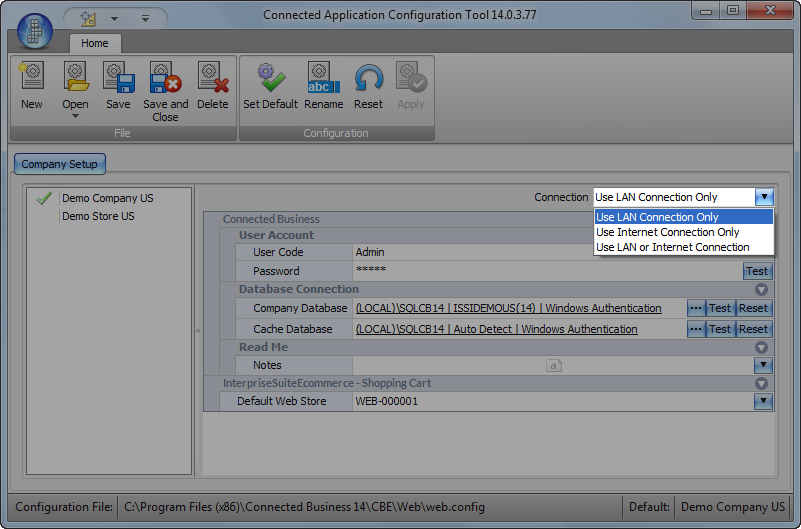
Click Image to Enlarge
-
In the User Account code section, enter the details for the User Code and Password then click Test to verify the connection.
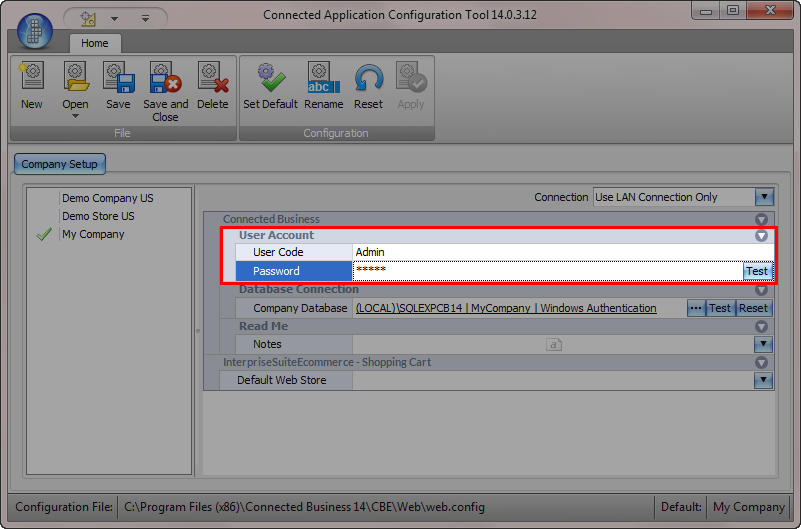
Click Image to Enlarge
-
In the Database Connection, click the ellipsis (…) button to enter the database credentials. The Database Connection form will be displayed.
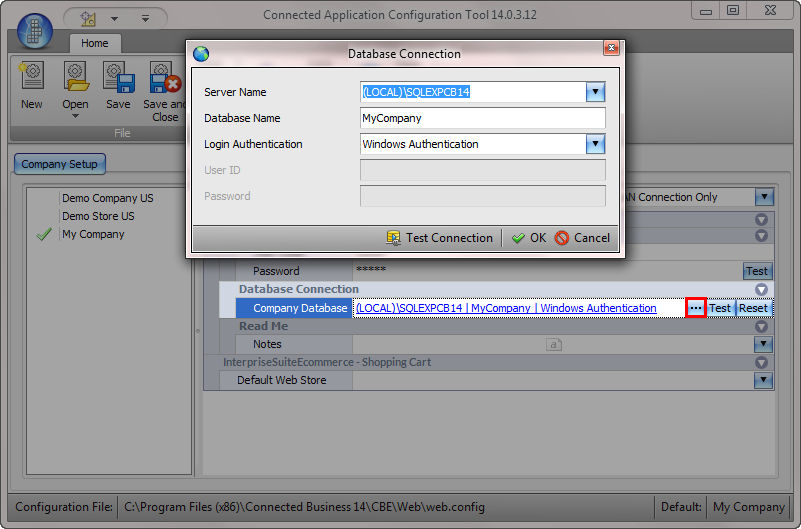
Click Image to Enlarge
-
Enter the Server Name, Database Name and Login Authentication details then click Test Connection to verify the database connection. Once the connection is successful, click OK to close the form.
-
In the Default Web Store field, select the webstore for the database from the dropdown list.
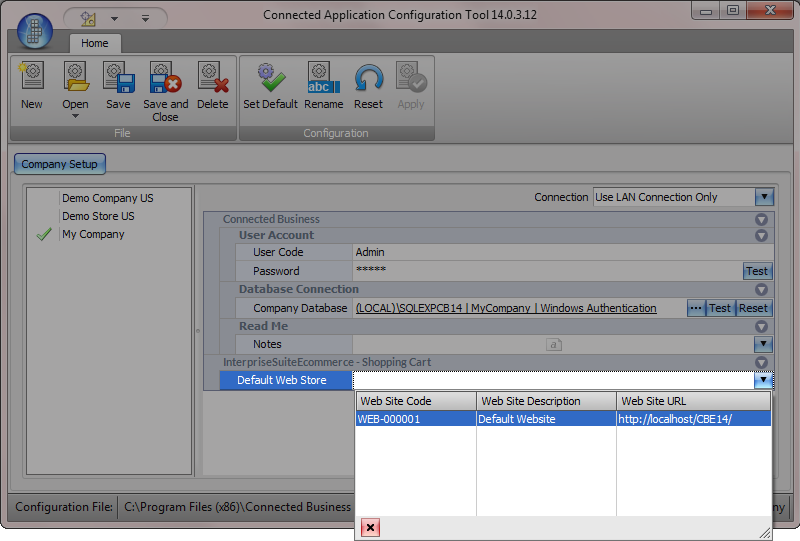
Click Image to Enlarge
-
After entering all the configuration details, click Set Default then Save and Close to apply the changes.
![]()
How To Configure Internet Information Services Settings
After setting the database connection, configure the Internet Information Services (IIS) settings for the webstore.
-
Open the Internet Information Services (IIS) Manager by entering inetmgr from the Start menu. The IIS Manager window will be displayed.
-
Expand the server name > Sites > Default Web Site then select the webstore from the list of virtual applications (e.g. CBE14).
-
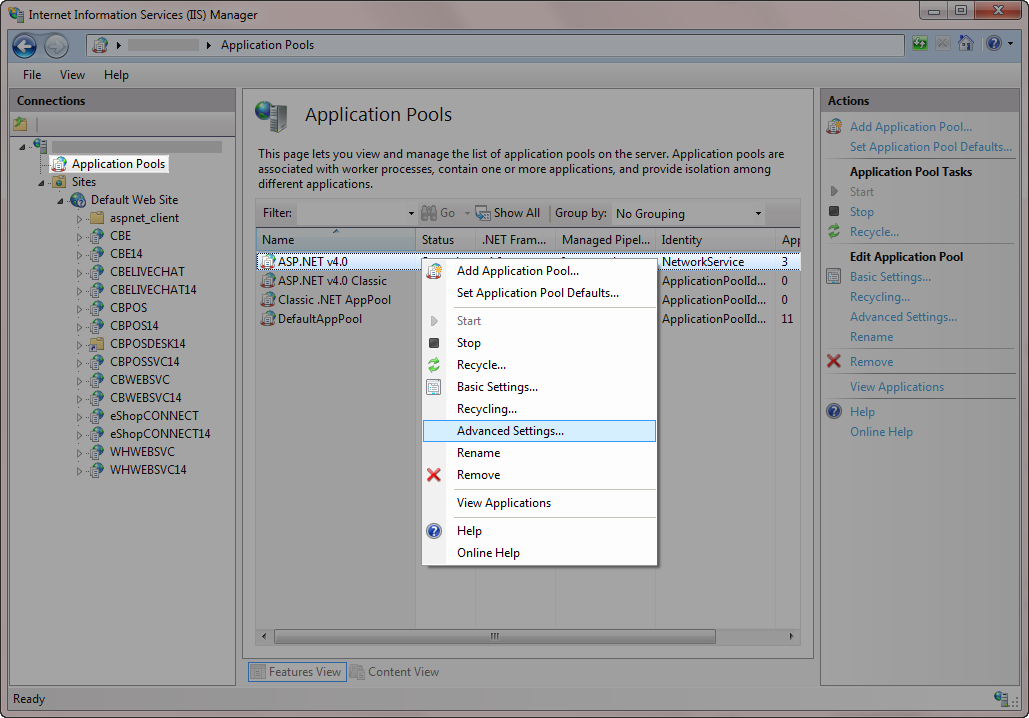
Right click on the webstore name then select Manage Applications > Advance Settings. The Advance Settings form will be displayed.
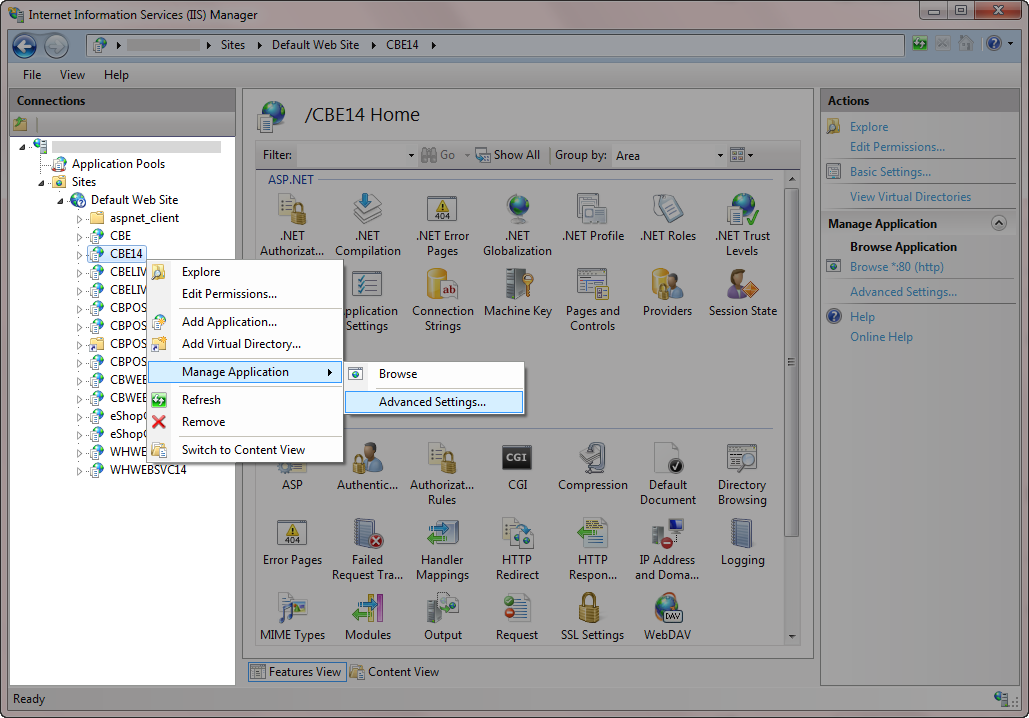
Click Image to Enlarge
-
Set the Application Pool to ASP.NET v4.0. Click the ellipsis button to load the Select Application Pool form then select ASP.NET v4.0 from the Application Pool dropdown list then click OK.
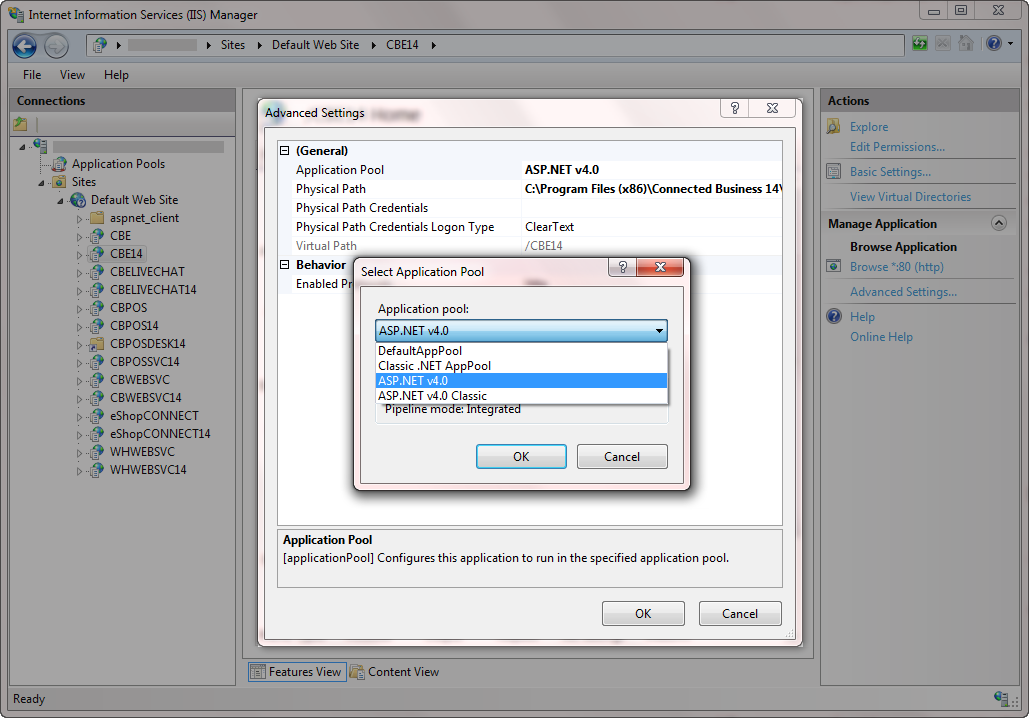
Click Image to Enlarge
-
Set the Physical Path to the location of the Connected Business installation folder then click OK (e.g. C:\Program Files (x86)\Connected Business 14\CBE\Web).
-
Set the Managed Pipeline Mode to Integrated. Click Application Pools from the server panel, right click on ASP.NET v4.0 then select Advance Settings to load the Advanced Settings form.
Click Image to Enlarge
In the Managed Pipeline Mode field, select Integrated from the dropdown list then click OK.
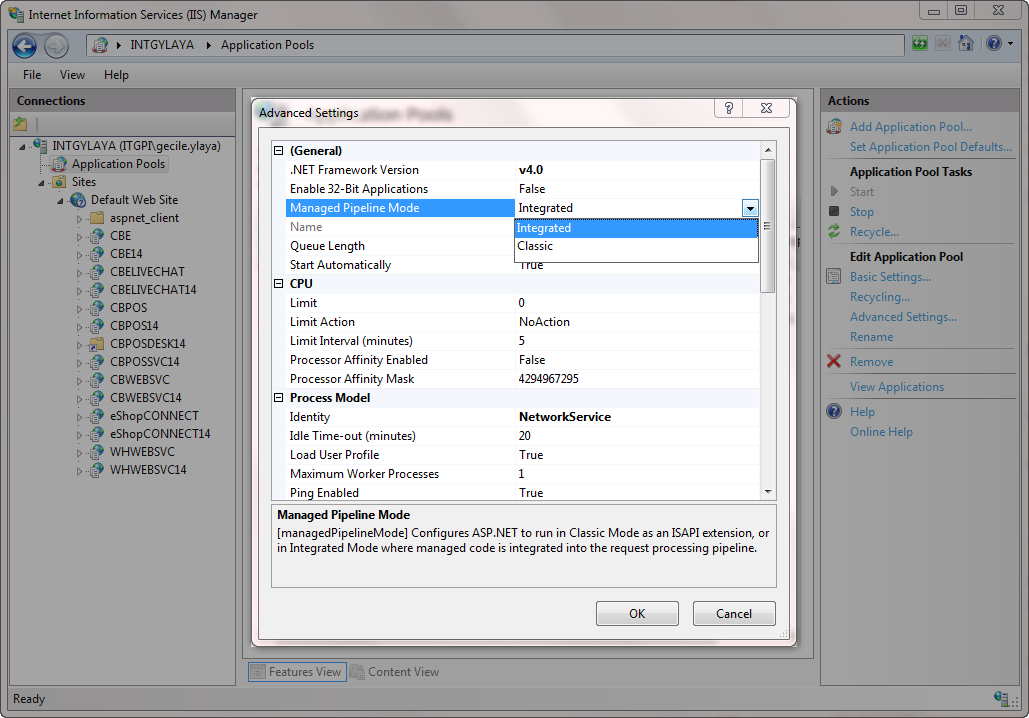
Click Image to Enlarge
If you are upgrading from an older version of Connected Business to v13, set the Enable 32-Bit Applications preference to True. However, if you are upgrading from Connected Business v13 to v14, set this preference to False.
-
After configuring the IIS Settings, browse your upgraded webstore. Right click on the webstore name, select Manage Application > Browse. Your upgraded webstore should load without errors.
![]()
How To Synchronize Item Images To Upgraded Webstore
After successfully upgrading your webstore, synchronize all item images from your database to the webstore. You can synchronize large, medium, micro and icon items images directly from the Connected Business backend application. Minicart and mobile images can be synchronized from the eCommerce Admin Site.
To synchronize large, medium, micro and icon item images from the Connected Business backend application:
-
Go to eCommerce module > Webstore. The Webstore form will be displayed.
-
Select the webstore from the list of webstore codes then click the Details tab to view the webstore details.
-
From the Tools toolbar, click Synchronize Web Images button. A message prompt will be displayed indicating that the image records will be synchronized for the selected webstore. Click OK.
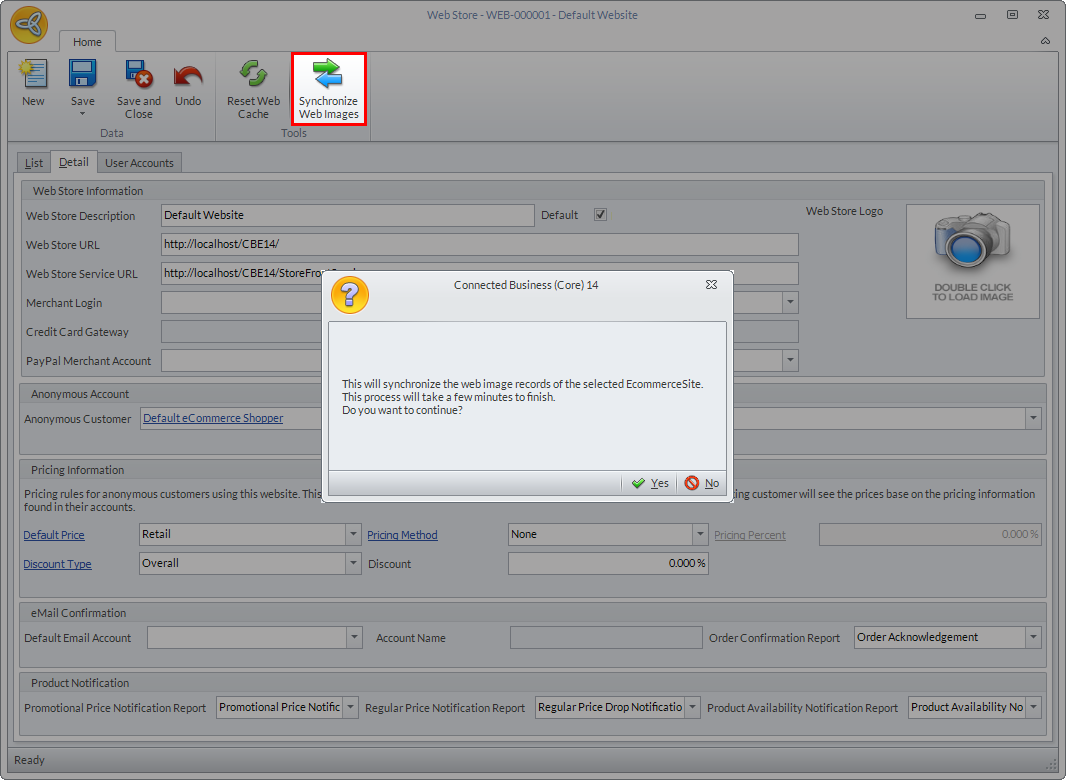
Click Image to Enlarge
To synchronize minicart and mobile images,
-
Open the eCommerce Admin Site (e.g. www.[your website name].com/admin). The eCommerce Admin Site login page will be displayed.
-
Enter your username and password then click Log In (by default the user name is admin and the password is ADMIN).
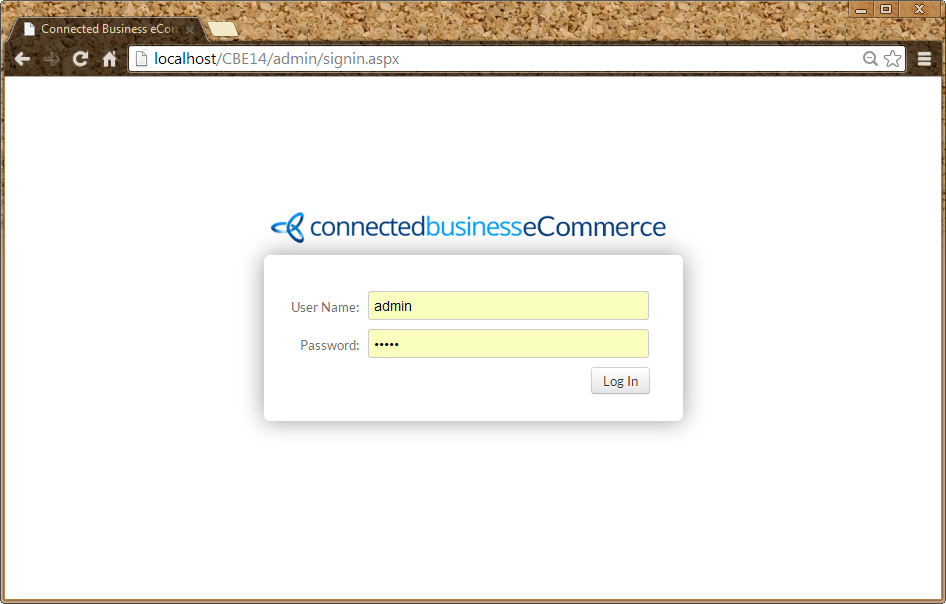
Click Image to Enlarge
-
From the Home page, go to Tools > Sync Images.
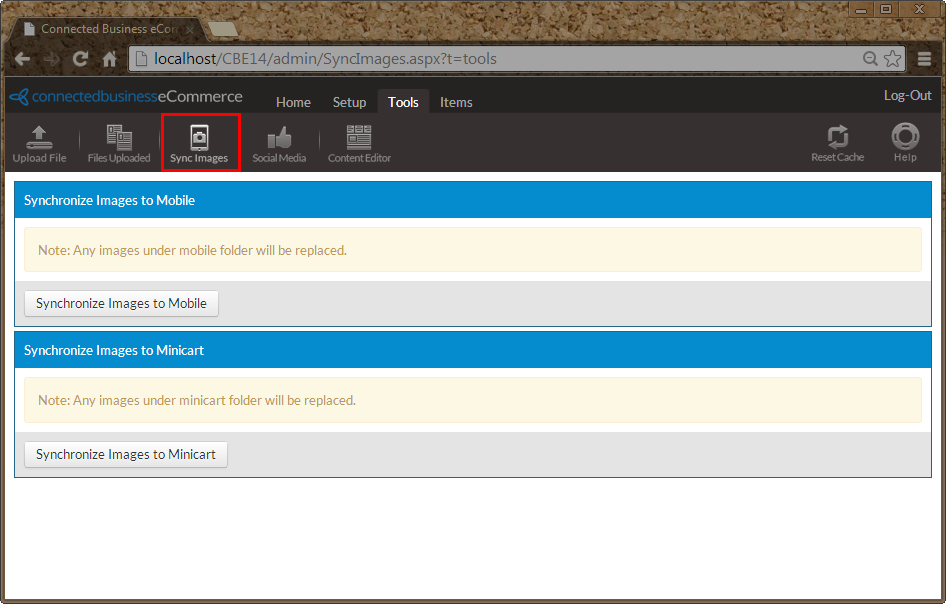
Click Image to Enlarge
-
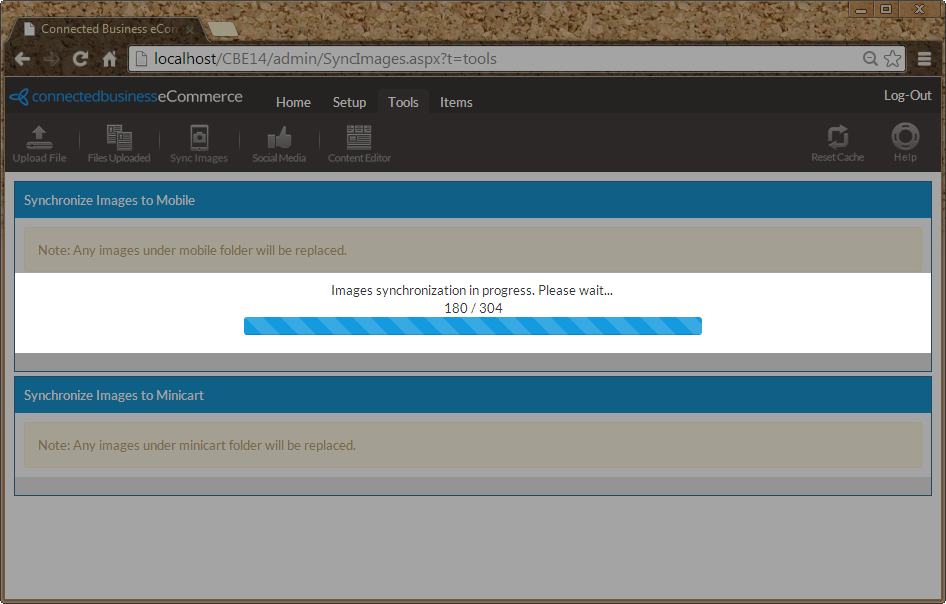
Click the respective buttons for synchronizing mobile and minicart images. A message prompt will be displayed confirming if you want to proceed, click OK. A progress bar will be displayed showing the number of images being synchronized.
Click Image to Enlarge
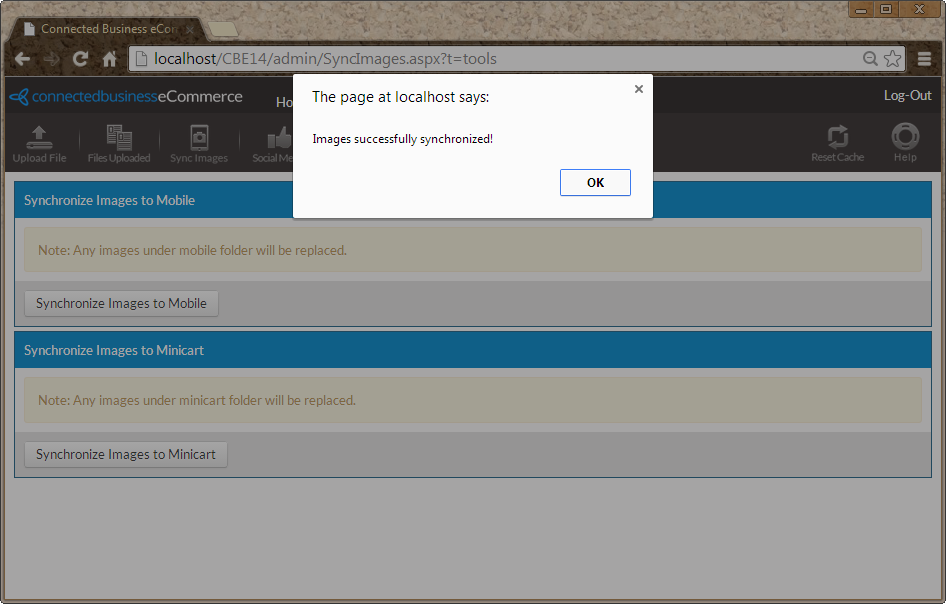
Once done, a message prompt will be displayed indicating that the images have been successfully synchronized. Click OK to close the prompt.
Click Image to Enlarge
![]()