Schedule and Estimate Campaigns
|
Content
|
|---|
Overview
Campaigns or any form of planned and coordinated effort of promoting or advertising products, services or an organization. Through the Campaign feature you will be able to record and track campaigns.
Plan and Estimate Campaigns
Steps
- From the CRM module, click Campaign > New Campaign button from the menu. The Campaign form will display. Specify the required fields for the Campaign form.
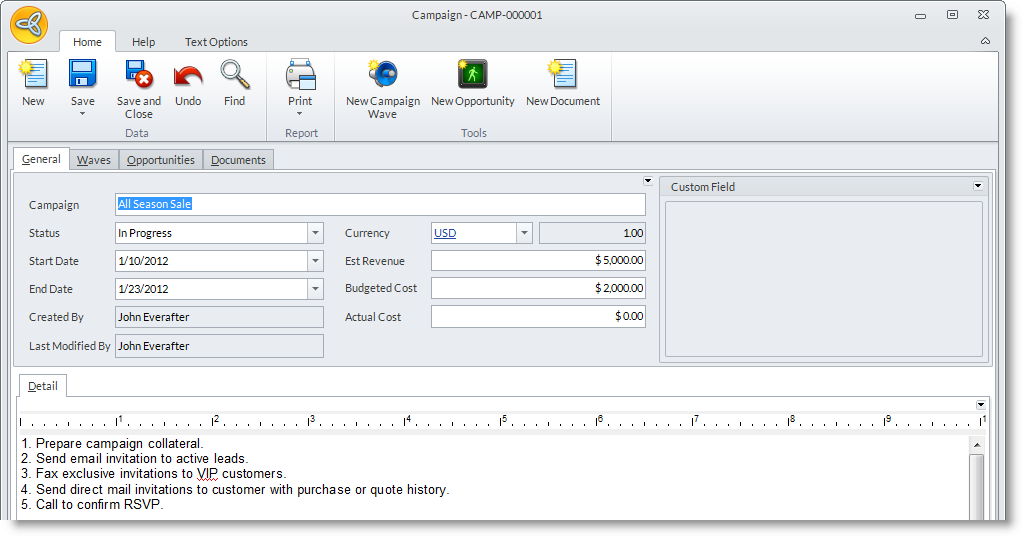
Campaign Fields
Definition
Campaign
Specify the name or theme of the campaign.
Status
Specify the progress of the campaign. The default status of the campaign is Not Started.
Start Date
Set the start date of the campaign. By default, this is set to the current date.
End Date Set the date as to when the campaign will end. By default, this is also set to the current date. Created By Specify the user who initially recorded the campaign. Last Modified By Specify the user who made the latest changes to the campaign record. Currency / Amount Specify the currency used and indicate the amount. Est Revenue Set the approximate value (expected income amount) from the campaign based on the currency specified. Budgeted Cost Enter the allotted expense amount for the campaign. Actual Cost Enter the actual cost incurred after the campaign ends. - In the Details section, enter the details of the campaign, e.g. for a product, a cause, or for your organization.
- In the Waves tab, you may enter details to each campaign activity you plan and accomplish. Click the Add Wave button to display the Wave form.
- Optional: In the Documents tab, you can attach documents related to the campaign
- Optional: In the Opportunities tab, you can create and manage opportunities related to the campaign. See Also: Manage Sales Opportunities
- Click Save and Close.
Record Campaign Activities
Campaign Waves stand for the activities being done in the duration of the campaign. You can create a campaign wave from the Campaign form by:
- Click on the New Campaign Wave button to switch to the Waves tab and display the Wave form.
- From the Waves tab, click on the New Wave button.
Share your Campaign Planning
To share your campaign planning, you can:
- Print the campaign details and hand out. To print, click on the Print button from the word processor area to display the Print Dialog window. Select the Printing Destination and set other printing preferences.
- Send the campaign details through email. You can also print out the document to PDF format so you could send it as email attachment. See Also: Manage Emails
- Send the campaign details through fax. To send via fax, click on the Fax button from the menu of the word processor area. The Fax Composer will display. See Also: Manage Fax
Manage Opportunities Related to the Campaign
To create new opportunities you can do one of the following:
- Click on the New Opportunity button to switch to the Opportunities tab. From the Opportunities tab, you will be able to create and manage opportunities.
- From the Opportunities tab, click on the New Opportunity button from the menu.
Attach Documents
- Click on the New Document button to switch to the Documents tab and browse for the document from your computer.
- To add more documents, click on the ellipsis button in the File Name column and select from the options to attach from the computer or from the Document Management. See Also: Manage Documents
![]()
Maintain Campaign Schedule
Steps
- From the CRM module, select on Campaign > Find Campaign button from the menu options. The Target List Wizard will display.
- Select a campaign record to display the Campaign form
- Edit the details as necessary or change the campaign status and save the form again before closing
Cancel the Campaign
- To cancel the campaign, set the campaign status to Cancelled.
Close the Campaign
When completed, you may close the campaign by:
- Set the Status to Completed.
- Enter a date in the End Date field and save.
![]()