Print Connected Sale Receipts
|
Content
|
|---|
In this process, you will learn how to print receipts in Connected Sales such as print preview, silent print and emailing receipts.
Print Preview
In this process you will learn the ways on how to preview Connected Sale receipts before printing a sale receipt in your printer. Receipt previews vary depending upon the users' printer setup.
There are two ways in which you can preview the receipts,
THROUGH THE RECEIPT PRINTER
- Go to Dashboard and them tap on the Settings icon.
- Tap on the Receipt button at the left side of the window.
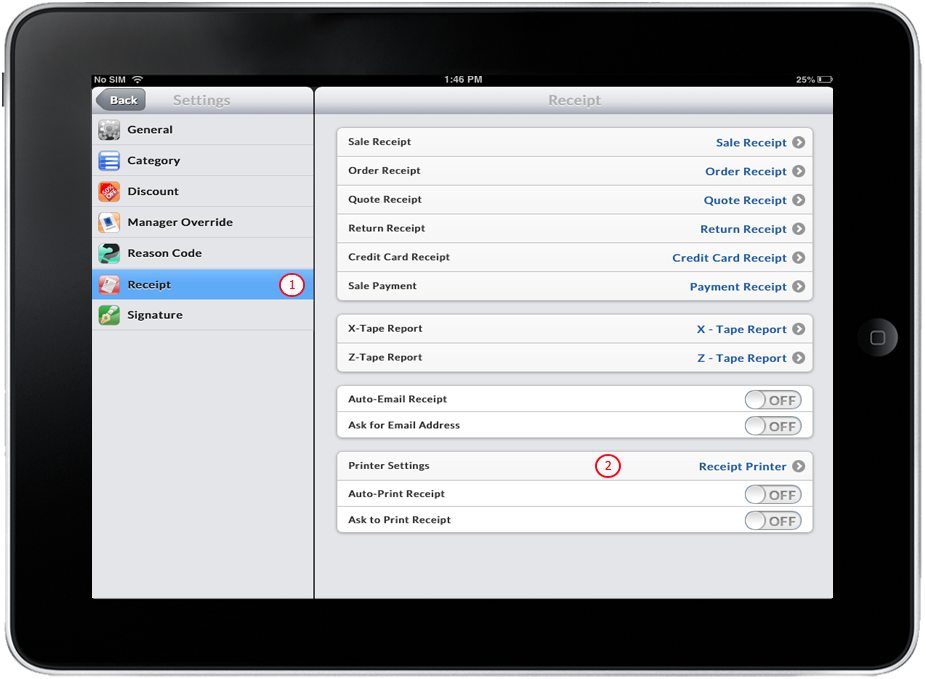
- Tap on Printer Settings button.
Click Image to Enlarge
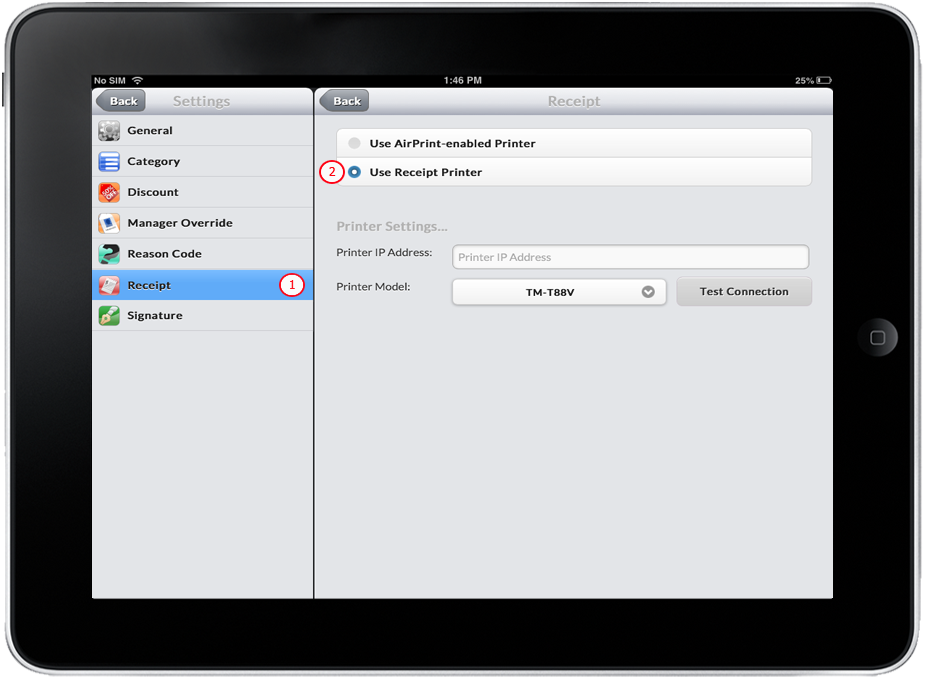
- Select Use Receipt Printer by tapping on it.
Click Image to Enlarge
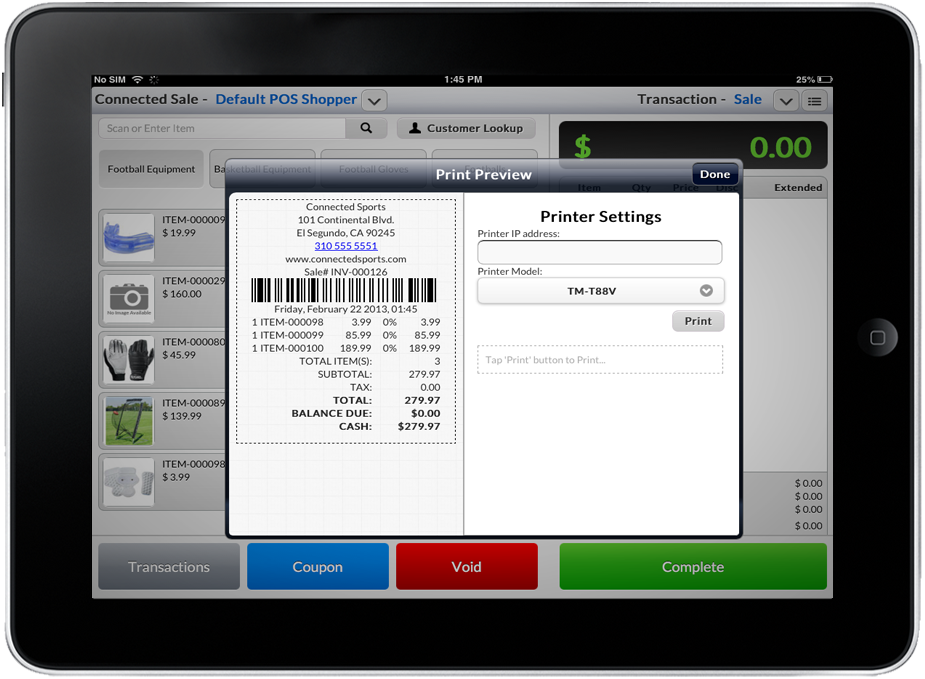
- Tap on POS icon and then create a Sale transaction. See Also: Creating Transaction - Sale
- Complete the transaction until Print Preview appears.
- The image below shows the Print Preview for this settings.

Click Image to Enlarge
THROUGH THE AIRPRINT ENABLED PRINTER
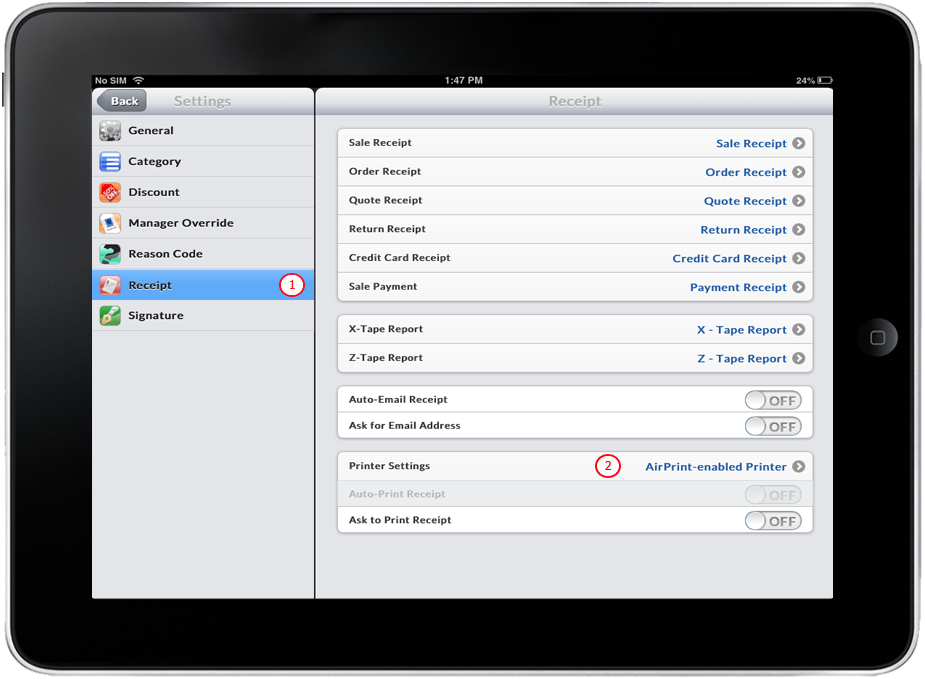
- Go to Dashboard and them tap on the Settings icon.
- Tap on the Receipt button at the left side of the window.
- Tap on Printer Settings button.
Click Image to Enlarge
- Use AirPrint-enabled Printer by tapping on it.

Click Image to Enlarge
- Tap on POS icon and then create a Sale transaction. See Also: Creating Transaction - Sale
- Complete the transaction until Print Preview appears.
- The image below shows the Print Preview for this settings.
Click Image to Enlarge
Silent Printing
Allows printing of receipt without print preview. You may check the Silent Printing(Auto-receipt) to automatically print the receipt without the need to ask printing for receipt.There are two settings for silent printing:
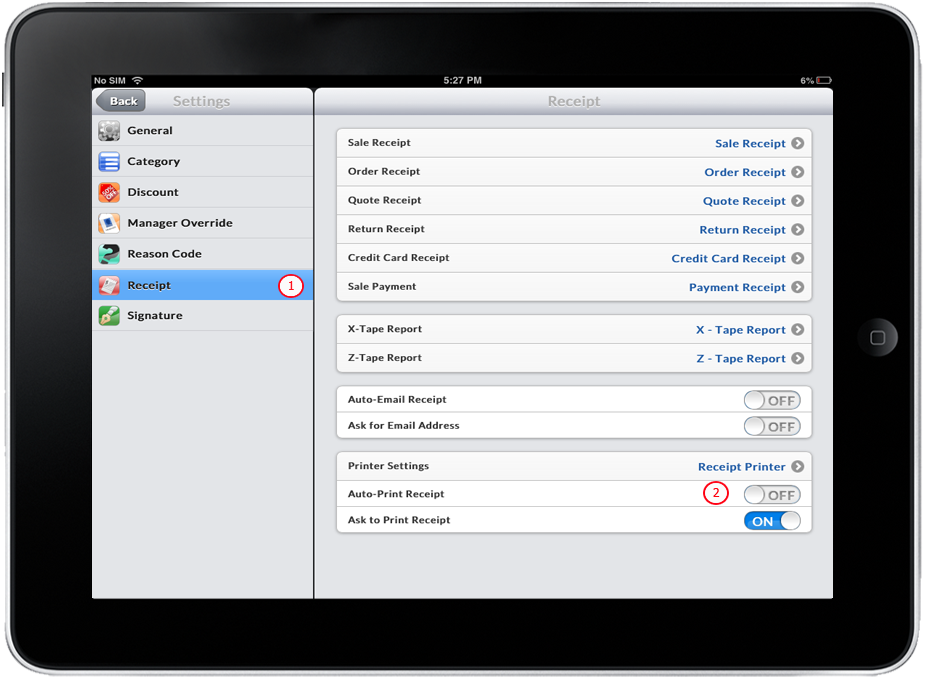
WHEN AUTO-RECEIPT IS DISABLED
- Go to Dashboard and them tap on the Settings icon.
- Tap on the Receipt button at the left side of the window.
- Make sure that Printer Settings is set to Receipt Printer and Ask to Print Receipt is turned ON.
- Turn OFF Auto-Print Receipt.
- Tap on the Back button to return to Dashboard.
Click Image to Enlarge
- Tap on POS icon and then create a Sale transaction. See Also: Creating Transaction - Sale
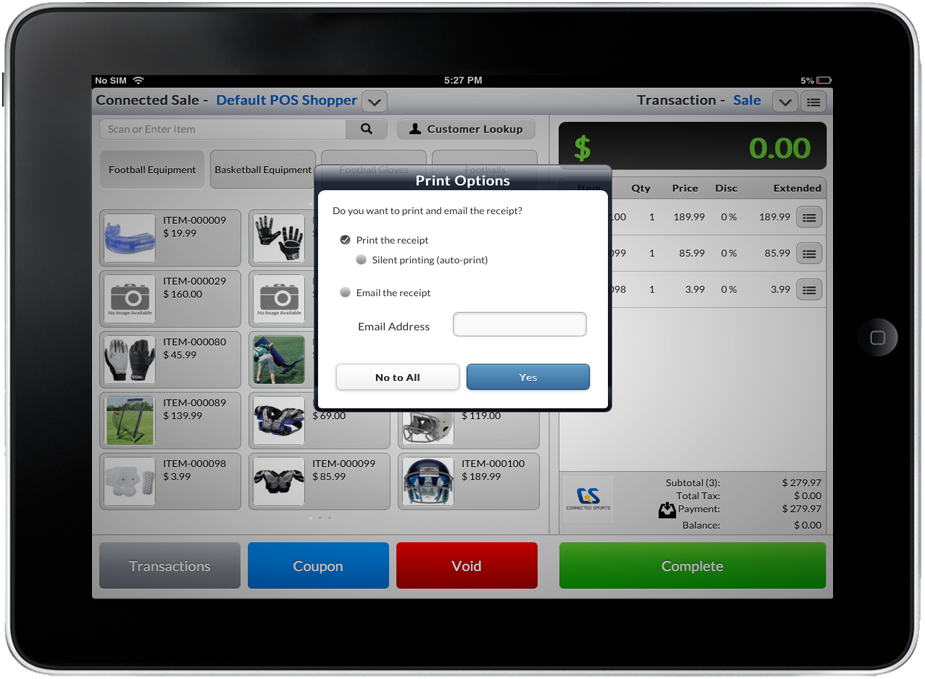
- Complete the transaction using any form of payment. When payment is made, Print Options will appear.
- With the current setting, when Auto-Print Receipt is turned OFF, the Silent printing (auto-print) check box is unchecked by default.
Click Image to Enlarge
- Tap on Yes button to continue. Print Preview will appear.
WHEN AUTO-RECEIPT IS ENABLED
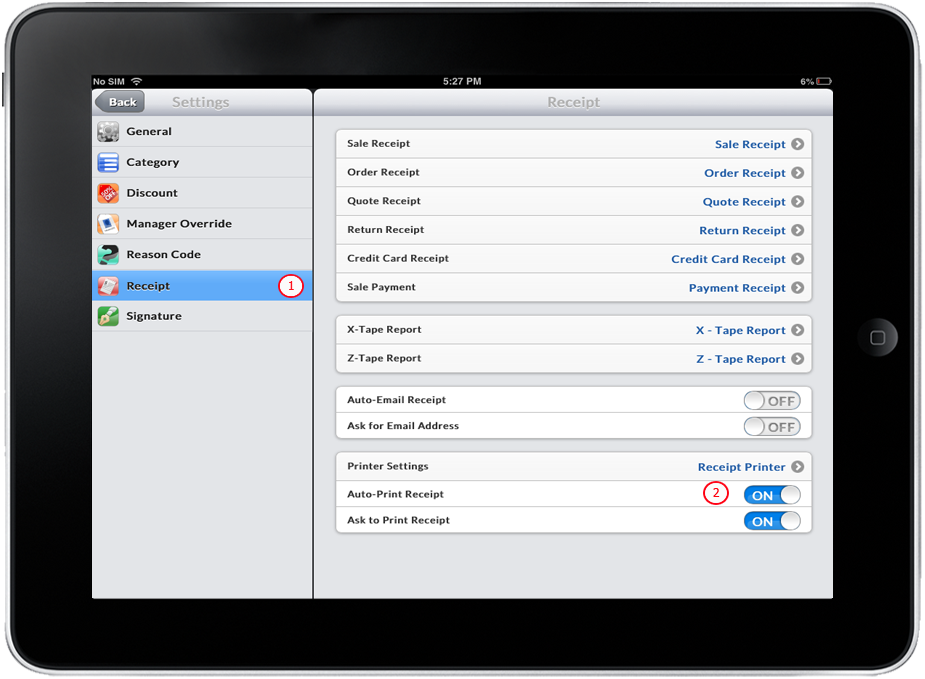
- Go to Dashboard and them tap on the Settings icon.
- Tap on the Receipt button at the left side of the window.
- Make sure that Printer Settings is set to Receipt Printer and Ask to Print Receipt is turned ON.
- Turn OFF Auto-Print Receipt.
- Tap on the Back button to return to Dashboard.
Click Image to Enlarge
- Tap on POS icon and then create a Sale transaction. See Also: Creating Transaction - Sale
- Complete the transaction using any form of payment. When payment is made, Print Options will appear.
- With the current setting, when Auto-Print Receipt is turned OFF, the Silent printing (auto-print) check box is unchecked by default.
Click Image to Enlarge
- Tap on Yes button to continue. Print Preview will appear.
Email the Receipt
Allows sending of receipt details by entering the customer's email address.
In this process, you will learn how to email receipt when the auto email receipts and ask for email address options are set at different scenarios:
- Scenario 1: Auto-Email Receipt is ON, Ask for Email Address is OFF
- Scenario 2: Auto-Email Receipt is OFF, Ask for Email Address is ON
- Scenario 3: Auto-Email Receipt is ON, Ask for Email Address is ON
Scenario 1: AUTO-EMAIL RECEIPT IS ON, ASK FOR EMAIL ADDRESS IS OFF
- Go to Dashboard and them tap on the Settings icon.
- Tap on the Receipt button at the left side of the window.
- Turn ON the Auto-Email Receipt.
- Turn OFF the Ask for Email Address.
- Tap on the Back button to return to Dashboard.

Click Image to Enlarge
- Tap on POS icon and then create a Sale transaction. See Also: Creating Transaction - Sale
- Complete the transaction using any form of payment. When payment is made, Print Options will appear.
Scenario 2: AUTO-EMAIL RECEIPT IS OFF, ASK FOR EMAIL ADDRESS IS ON
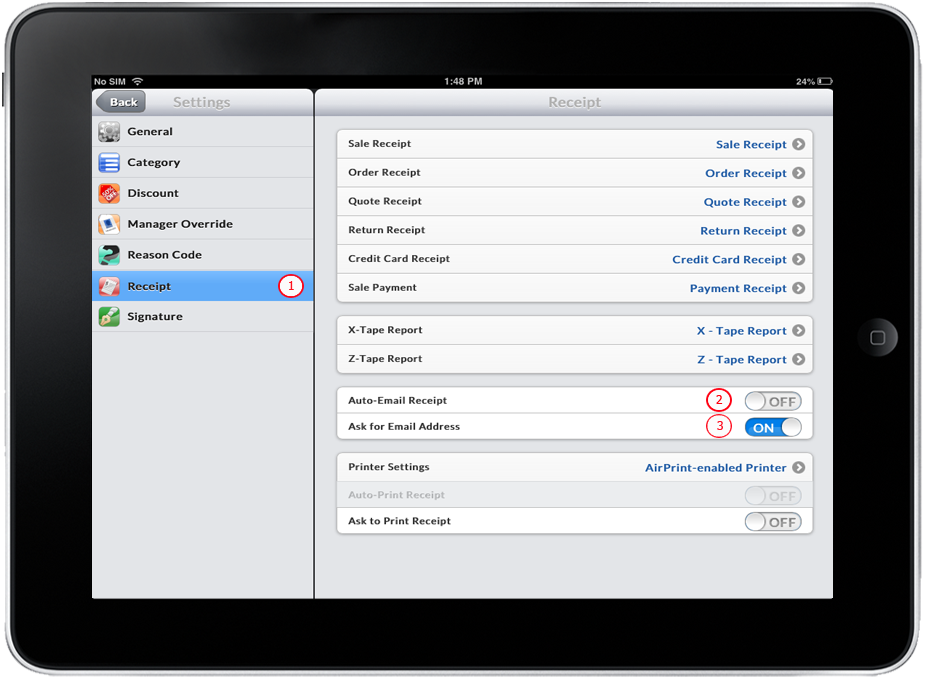
- Go to Dashboard and them tap on the Settings icon.
- Tap on the Receipt button at the left side of the window.
- Turn OFF the Auto-Email Receipt.
- Turn ON the Ask for Email Address.
- Tap on the Back button to return to Dashboard.
Click Image to Enlarge
- Tap on POS icon and then create a Sale transaction. See Also: Creating Transaction - Sale
- Complete the transaction using any form of payment. When payment is made, Print Options will appear.
- With the current settings, Auto-Email Receipt is OFF and this will make Email the Receipt check box to be unchecked by default. The Email Address text box will be populated if the current customer has an Email Address defined, otherwise, it will be blank.

Click Image to Enlarge
- Check on Email the Receipt check box.
- Enter the Email Address in text box provided.

Click Image to Enlarge
- Tap on Yes button to continue. Print Preview will appear and the receipt will be sent to the email address defined.
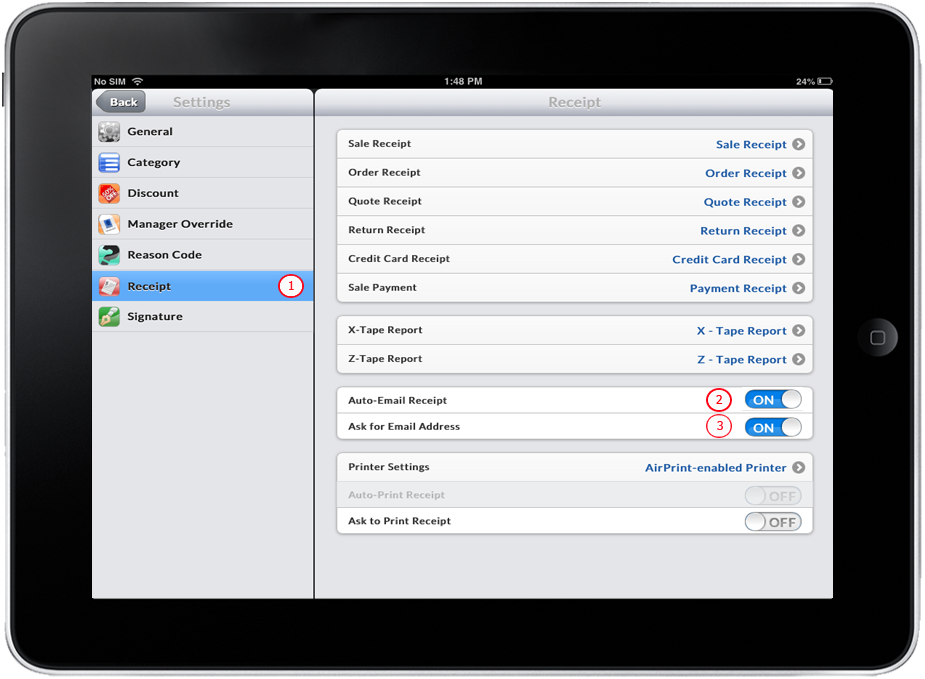
Scenario 3: AUTO-EMAIL RECEIPT IS ON, ASK FOR EMAIL ADDRESS IS ON
- Go to Dashboard and them tap on the Settings icon.
- Tap on the Receipt button at the left side of the window.
- Turn OFF the Auto-Email Receipt.
- Turn ON the Ask for Email Address.
- Tap on the Back button to return to Dashboard.
Click Image to Enlarge
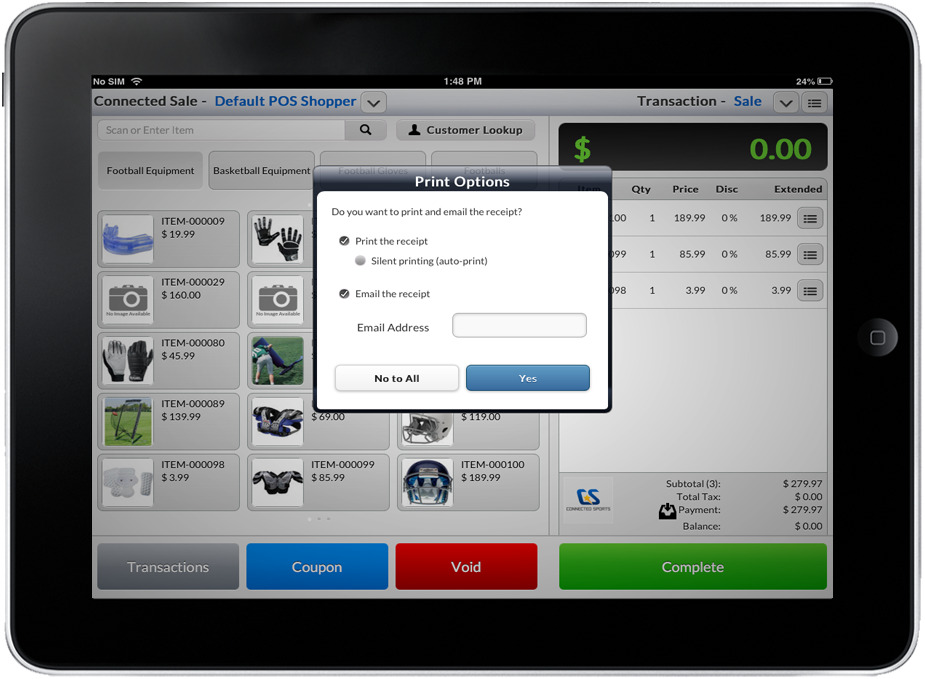
- Tap on POS icon and then create a Sale transaction. See Also: Creating Transaction - Sale
- Complete the transaction using any form of payment. When payment is made, Print Options will appear.
- With the current settings, Auto-Email Receipt is OFF and this will make Email the Receipt check box to be unchecked by default. The Email Address text box will be populated if the current customer has an Email Address defined, otherwise, it will be blank.
Click Image to Enlarge
- Enter the Email Address in text box provided.

Click Image to Enlarge
- Tap on Yes button to continue. Print Preview will appear and the receipt will be sent to the email address defined.