Perform Bank Reconciliation
|
Content
|
|---|
Bank Reconciliation is a process of checking and comparing your monthly bank statement with the cash balance on the company’s bank accounts. It is wise that you reconcile your checks with your checking transactions after entering them to know that Connected Business and your bank accounts are in agreement.
MANAGEMENT OF BANK STATEMENTS
With the assumption that the user already has the bank account statements from the bank, follow the details on how to integrate the bank statements with Connected Business:
- Go to the Tools > Banking > Reconciliation. A search screen of active bank accounts and previous reconciliations is displayed.
- Select an active bank account from the list. The Reconciliation Form will display.
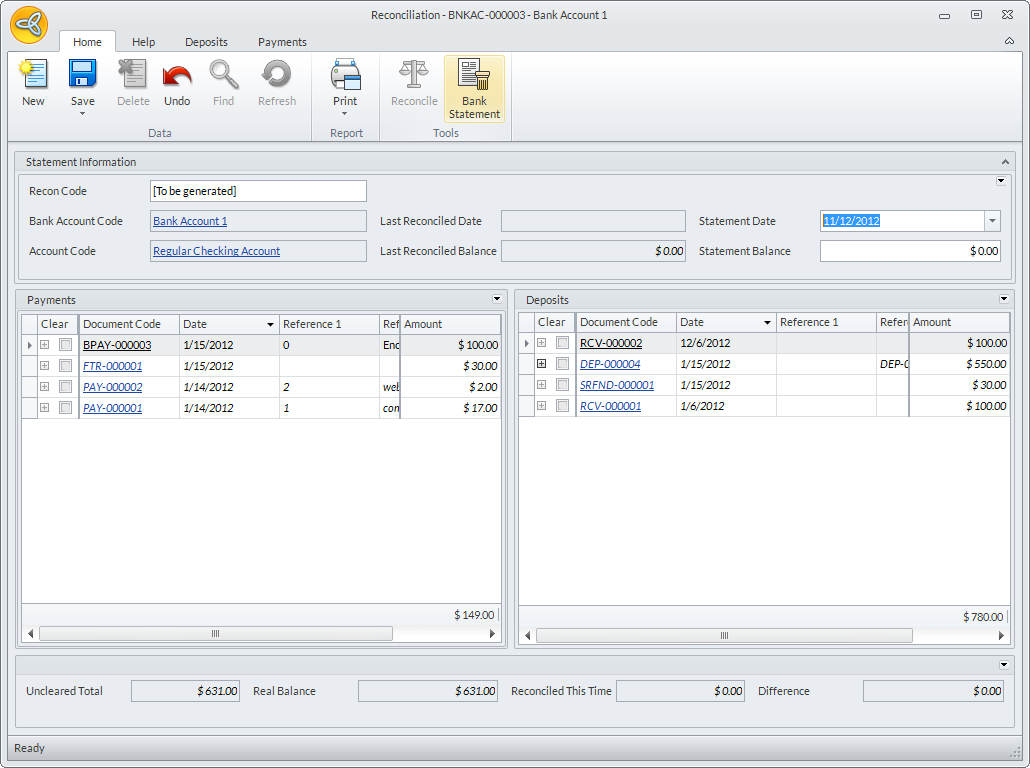
- Indicate the date to which you have recently reconciled bank account statements in the Last Reconciled Date field.
- The statement date is set to the current date in the Statement Date field. You can change it accordingly
- Indicate previous balance you reconciled recently through the Last Reconciled Balance field.
- Indicate the statement balance amount in the Statement Balance field from the statement balance you received from your bank.
- Connected Business tracks the deposits, transfers and checks connected with the bank account. Select the deposits, transfers or checks that were cleared by checking the adjoining Clear checkbox in the Payments and Deposits grids.

If there are no discrepancies between the statement balance from the bank and the values in the system (as shown in the Payments and Deposits grids’ values), you will be able to reconcile the transactions.
- After making changes from the Reconciliation Form and saving your inputs, click the Refresh button to view recently-changed Bank Payments and Deposits.
![]()
RECONCILE BANK ACCOUNTS WITH BANK STATEMENTS
- Go to the Banking module.
- Select Reconciliation under the Banking menu. A search screen of active bank accounts and previous reconciliations is displayed.
- Select the bank account in the Active Bank Accounts tab to display the Bank Reconciliation form.
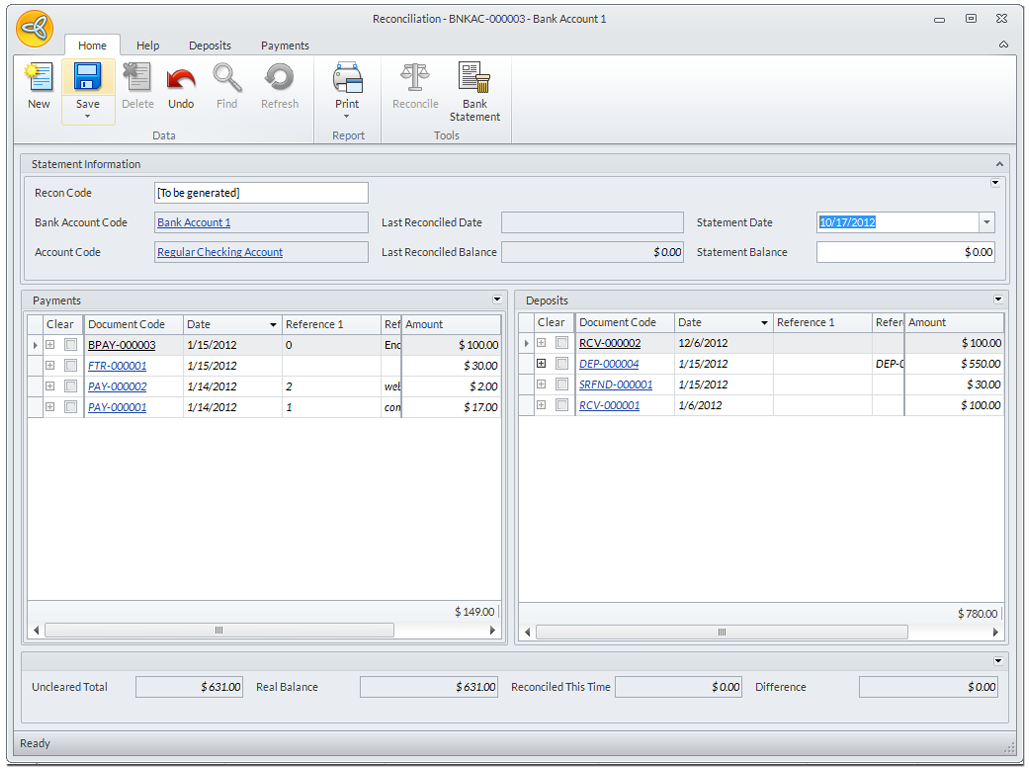
- The statement date is set to the current date in the Statement Date field. You can change it accordingly.
- Indicate the statement balance amount in the Statement Balance field from the statement balance you received from your bank.
- Connected Business tracks the deposits, transfers and checks connected with the bank account. Select the deposits, transfers or checks that were cleared by checking the adjoining Clear checkbox in the Payments and Deposits grids.
If there is no discrepancy between the statement balance from the bank and the values in the system (as shown in the Payments and Deposits grids’ values), you will be able to reconcile the transactions.
- If the statement balance value is the same as the cleared balance, click on the Reconcile button to process. The cleared balance (seen in the Reconciled This Time field) and the Difference will display in their respective fields.
![]()
CREATE A BANK RECEIPT FROM THE BANK RECONCILIATION FORM
You can create bank payments or bank receipts from the Bank Reconciliation form for any unrecorded bank payment or receipt.
- Click on the New Bank Payment option from the Payment section to create a bank payment or the New Bank Receipt option from the Deposits section to create new bank receipts.
To learn more about how Connected Business makes it easy for you to create and manage bank payments, read the following documentation:
Manage Bank Payments | Manage Bank Receipts
![]()
VIEW PREVIOUS BANK ACCOUNT RECONCILIATION
- Go to the Banking Module.
- Select Tools > Banking > Reconciliation. A search list of active bank accounts and previous reconciliations will display.
- You will find the previous bank account reconciliations in the Recon History tab.

- Select a reconciliation record in the list to display the Reconciliation Form.
![]()
PERFORM BANK RECONCILIATION USING OFX
Before you can successfully reconcile your records with your bank using OFX, you first need to make sure that your bank allows data streaming. You can then proceed with setting up your OFX connection. The steps for configuration can be found at: Establish OFX Connection With Bank.
Once the connection has been set up, proceed with bank statement reconciliation:
-
Initiate the bank reconciliation process in the Banking module.
-
On the Reconciliation form, click on the Bank Statement button.

Click Image to Enlarge
-
The Transactions List inside the bank statement form will contain the data retrieved from your bank in real time, using OFX. You can then use this information to proceed with bank reconciliation.
Click Image to Enlarge
-
Click the Get Statement button to load the data to the bank statement form.

Click Image to Enlarge
-
A dialog box will appear, containing the bank name, account description, account type and account number. You need to input the start date and end date of the transactions that you want to see displayed.

Click Image to Enlarge
Click OK to retrieve the data from your bank account.
-
When the system recognizes a check number associated with a transaction, the tick box next the Check Number is automatically enabled. You can also manually enable or disable the tick boxes.
-
You can also manually connect checks with payments by manually typing the Document Code to the Check Number associated with it.
-
If your bank's OFX data is not compatible with real-time data retrieval, you can download an OFX file (*.ofx) of your bank records and load the data into Connected Business. To load an OFX file, click on the Open Statement button and look for the correct OFX file.
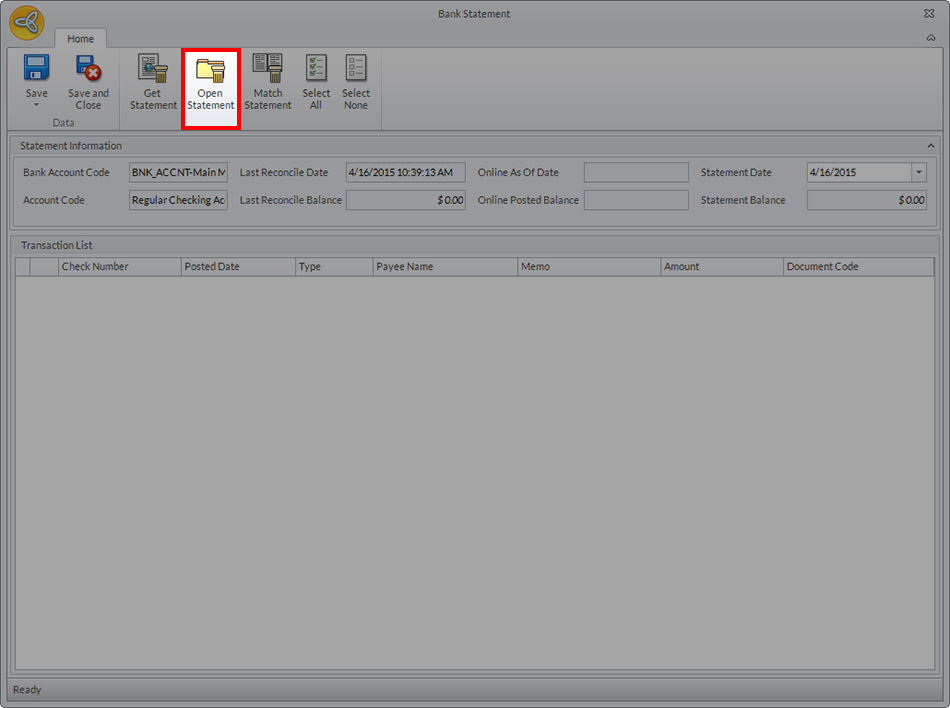
Click Image to Enlarge
If successful, the data will be loaded into the Transactions List.
-
Click on Match Statement button to automatically connect the check numbers with the relevant payments.

Click Image to Enlarge
-
Click Save and Close to return to the Bank Reconciliation form. Click the Refresh button to make sure that all the changes you have made are applied.
![]()
SEE ALSO:
Manage Bank and Bank Account Details