Other Customer Billing Processes
| Content |
|---|
This article discusses the various features that can be used to further enhance your database of customer information.These features can be accessed by selecting specific client forms.
To edit the customer's billing details, go to Customer module > Customer > Find Customer.
Manage Customer Posting Accounts
The GL Class section shows the default GL class template for the customer. A GL Class is a group of accounts used for posting entity transactions. By default, the accounts used in the GL Class are the same as the Default Accounts unless otherwise specified in the Customer GL Class templates. You can also amend the account codes as needed.
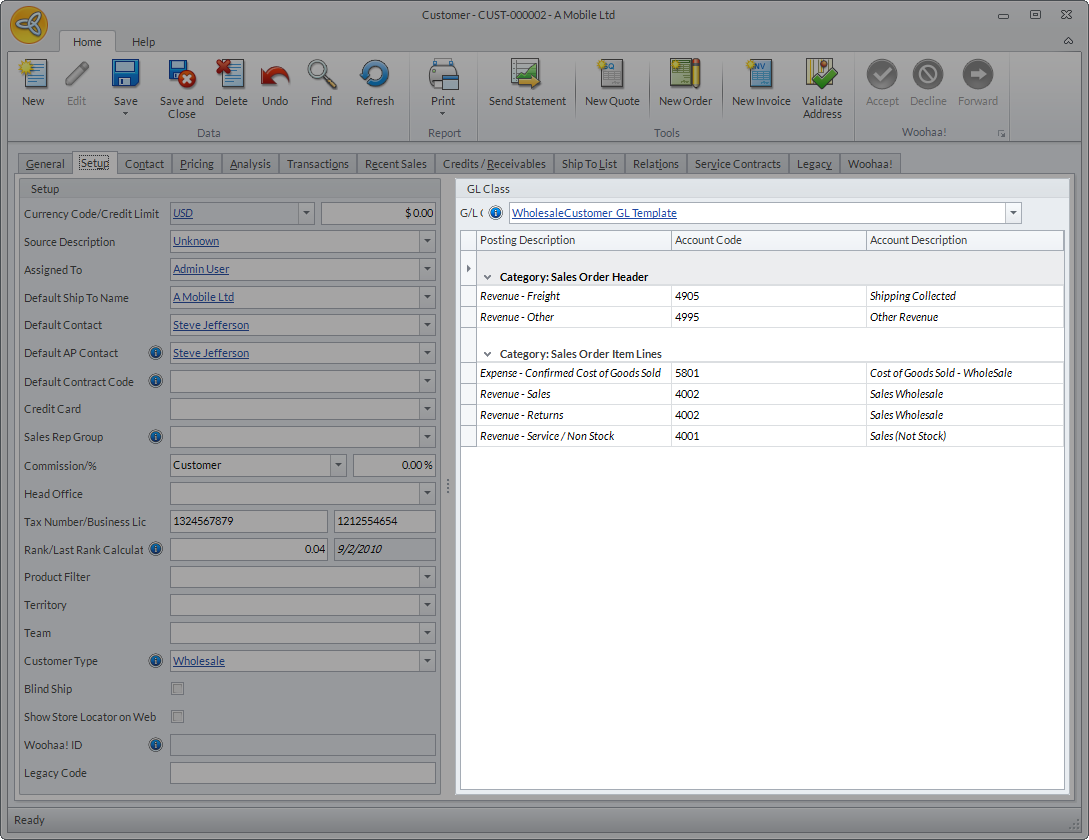
Click Image to Enlarge
You can specify the basis for the account analysis from the Accounting Preference form (Accounting > Setup > Preferences). Aside from that, you can also define to get the analysis accounts based on the customers directly from the Customer GL Class Templates. It is recommended though to set your basis in the Accounting Preferences before creating your chart of accounts or transactions in Connected Business and to only select one preference to maintain consistency of records in accounting.
In Connected Business v14, the GL Class template can be found in the Accounts tab of the Ship To form. This tab is only visible if the Sales Analysis is set to Customer Account in the Accounting Preference form.
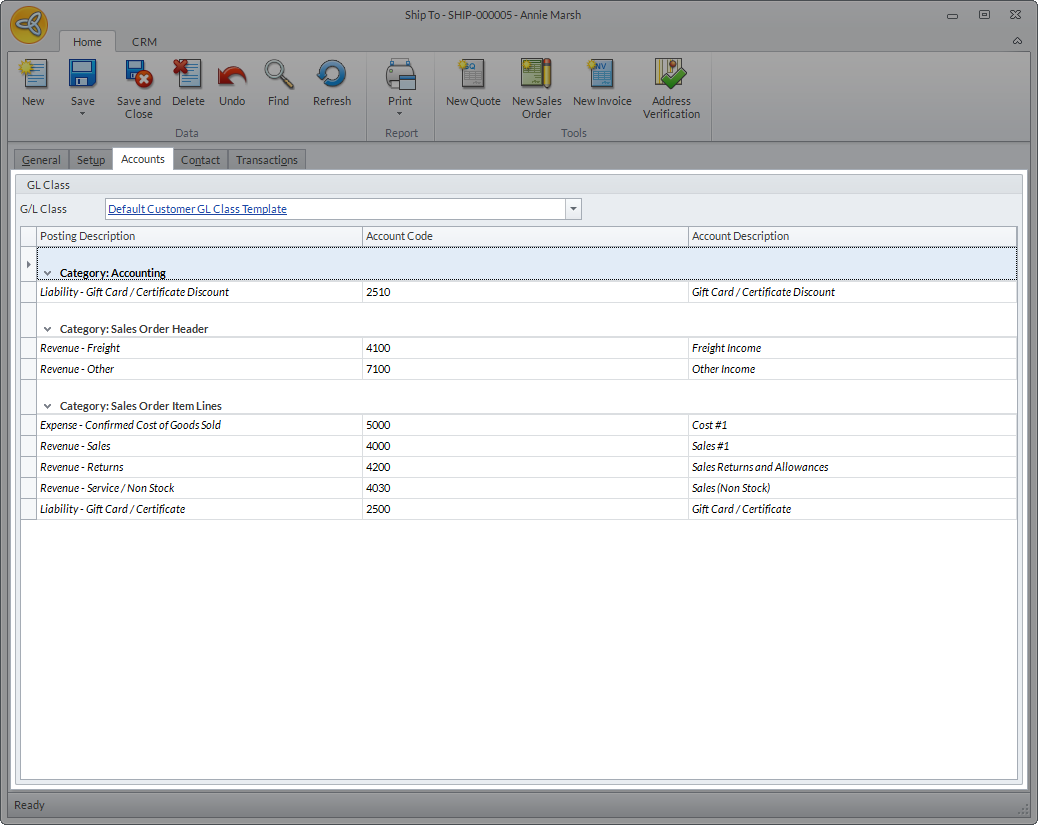
Click Image to Enlarge
Configure Customer Pricing
The documentation for this feature has been expanded. To read about customer pricing, go to: Promotional and Discount Pricing.
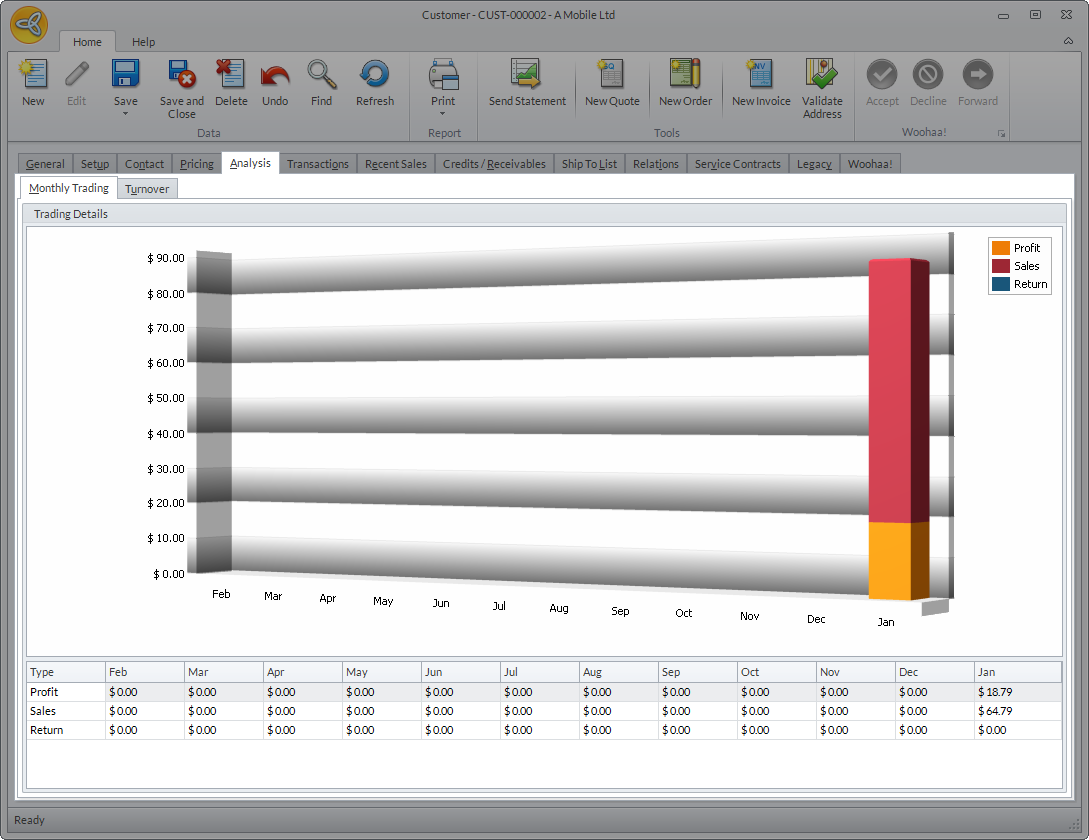
View Customer Transaction Analysis
The Analysis tab shows the evaluation of the customer's monthly transactions per year.
Click Image to Enlarge
The Monthly Trading tab shows a chart detailing the customer’s monthly trading.
Click Image to Enlarge
The Turnover tab shows the chart and turnover details of the customer's transactions.
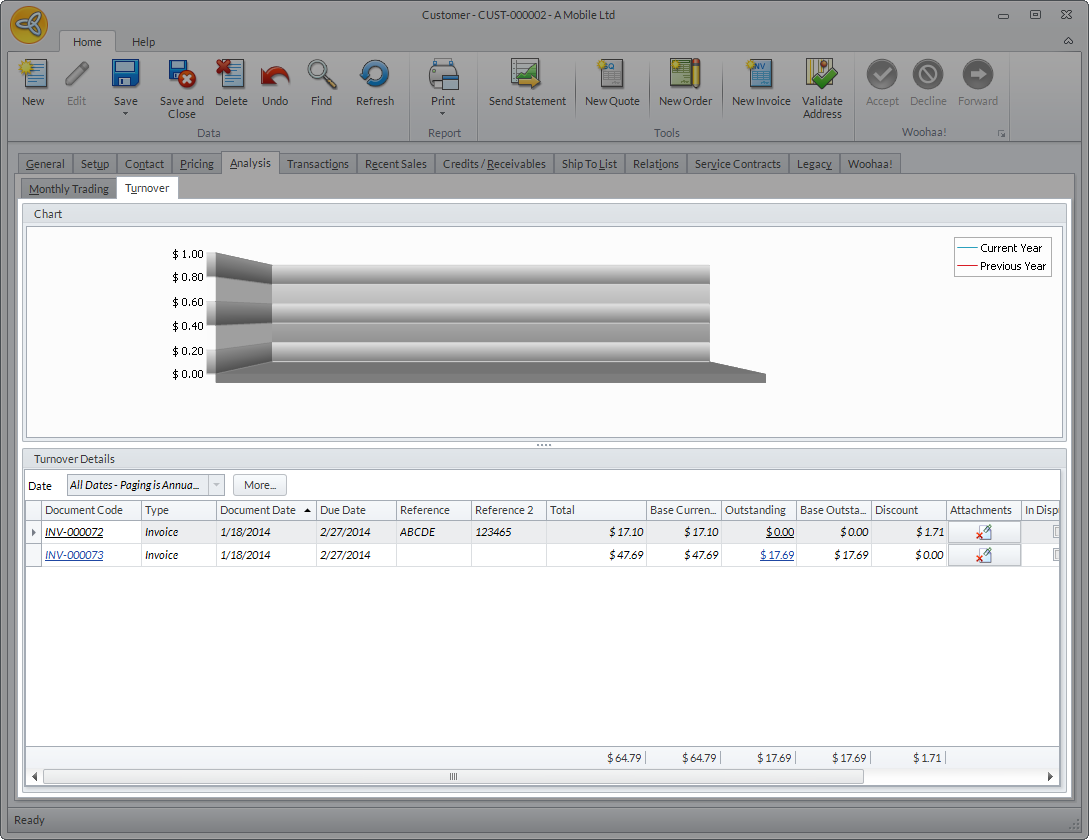
Click Image to Enlarge
View Customer Transaction History
The Transactions tab shows all transactions related to the customer. All transactions are sorted by transaction type. You can sort the transactions for each type by selecting the transaction status from the View Option field available in each type or filter the transactions by date.
Click Image to Enlarge
The following tables show the fields common in each transaction type.
Quotes/Order/RMA
|
Field |
Definition |
|
Document Code |
Shows the unique document code generated for the transaction. You can double-click on code to view the transaction details. |
|
Reference |
Shows the Customer PO related to the transaction (if there’s any entered in the transaction). |
|
Reference 2 |
Shows the Alternated Order # related to the transaction (if there’s any entered in the transaction). |
|
Document Date |
Shows the date when the transaction was created. |
|
Due Date |
Shows the estimated due date of the transaction. |
|
Currency Code |
Shows the currency of the customer used in the transaction. |
|
Total |
Shows the total value of the transaction excluding the tax and other charges. |
|
Base Currency Amount |
Shows the total amount of the transaction based on the home currency. |
|
Order Status |
Shows the current status of the transaction. |
| Attachments | Shows if there are files attached to the transaction. If you want to attach files, click on the Attachment icon and attach the files from the Attach Document form. |
Invoice/Credit Memo/Ledger
|
Field |
Definition |
|
Document Code |
Shows the unique document code generated for the transaction. You can double-click on code to view the transaction details. |
|
Type |
Show the document type for the transaction. This column can only be found in the Ledger tab. |
|
Document Date |
Shows the date when the transaction was created. |
|
Due Date |
Shows the estimated due date of the transaction. |
|
Reference |
Shows the Customer PO related to the transaction (if there’s any entered in the transaction). |
|
Reference 2 |
Shows the Alternated Order # related to the transaction (if there’s any entered in the transaction). |
|
Total |
Shows the total value of the transaction excluding the tax and other charges. |
|
Base Currency Amount |
Shows the total amount of the transaction based on the home currency. |
|
Outstanding |
Shows the remaining outstanding balance of the transaction. You can click on the balance link to view the allocation details of the transaction through the Document Allocation form. |
| Base Outstanding | Shows the outstanding balance based on the home currency. |
| Discount |
Shows the amount of discount applied to the transaction. Note that only early payment discounts from settlement terms are shown in this column. |
| Attachment | Shows if there are files attached to the transaction. If you want to attach files, click on the Attachment icon and attach the files from the Attach Document form. |
| In Dispute | Indicates that there is a conflict in the transaction. If ticked, the transaction will be put hold until resolved. You can untick the checkbox once the dispute is resolved. |
| Reason | Indicates the reason for the dispute. |
| Date Paid | Shows the latest date when the payment for the transaction was received. |
Receipts/Refund/Void Receipt
|
Field |
Definition |
|
Document Code |
Shows the unique document code generated for the transaction. You can double-click on code to view the transaction details. |
|
Document Date |
Shows the date when the transaction was created. |
|
Due Date |
Shows the estimated due date of the transaction. |
|
Reference |
Shows any documents or notes related to the transaction (if there’s any entered). |
|
Reference 2 |
Shows any additional documents or notes related to the transaction (if applicable). |
|
Total |
Shows the total value of the transaction excluding the tax and other charges. |
|
Base Currency Amount |
Shows the total amount of the transaction based on the home currency. |
|
Outstanding |
Shows the remaining outstanding balance of the transaction. You can click on the balance link to view the allocation details of the transaction through the Document Allocation form. |
|
Base Outstanding |
Shows the outstanding balance based on the home currency. |
| Discount | Shows the amount of discount applied to the transaction. |
| Attachments |
Shows if there are files attached to the transaction. If you want to attach files, click on the Attachment icon and attach the files from the Attach Document form. |
| Date Paid | Shows the latest date when the payment for the transaction was received. |
Manage Customer Relations
The Relations tab shows all the customer’s relations. By default, all customer contacts will be added as relations. You can expand the node right beside the customer name to view the contacts and relationship type.
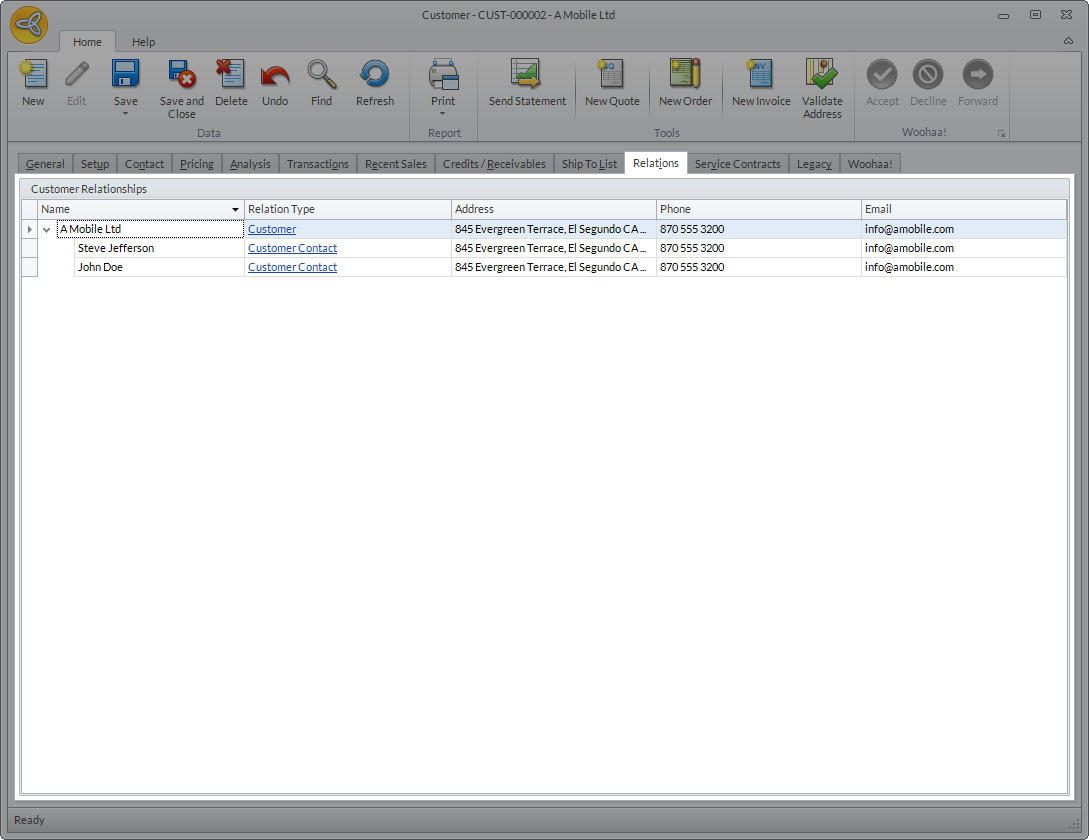
Click Image to Enlarge
You can also add and create a hierarchy of customer relations (parent, sibling and child) and define the relationship type. To do this,
Right click on the customer or contact name and select the relationship type from the pop-up menu options (see table below).
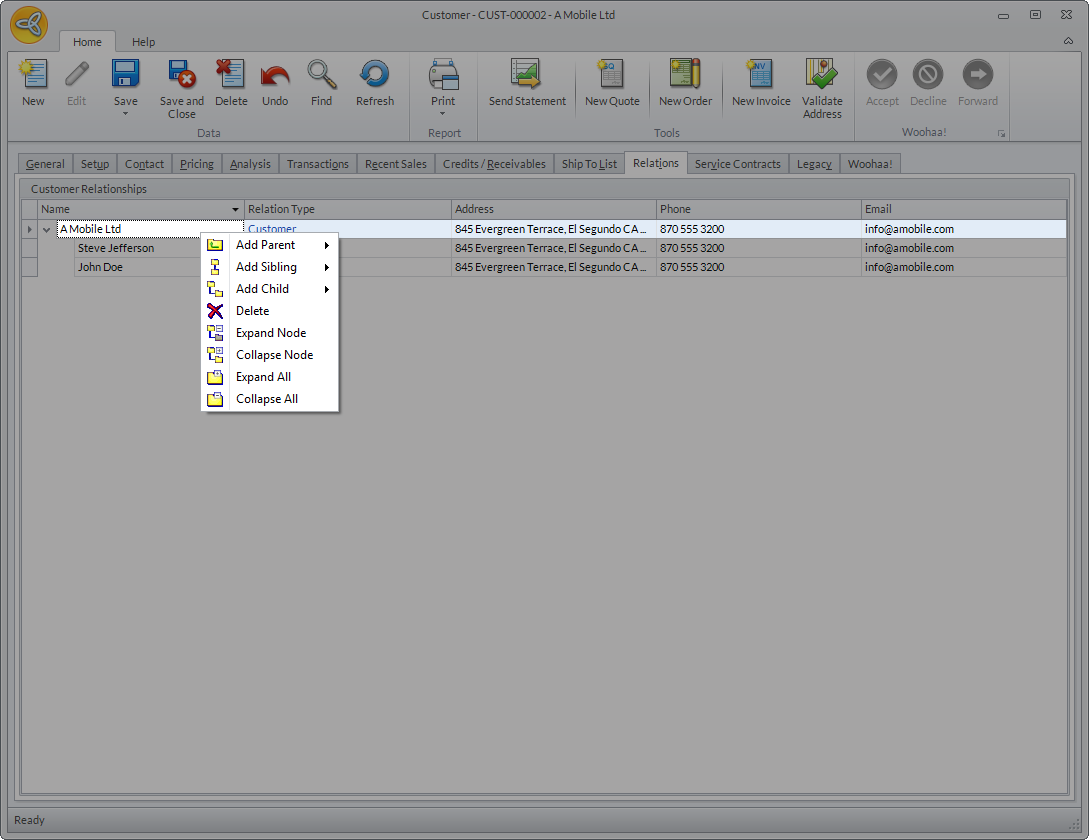
Click Image to Enlarge
|
Relation Option |
Function/Description |
|
Add Parent |
Select this option if you want to add an entity-related relation to the customer or contact. You can choose from customer, supplier or contact. When selected, a child entry is created under the entity e.g. adding a new contact in the list of customer contact. |
|
Add Sibling |
Select this option if you want to create a relation that is the same as the parent or entity. You can choose from customer, supplier, or contact. e.g. a prospect in your record assigned as the head in one of your customer's office or a supplier in your record that has transactions with your customer. |
| Add Child | Select this option if you want to enter a child relation for the selected entity. You can choose from supplier, customer or contact. Basically, the parent is the customer and the child relations are the contact that’s why a default relation is created for the customer with the contacts as child entries. |
| Delete | Select this option if you want to remove the entity or relation. |
| Expand Node | Select this option if you want to view the child relations under the selected entity. |
| Collapse Node | Select this option if you want to hide all the child relation under the selected entity. |
| Expand All | Select this option if you want to view all entity relations including the contact’s child relations. |
| Collapse All | Select this option if you want to hide all entity relations including the contact’s child relations. |

Upon selecting the entity for the relation (customer, supplier, contact), a window will be displayed with the list of entity details. The list may vary depending on the entity selected.
After setting the relation details, select the relation type from the Relation Type dropdown list then click OK.
Set Up Customer Service Contracts
The Service Contracts tab shows all existing service contracts for the customer. From here, you can define new service contracts which include defining the service contract type, contract value rate, assign the service level agreement, etc.
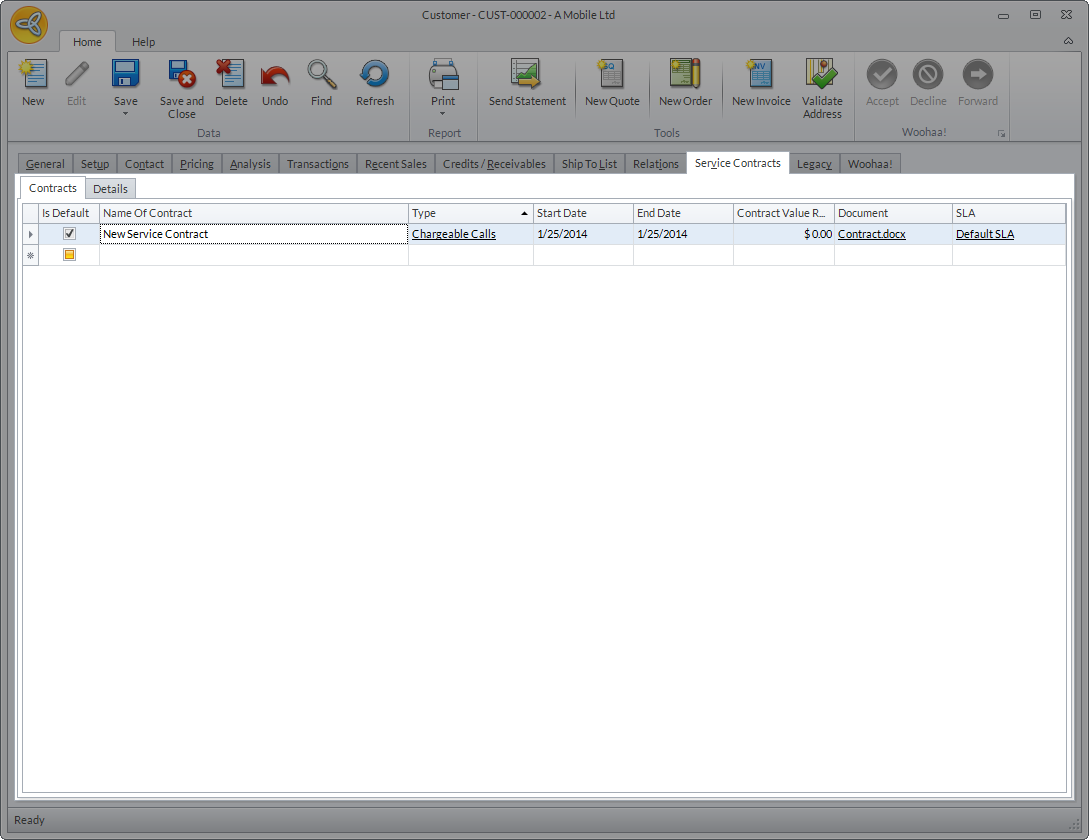
Click Image to Enlarge
You can define a new service contract from the Contracts tab. The following table shows the columns found in the Contracts tab and the corresponding function/description.
|
Field |
Function/Description |
| Is Default | This option allows you to set the service contract as default to the customer. You can also select a default contract from the Default Contract Code dropdown list of the Setup tab in the Customer Detail form. |
| Name of Contract | Shows the title of the service contract. |
| Type | Shows the service contract type. You can select the service contract type from the drop down list. |
| Start Date | Shows the start date of the service contract. |
| End Date | Shows the end date of the service contract. |
| Contract Value Rate | Shows the value of the service contract. |
| Document | Shows the attached documents related to the service contract (if there is any). You can click on the ellipsis button to attach documents as needed. |
| SLA | Shows the service level agreement used to determine the serviceable hours in the service contract. You can click on the dropdown list to select the SLA to be used. You can also click on the SLA code to view the Service Level Agreement form. |
View Woohaa! Retailer Details
The Woohaa! tab shows all Woohaa! retailer-related information such as registration details, bank and trade references, etc. The details in this section will only be visible if the customer is enrolled as a retailer in the Woohaa! network. For more information, refer to Woohaa!
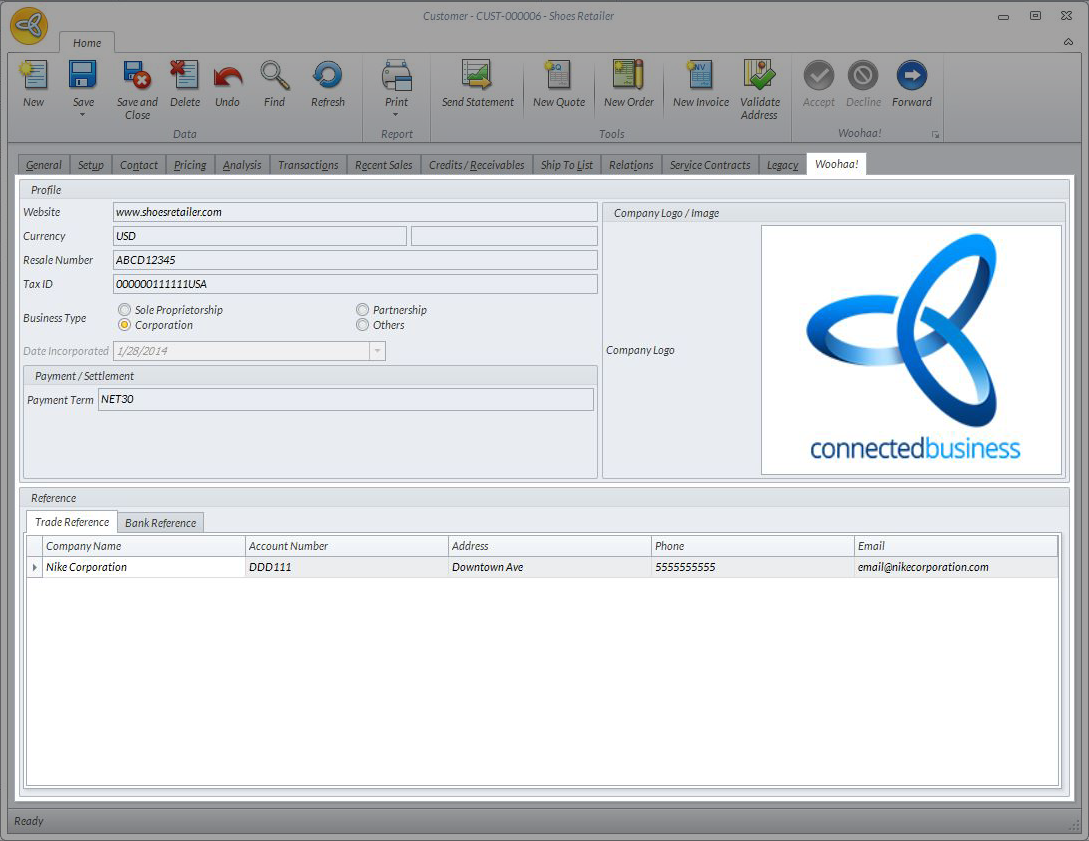
Click Image to Enlarge