Manage Cases
Overview
Cases are situations or problem related to the customer that needs to be resolved. Through the case feature, you will be able to take into account, track and resolve customer cases.
Through Service Contracts, you will be able to determine the scope of service to provide your customer. Service Level Agreements allows you to track and analyze your case performance.
Resolve Customer Cases
- From the CRM Module, click on Case > New Case button from the menu. The Case form will display.

- Select a Contact from the list. The contact’s address would appear in the Location field. You may change the default location.
- In the Assigned To and Team field, the default user displayed is the user that recorded the case. You can change this information or assign another user for the case.
- The Start Date and Due Date are set to the current date. Select the start and due date according to the schedule of the case. Or, you can set the expected duration of the case in the Duration field. This will determine the due date for you.
- Assign the Priority Level for the case whether if it's Critical, High, Medium or Low.
- If you want to include the case in the reminders, click on the Reminder Info checkbox and put in the time interval for the reminder to appear.
- If the customer has service contract(s) set up, the default contract will appear in the Service Contract field.

The SLA Calendars from the Service Contract will determine the Due Date for the case. You can change it by selecting other available contracts. Expired service contracts will not appear in the field or in the pulldown.
See Also: Setup Customer Service Contracts - Optional: Select a Campaign Wave document that you will relate to the case in the Wave field.
See Also: Manage Campaign Waves - In the Problem tab, enter as much information as you may about the problem or situation.
- In the Solutions tab, enter the proposed or the applied solution to the problem.
- In the Items tab, you can indicate the problems specific to the product sold to the customer.
- Save the details before closing the Case form.
- Set the status for the case as it progresses. You may set the status from the Status field from the menu options.
![]()
Escalate the Case
If the case needs to be escalated to another authority, you can assign the case to another user in Connected Business.
|
|
Only Open, Not Started and in Progress cases can be amended. |
- Select the user in the Assigned To field and save. The case would then appear in the user’s assigned case list.
Let Others Know About the Case
The case can be printed out, sent to fax or email recipients allowing you to share and solve the case(s) to all concerned.
- To compose a letter and send view email
Click on Tools > Write Letter from the menu bar of the Activity form. The Connected BusinessWord will display. You can save the letter into a word document or print to PDF and send via email.
See Also: Manage Emails - To send a message through email or fax
Click on the Fax button from the menu of the Details section. This displays the Email/Fax Composer.
See Also: Manage Fax
Attach Documents
- Click on the New Document button to switch to the Documents tab and browse for the document from your computer.
- To add more documents, click on the ellipsis button in the File Name column and select from the options to attach from the computer or from the Document Management.
See Also: Manage Documents
Add Notes
- Click on the New Note button to switch to the Notes tab and load the Notes form.
- To add more notes, click on the ellipsis button in the Title column and select New Note to load the Notes form.
See Also: Notes
Follow up on Customer Cases
Steps
- From the CRM module, click on Case > Find Case from the menu. The Case search screen will display.
- Search for the case record in the list and select to display the Case form.
- Edit details as necessary or change the case status and save the form before closing.
Setting the Case Status to "Complete"
- In the End Date field, you may set the end date and the case status will be set to Completed or in the Status field, select Completed.
Cancel the Case
- In the Status field, select Cancelled.
View Case from the Activity Calendar
- On the CRM module, go to Tools menu then select Calendar. The Activity Calendar form will display.
See Also: View Activity Calendar
View Case Analysis
- From the Switch Dashboard menu, select Case. The Case Analysis dashboard will display.
See Also: View Case Analysis Dashboard
Set up Customer Service Contracts
- See Also: Service Contracts

View Case Analysis Dashboard
The Cases Analysis dashboard shows the case analysis in multiple ways. It has a customizable list and many different chart and analysis views. The Filter Options sliding pane can be used to refine your search for cases by date, priority, status or assigned users. Commonly used filters may be saved for easy look up of case records.
Steps
View Analyses of Customer Cases
- Click on the Dashboard menu and select Case. The Case Analysis dashboard will be displayed.
- The Filter Options sliding pane can be used to refine search for cases by Date, Priority, Status or Assigned To (users).

Change the Chart Type
- Change the chart view by clicking on the Chart Types (
 ) from the menu.
Change Analysis View
- Switch analysis type by clicking on Show Analysis By pulldown and selecting from the options. You can select Status or SLA(Service Level Agreements) as options for your analysis.
Filter Records Displayed in the Chart List
- From the sliding pane, click on Filter Options. The default filter, My Default Filter, shows all case records.
- You can modify the default filter and create new preset filters. To do this, modify the filter by selecting the criteria of what you want it to show e.g. all high and critical priority cases or all cases assigned to a user.
- Filter by Priority or Status
- Filter by Territory or by Activity Category
- Filter by Assigned To (user)
- Click Save Filter button to save the changes to the default filter or click on the pulldown arrow button to view the option Save New Filter As. Click on this to enter the label for the new filter.
- You can apply the filter by selecting from the Load Saved Filter pulldown and clicking on the Apply Filter button.
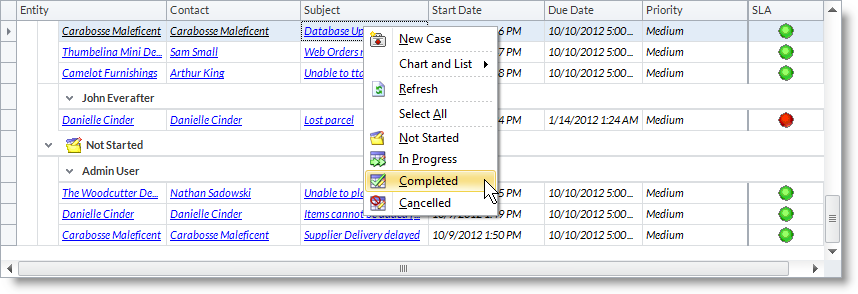
Change the Case Status from the Case Analysis Dashboard
- Right click on a case record from the List section of the Case Analysis dashboard.
View Full Details to the Case
- From the List section of the Case Analysis dashboard, drill down on the case’ subject in the Subject column to display the Case form.
Create New Case from the Case Analysis Dashboard
- From the Case Analysis dashboard toolbar, click on the New Case button to display the Activity form.
- Right-click on the Chart or List section to view the options and select New Case.
Know the Case Performance
The Case Analysis Dashboard shows the case performance through the SLA you specified (otherwise, the default SLA). Performance indicators are shown in the form of colored dots in the SLA column. These are the following:
- Green – indicates that the case is in progress and currently being resolved.
- Red – indicates that the case is overdue or passed the specified due date and is still not resolved.
- White – indicates that the case has been cancelled.
![]()