Maintain Customer Module Preferences
The Customer Module Preferences is used to set up your workflow in sales order processing, display prompts for pricing scheme, order availability, and specify settings for your receivables.
Configure Customer Preferences
- From the Customer module, select Setup > Preferences. The Customer Preference form is displayed.
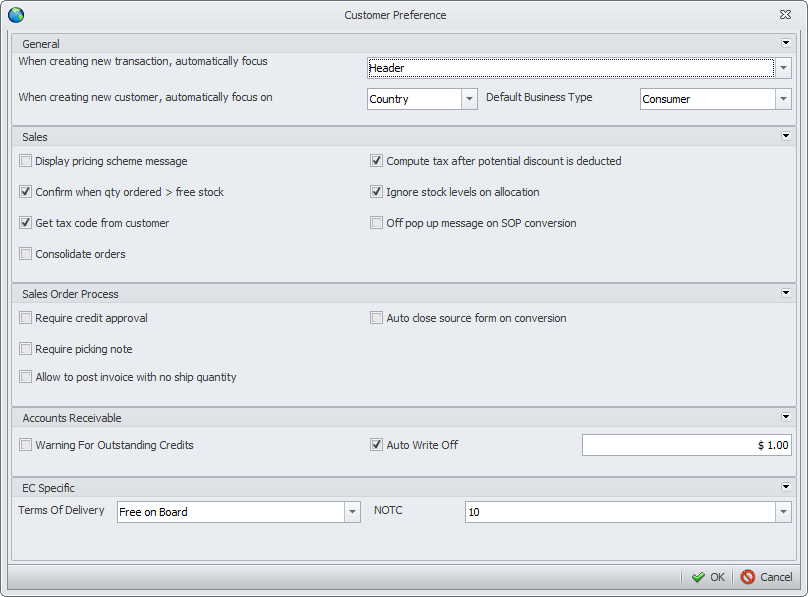
Click Image to Enlarge
Preference Description
GENERAL General preferences for the Customer module. When creating a new transaction, automatically focus on…
This option allows you to set where you want the cursor to appear upon opening a transaction form such as the Sales Order. In the field pulldown, you can select:
Header - displays the cursor in the first field of the Order tab
Item Lines - displays the cursor in the first column of the Inventory Item tab.When creating a new customer automatically focus on… This option allows you to set where you want the cursor to appear upon opening the New Customer Wizard. In the field pulldown, you can select to display the cursor in the Country field or in the Customer Name field. Default Business Type Select a default Business Type to use when setting up new customers in the New Customer Wizard. The options are Wholesale and Retail.
Preference
Description
SALES General preferences for the sales order process. Display pricing scheme message
When checked, it will allows messages to appear when entering item lines letting users know what the current price scheme is applied to each item. It also displays messages of expired pricing schemes. You can also check for the pricing for each line item in the Pricing column of the Sales Order form. Confirm when qty ordered > available free stock When checked, warning messages will be displayed when the specified order quantity is greater than the available quantity in stock. Get Tax Code from customer When checked, the sales tax code you set up for the customer will be applied in his orders. If not, the default tax setup for inventory items will be used. Note that the sales tax should be properly setup for the customer. Consolidate orders When checked, multiple "Ready to Invoice" sales orders can be consolidated into one invoice by selecting multiple sales orders of the customer. When unchecked, a separate sales invoice records are created when selecting multiple sales orders in creating a new sales invoice. Compute Tax after the discount is deducted When checked, the system will compute the tax and apply it to the order sub total after deducting the discount from the payment term. Ignore stock levels on allocation Starting with Interprise Suite 6.0, when this option is checked, the system will consider the free stock of the item and places the quantity in the Allocate columns in the inventory tab of the Sales Order/Invoice form. You have the option to increase the Allocate quantity if desired. This means that you can have negative free stock, thereby, unchecking this option is not allowed. You must first clear off the negative free stock if you want to uncheck this option.

When unchecked, the system places the actual units in stock in the Quantity and Allocate columns in the inventory tab of the sales invoice. In case the quantity ordered is more than the free stock, a pop up message will then inform you that the stock is low and will not suffice the ordered quantity. Click Yes and the remaining quantity will be automatically filled up.
Off pop up message on SOP conversion When checked, pop up message being displayed during SOP conversion will not be displayed.
Preference
Description
SALES ORDER PROCESS These options allow you to set up a workflow of your sales order process. Require Credit Approval
When checked, the default status of the sales orders would be "Approve Credit". The customer credit would then have to be reviewed then the sales orders can be approved using the Approve Creditoption in the Tools menu of the Customer module. Require Picking Note When checked, the default status of the sales orders would be "Print Picking Note". Picking Note will be the default document to print in the Print Dialog window. Allow to post invoice with no ship quantity When checked, this will allow to post invoice that does not require any ship quantity. Auto close source form on conversion When checked, the source form will automatically close upon conversion.
Preference
Description
ACCOUNTS RECEIVABLE Preferences for accounts receivable transactions Warning for Outstanding Credits
When checked, Interprise Suite will display a message if the customer has exceeded the allowed credit limit. Auto Write Off Amount If checked, you may set a maximum amount to write off of customer outstanding balances from theCustomer Receipt form. When set, Interprise Suite will not allow the user to write off more than the specified amount.
Preference
Description
EC SPECIFIC These preferences are for UK companies. Terms of Delivery
You may select a default value for the Terms of Delivery used in orders. The Terms of Delivery Codes are explained herein. NOTC You may select a default value for the Nature of Transaction for sales orders. The NOTC codes are explained herein.
![]()
Configure Customer Advanced Preferences
The Customer Module Advanced Preferences is used to setup your workflow in sales order processing, order availability, autoallocation and reservation, adding serial or lot numbers to items and other picking ticket transactions.
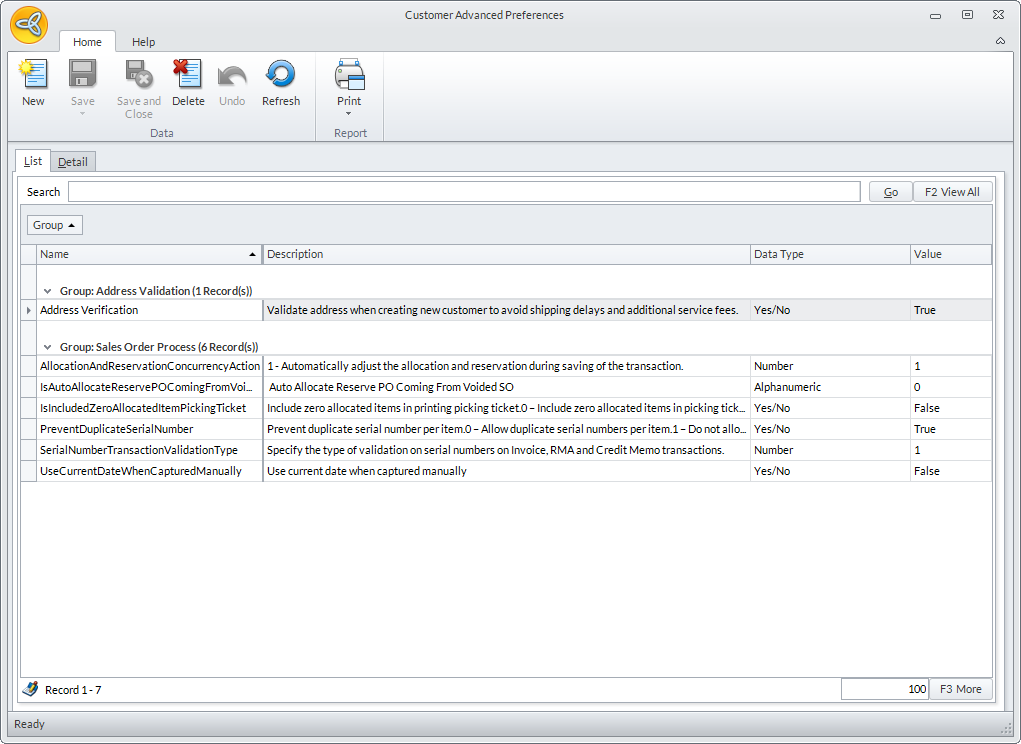
From the Customer module, select Advanced Preferences under the Setup menu. The Advanced Customer Preference form is displayed.
Click Image to Enlarge
AllocationAndReservationConcurrencyAction
This option allows you to manage several concurrencies when allocating and reserving items during sales order, invoice and purchase order transactions.
On the Detail tab, change the Value field with the following options:
- Automatically adjust the allocation and reservation during saving of the transaction
- For allocation concurrency, this option automatically adjusts the allocated quantity of the items that encountered concurrency.
- For the reservation concurrency, it will automatically adjust the reserved quantity of the item based on their available quantity to be reserved.
- Manually adjust the allocation and reservation of the first item that encountered concurrency in the stock management form
- This will show the allocation and reservation concurrency form and display the first item that encountered the concurrency. Allocation and Reservation Concurrency manager form will display for each items.
- Have the system check all the items that encountered concurrency and let the user manually adjust allocation and reservation in the stock management form
- This option will display all the items that encountered concurrency on the allocation and reservation concurrency form.
IsAutoAllocateReservePOComingFromVoidedSO
This option allows you to autoallocate or reserve item(s) from a voided SO. For example, if there is not enough free stock and you void one of the sales order, it will automatically allocate and reserve the item(s) to the next sales order transaction.
On the Detail tab, change the Value field with the following options:
- 0 - Do not reserve: It will not reserve any item even if the Sales order is voided.
- 1 - Auto allocate: It will automatically reserve the item after voiding a Sales order.
IsIncludedZeroAllocatedItemPickingTicket
This option allows you to include zero allocation on the Item picking ticket Report.
On the Detail tab, change the Value field with the following options:
- 0 – Include zero allocated items in picking ticket report.
- 1 – Do not include zero allocated items in picking ticket report.
PreventDuplicateSerialNumber
This option allows you to prevent redundancy of serial or lot numbers for every items created. Once a serial or lot number exists it will automatically pop-up a message when the 0 option is selected.
On the Detail tab, change the Value field with the following options:
- 0 – Allow duplicate serial numbers per item.
- 1 – Do not allow duplicate serial numbers per item.
SerialNumberTransactionValidationType
This option allows you to specify the type of validation on serial numbers only on Sales Order, Sales Invoice, RMA, Picked Routine and Credit Memo transactions.
On the Detail tab, the Valid values are:
- 1 - No validation: There will be no validation requirement.
- 2 - Require serial number quantity to be equal to ship quantity
- 3 - Show warning when serial number quantity is not equal to ship quantity
Address Validation
When checked, this option allows you to validate addresses when creating new customers to avoid shipping delays and additional service fees.
![]()