Live Support
| Content |
|---|
eCommerce has an integrated live support application which you can configure and utilize for your online store. This application gives you the ability to respond to customer queries on the spot in real-time.
This article will demonstrate the procedures in installing the Connected Business Live Support application.
Set Up Live Support Application
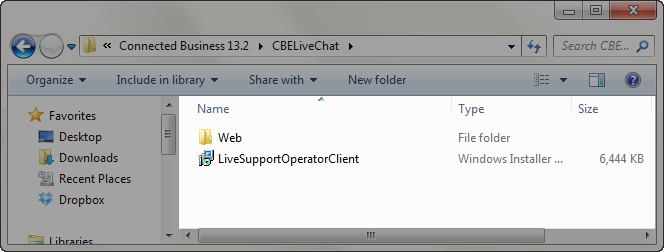
- Check live support files.Prior to installing the live support application, make sure that you have the following Connected Business live support files in your installation folder.
- Web folder
- LiveSupportOperatorClient.msi
- Create a live support virtual application. By default, Connected Business has a preconfigured virtual application for live support, CBELIVECHAT, which you can use in installing the live support application. However, if you want to create your virtual application for the live support, follow the steps below.
- Open the Internet Information Services(IIS) utility by typing inetmgr from the Start menu or in the Run window (Start > Run).

It is recommended that you configure the live support application in the same server where the Connected Business admin application and the webstore are hosted.
- Click on the Default Web Site folder and select Add Application. The Add Application window will be displayed.

Click Image to Enlarge
- In the Add Application Window, enter the alias for the virtual application (e.g. MyLiveSupport)

Click Image to Enlarge
- Click Select and set the application pool to ASP.NET v4.0 and click OK.

Click Image to Enlarge
- In the Physical Path field, click the ellipsis button and locate the web folder for the live chat. Click OK.
- After adding, set the permissions for the virtual application. Click on the virtual application and select Edit Permissions. The Web Properties window will be displayed.

Click Image to Enlarge
- In the Web Properties window, go to Security tab and click Edit to load the Permissions for Web window.

Click Image to Enlarge
- From the Group or User names list, select Network Service user and set the permission to full control.

Click Image to Enlarge
- Click Apply and OK to close the Permissions for Web window.
- Click OK to close the Web Properties window.
- In the Web Properties window, go to Security tab and click Edit to load the Permissions for Web window.
- Launch the live support website. To check if the live support is working properly, right click on the application and select Manage Application > Browse. Note: Please take note of the live support URL as this will be used in configuring the application for the Live Support Operator.

Click Image to Enlarge
Please take note of the live support URL as this will be used in configuring the application for the Live Support Operator.

Click Image to Enlarge
- Open the Internet Information Services(IIS) utility by typing inetmgr from the Start menu or in the Run window (Start > Run).
![]()
Configure Live Support Web File
Locate the live support Web folder. It is usually located in C:\Program Files (x86)\Connected Business 13\CBELiveChat\Web. Open the web.config file in a notepad or any html editor.

Click Image to Enlarge
Update the web.config file to use your custom connection string.
When configuring the web.config file, it is recommended to use the SQL Authentication settings. However, if you want to use the Windows Authentication, simply uncomment the code for Windows Authentication.

Click Image to Enlarge
| SQL Authentication | |
| Connection String | |
| Server | Server Instance |
| Database | Database used in the webstore. |
| uid | SQL Server Authentication username |
| pwd | SQL password |
| Windows Authentication | |
| DefaultAdminusername | admin |
| Connection String | |
| Catalog | Database used in the webstore |
| Data Source | Server instance |
After specifying the configuration details, save changes in the web.config file.
![]()
Configure Live Support Email
To configure the email to be used in the live support application, go to the installation folder of Connected Business > CBELiveChat > Web and open the CuteChatMail.config file in a notepad or any html editor.

Click Image to Enlarge

Specify the values for the following:
| DefaultMailAddress | The email address where customer inquiries will be sent when the live support is on offline mode. |
| SmtpServer | This should contain the email service server. |
| SmtpUsername | The username used to access the defined email address and server. |
| SmtpPassword | The password for the defined email address. |
| SmtpuseSLL | Set to true if your email server uses SSL, otherwise, set to False. |
After configuring the details for the live support email, save changes in the email config file.
![]()
Modify the Webstore Skin
Open the installation folder of Connected Business and go to CBE > Web > Skins. Select the skin folder currently used in your webstore.

Click Image to Enlarge
If you want to change the webstore skin, go to eCommerce module > Setup > Application Configuration. Type "Skin" in the search control field to open the DefaultSkinID appconfig. Specify the skin id in the Config Value field and save your changes.
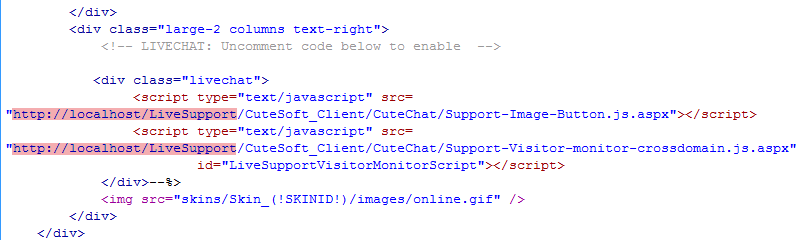
From the skin folder, open the template.ascx file in a notepad or any html editor.

Click Image to Enlarge
Search for "LIVECHAT" within the script. By default, the livechat application is disabled. To enable it, simply uncomment the code.
Once enabled, replace the src value with your live support URL (refer to Set Up Live Support Application step #2.g).
![]()
Install Live Support Operator
The Live Support Operator client application should be installed in all operator /support staff's machines. To install the live support operator application,
- Run the LiveSupportOperatorClient.msi. Go to the installation folder of Connected Business > CBELiveChat and double click on the LiveSupportOperatorClient.msi to launch the installer.

Click Image to Enlarge
- Click Next to continue.

Click Image to Enlarge
- Select the installation folder for the application. Click Next to continue.

Click Image to Enlarge
- Confirm the installation by clicking Next.

Click Image to Enlarge
- The system will start installing the application.

Click Image to Enlarge
- You will be prompted once the installation is complete. Click Close to close the installation window.

Click Image to Enlarge
![]()
Open Live Support Console
After installing, run the Cute Live Support application by navigating to Start > Programs > Cute Live Support > Live Support Operator. The Cute Live Support login window will be displayed.
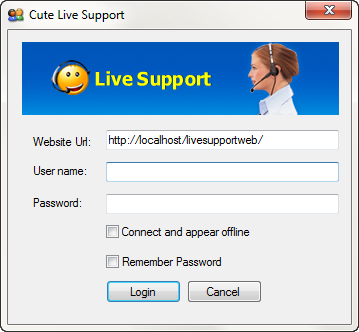
Specify the values for the following:
| Website URL | Your live support URL. Refer to Set Up Live Support Application step #2.g. |
| Username | Default value is admin. |
| Password | Default value is admin. |
The Cute Live Support console will be displayed. You can see all users who are currently browsing in your webstore from the Website Visitors section.

Click Image to Enlarge
You can see all users who are currently browsing in your webstore from the Website Visitors section.
You can refer to the Live Support User Guide for details on how to navigate the console. To access the user guide, go to Start > Programs > Cute Live Support Operator > Live Support User Guide.
Upon logging in the Live Support console , the livechat icon in your webstore will be changed from offline to online mode.

Click Image to Enlarge
If you want to connect to the console and appear offline, tick the Connect and appear offline checkbox from the login window.
![]()
Start Live Chat
To start a livechat, click on the Livechat icon in the webstore. The Live Support pop-up window will be displayed. Enter your name, email address, question and the department concerned (if applicable).

Click Image to Enlarge
You can also invite users, who are currently visiting your webstore, for a live chat. To do this , simply log in to the Live Support Console and right click on the visitor's name then select Invite.

Click Image to Enlarge
In the webstore, a chat invitation icon will pop up in the customer's end.

Click Image to Enlarge
The customer can click on the livechat icon to accept the invitation or click the Close button to decline invitation. If the customer chose to accept the invitation, the Live Support chat window will be displayed indicating that he/she is now connected to the live support operator.

Click Image to Enlarge
![]()
Add Live Support Operator
- Launch the Live Support website. Type "inetmgr" in the Start menu or the Run window (Start > Run) to open the Internet Information Services (IIS) Manager.
- Right click on the live support virtual application (e.g. CBELIVECHAT) then select Manage Application > Browse.

Click Image to Enlarge
This will launch the live support website.

Click Image to Enlarge
- Log in to the Live Support website. Click on the Login menu and use the default username and password: admin.

Click Image to Enlarge
- After logging in, click on the Dashboard menu to view the dashboard categories.

Click Image to Enlarge
- From the Dashboard categories, select Manage Operators.

Click Image to Enlarge
- In the Create Operators section, enter the username, password and department of the user to be added and click Create. You will be prompted that a user has been created. Click OK.

Click Image to Enlarge
Notice that the user has been added in the list of live support operators as well as in the list of agents in the Department category.

Click Image to Enlarge

Click Image to Enlarge
If you want to remove an operator, simply click on the corresponding Delete link for the user.
You can also refer to the Live Support User Guide for details on how to manage users in the Live Support Operator console. To access the user guide, go to Start > Programs > Cute Live Support Operator > Live Support User Guide.
![]()