Activate eShopCONNECTED
In order to use eShopCONNECT, you must make sure you have installed the eShopCONNECT Windows Service and Web Service components on your server. If you are using Connected Business in a hosted environment, you need to request that Connected Business enable these components for you, otherwise if you are running Connected Business on your own servers, you need to install these optional components on your server by running the Connected Business Installer and selecting the eShopCONNECT Windows Service and Web Service components.

This activation feature is only available in Connected Business v15 and higher.
Register eShopCONNECTED
To use eShopCONNECTED, clients are required to coordinate with the Connected Business Sales Team. They need to specify which type(s) of WebCart or third-party marketplace connectors they need to purchase to suit their needs.
The serial and confirmation codes generated by Connected Business are necessary to register the connectors using the CB's Database Management Console (DBMC). To activate the respective eShopCONNECTORS, perform the following steps.
-
Open the DBMC program, found under the Tools subcategory in Connected Business.
-
Under the Server List window, find the list of Company Databases. Select the correct company database before clicking on the Register Product button at the ribbon menu. This action will prompt the Connected Business License Activation Wizard.
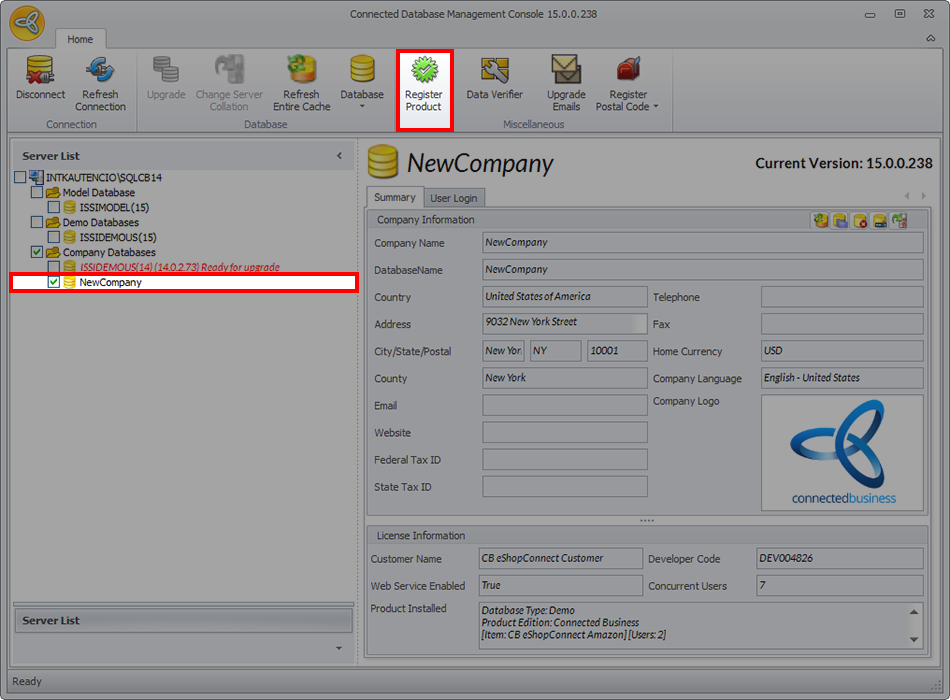
Click Image to Enlarge
-
Follow the steps outlined by the Activation Wizard. In one of the steps, enter the serial number that has been provided for you, then click Next.

Click Image to Enlarge
-
On the next window, enter the required details about your company before clicking Next.
-
The next window will prompt you to enter the confirmation code, which is different from the initial serial code.

Click Image to Enlarge
-
Once the codes have been validated, the Activation Wizard will then display the license information that is associated with your account. The information will include the different purchased connectors, as well as the number of users that are allowed to run the connectors at the same time.

Click Image to Enlarge
-
It is important to note how many user counts are indicated in the license information, since it will determine how many accounts can be processed by eShopConnected at the same time. For this example, the Amazon eShopCONNECTOR can process two Amazon accounts using the same license.
-
Click Finish and wait for the validation process to complete.

Click Image to Enlarge
Configure eShopCONNECTED
Once the licenses have been validated, you can proceed with using and configuring eShopCONNECTED.
-
Open the Connected Business program. Go to the eCommerce module, click eShopCONNECTED > Configuration. This will display the eShopCONNECTED Configuration form.

Click Image to Enlarge
-
On the Configuration form, the list tab will display the list of available marketplace and WebCart connectors. The column labeled Active indicates which have licenses that have been validated and are ready to use.

Click Image to Enlarge
-
Double click on one of the connectors to go to the Detail tab. On the Config Settings window, there is a list of configuration settings and their corresponding values. You need to fill up the fields under Config Setting Values so that the synchronization process will run correctly.
-
For this example, two User Counts have been purchased for this account, which means that eShopCONNECTED can process two different Amazon accounts at the same time. Having more than one user counts means that you will need to fill out two sets of configuration groups.

Click Image to Enlarge
-
Make sure to fill up the fields for all the Accounts indicated in the Config Settings window. Once they have been filled up, click Save and Close.

Click Image to Enlarge
The eShopCONNECTED module does not allow you to save the information within the Config Settings window unless all the required fields have been completed. Be sure that all the fields are completed so that you can exit the Configuration form.